Data Consultant

Unfolding the work of an Analytics Consultant

Meet Johanna, Tuomas and Tero! Our Consultants, who all work with data analysis and visualizations. Let’s map out their journey at Solita and demystify the work of Analytics Consultants!

All three have had different journeys to become an Analytics Consultant. Tuomas has a business degree and Tero started his career working with telecommunications technology. Johanna however found her way to visualizations quite young: “I created my first IBM Cognos reports as a summer trainee when I was 18 and somehow, I ended up studying Information Systems Science.” It has been, however, love at first sight for all of them. Now they work at Solita’s Data Science and Analytics Cell.

What is a typical Analytics Consultant’s workday like?

The interest in versatile work tasks combines our Analytics Consultants.  Tuomas describes himself as “a Power BI Expert”. His days go fast by designing Power BI phases, modelling data, and doing classical pipeline work. “Sometimes I’d say my role has been something between project or service manager.”

Tero in the other hand is focusing on report developing and visualizations. He defines backlogs, develops metadata models, and holds client workshops.

Johanna sees herself as a Data Visualization Specialist, who develops reports for her customers. She creates datasets, and defines report designs and themes. “My work also includes data governance and the occasional maintenance work,” Johanna adds.

All three agree that development work is one of their main tasks. “I could say that a third of my time goes to development,” Tuomas estimates. “In my case I would say even half of my time goes to development,” Tero states.

Power BI is the main tool that they are using. Microsoft Azure and Snowflake are also in daily use. Tools vary in projects, so Tuomas highlights that “it is important to understand the nature of different tools even though one would not work straight with them”.

What is the best part of an Analytics Consultant’s work?

The possibility to work with real-life problems and creating concrete solutions brings the most joy to our consultants. “It is really satisfying to provide user experiences, which deliver the necessary information and functionality, which the end users need to solve their business-related questions,” Johanna clarifies her thoughts.

And of course, collaborating with people keeps our consultants going! Tuomas estimates that 35% of his time is dedicated to stakeholder communications: he mentions customer meetings, but also writing documentations, and creating project defining, “specs”, with his customers.

Our consultants agree that communication skills are one of the key soft skills to master when desiring to become an Analytics Consultant! Tuomas tells, that working and communicating with end-users has always felt natural to him.

Tero is intrigued by the possibility of working with different industries: “I will learn how different industries and companies work, what kind of processes they have and how legislation affects them. This work is all about understanding the industry and being customer-oriented.”

“Each workday is different and interesting! I am dealing with many different kinds of customers and business domains every day.”

When asked, what keeps the consultants working with visualizations, they all ponder for a few seconds. “A report, which I create, will provide straight benefit for the users. That is important to me,” Tuomas sums up his thoughts. “Each workday is unique and interesting! I am dealing with many different customers and business domains every day,” Johanna answers. Tero smiles and concludes: “When my customers get excited about my visualization, that is the best feeling!”

How are our Analytics Consultants developing their careers?

After working over 10 years with reporting and visualizations, Tero feels that he has found his home: “This role feels good to me, and it suits my personality well. Of course, I am interested in getting involved with new industries and learning new tools, but now I am really contented!”

Tuomas, who is a newcomer compared to Tero, has a strong urge to learn more: “Next target is to get a deeper and more technical understanding of data engineering tools. I would say there are good opportunities at Solita to find the most suitable path for you.”

Johanna has had different roles in her Solita journey, but she keeps returning to work with visualizations: “I will develop my skills in design, and I would love to learn a new tool too! This role is all about continuous learning and that is an important capability of an Analytics Consultant!”

“I would say there are good opportunities at Solita to find the most suitable path for you.”

How to become an excellent Analytics Consultant? Here are our experts’ tips:

Johanna: “Work together with different stakeholders to produce the best solutions. Do not be afraid to challenge the customer, ask questions or make mistakes.”

Tuomas: “Be curious to try and learn new things. Don’t be afraid to fail. Ask colleagues and remember to challenge customer’s point of view when needed.”

Tero: “Be proactive! From the point of view of technical solutions and data. Customers expect us to bring them innovative ideas!”

Would you like to join our Analytics Consultant team? Check our open positions.

Read our Power BI Experts’ blog post: Power BI Deep Dive

Snowflake external functions, Part 2 – How to do Natural Language Processing and analyze product reviews stored in Snowflake

This tutorial is a hands-on tutorial for Snowflake external functions and shows how you can translate and categorize your Snowflake data using Amazon Translate and Amazon Comprehend services. This tutorial will translate Finnish product comments to English and analyze them.

This the second part of the external functions blog post series and teaches how you can trigger Amazon services like Translate and Comprehend using Snowflake external functions. I will also explain and go through the limits of external functions in this blog post.

In the first blog post, I taught how you can set up your first Snowflake external function and trigger simple Python code inside AWS Lambda. In case external functions are a new concept for you, I suggest reading the first blog post before diving into this.

External functions limitations

Previously I left the limitations of external functions purposely out, but now when we are building something actually useful with them, you should understand the playground what you have and what are the boundaries.

Let’s start with the basics. As all the traffic is going through AWS API Gateway, you’re bound to the limitations of API Gateway. Max payload size for AWS API Gateway is 10MB and that can’t be increased. Assuming that you will call AWS Lambda through API Gateway, you will face the Lambda limits, which are maxed to 6MB per synchronous requests. Depending on the use-case or the data pipeline you’re building, there are workarounds, for example, ingesting the raw data directly through S3.

Snowflake also sets limitations; for example, the remote service at a cloud provider, in our case AWS, must callable from a proxy service. Limitations include that external functions must be scalar functions which mean single value for each input row. It doesn’t though mean that you can’t process only one row at the time. The data is sent as a JSON body which can contain multiple “rows”. Additional limitations set by Snowflake is that Snowflake optimizer can’t be used with external functions, external functions can’t be shared through Secure Data Sharing and you can’t use them in DEFAULT clause of a CREATE TABLE statement or with COPY transformations.

Things to consider

The cloud infrastructure, AWS in this case, sets also limitations or rather things to consider. How does the underlying infrastructure handle your requests? You should think how your function scales, acts on concurrency cases and how reliable it is. Doing a simple function which is called by a single developer usually functions without any issues, but you must design your function in a way that it works with multiple developers who are calling the function numerous times within hour contrasted to the single call which you made during development.

Concurrency is an even more important issue as Snowflake can parallelize external function calls. Can the function you wrote handle multiple parallel calls at once or does it crash? Another thing to understand is that with multiple parallel calls, you end up in a situation where the functions are in different states. This means that you should not write function where the result depends upon the order in which user’s rows are processed.

Error handling is also a topic which should not be forgotten. Snowflake external functions understand only HTTP 200 status code. All other status codes are considered as an error. This means that you need to build the error-handling to the function itself. External functions also have poor error messages as stated above. This means that you need to log all those “other than 200 status codes” to somewhere for later analysis.

Moneywise you’re also on the blindside. Calling out Snowflake SQL function hides all the costs what are related to the AWS services. An external function which is implemented poorly can lead to high costs.

Example data format

External functions call the resources by issuing HTTP POST request. This means that the sent data must be in a specific format to work. The returned data must also conform to a specific format. Due to these factors, the data sent and returned might look unusual. For example, we must always send integer value with the data. This value appears as a row number for the 0-based index. The actual data is converted to JSON data types, i.e.

  • Numbers are serialized as JSON numbers.
  • Booleans are serialized as JSON booleans.
  • Strings are serialized as JSON strings.
  • Variants are serialized as JSON objects.
  • All other supported data types are serialized as JSON strings.

It’s essential also to recognise that this means that dates, times, and timestamps are serialized as strings. Each row of data is a JSON array of one or more columns and can sent data can be compressed COMPRESSION syntax with CREATE EXTERNAL FUNCTION -SQL clause. It’s good to though understand that Amazon API Gateway automatically compresses/decompresses requests.

What are Amazon Translate and Amazon Comprehend?

As Amazon advertises, Amazon Translate is a neural machine translation service that delivers fast, high-quality, and affordable language translation. What does that truly mean? It means that AWS Translate is a fully automated service where you can transmit text data to Translate API and you get the text data translated back in the chosen language. Underneath the hood, Amazon uses its own deep learning API to do the translation. In our use case, Amazon Translate is easy to use as the Translate API can guess the source language. Normally you would force the API to translate text from French to English, but with Translate API, we can set the source language to ‘auto’ and Amazon Translate will guess that we’re sending them French text. This means that we only need minimal configuration to get Translate API to work.

Amazon Translate can even detect and translate Finnish language, which is sometimes consider a hard language to learn.


For demo purposes Translate billing is also a great fit, as you can translate 2M characters monthly in your first 12 months, which start from your first translation. After that period the bill is 15.00$ per million characters.

Amazon Comprehend is also a fully managed language processing (NLP) service that uses machine learning to find insights and relationships in a text. You can use your own models or use built-in models to recognize entities, extract key phrases, detect dominant languages, analyze syntax, or determine sentiment. Like Amazon Translate, the service is called through an API.

As Finnish is not supported language for Amazon Comprehend, the translated text is run through the Comprehend API to get insights.

Example – Translating product comments made in Finnish to English with Amazon Translate and Snowflake external functions

As we have previously learned how to create the connection between Snowflake and AWS, we can focus on this example on the Python code and external function itself which is going to trigger the Amazon Translate API. As with all Amazon services, calling Translate API is really easy. You only need to import the boto3 class and use the client session to call the translate service.

After setting up the translate, you call the service with a few mandatory parameters and you’re good to go. In this example, we are going to leverage the Python -code, which was used in the previous blog post.

Instead of doing simple addition of string to the input, we’re going to pass the input to Translate API, translate the text to English and get the result back in JSON -format for later use. You can follow the instructions in the previous example and replace the Python -code with this new code stored in my Github -account.

After changing the Python -code, we can try it right away, because the external function does not need any change and data input is done in the same way as previously. In this case, I have created a completely new external function, but it works in a similar way as previously. I have named my Lambda -function as translate and I’m calling it with my Snowflake lambda_translate_function as shown. 

Calling the function is easy as we have previously seen, but when we call the Translate API directly we will the get full JSON answer which contains a lot of data which we do not need.


Because of this, we need to parse the data and only fetch the translated text.

Snowflake external functions
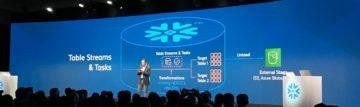
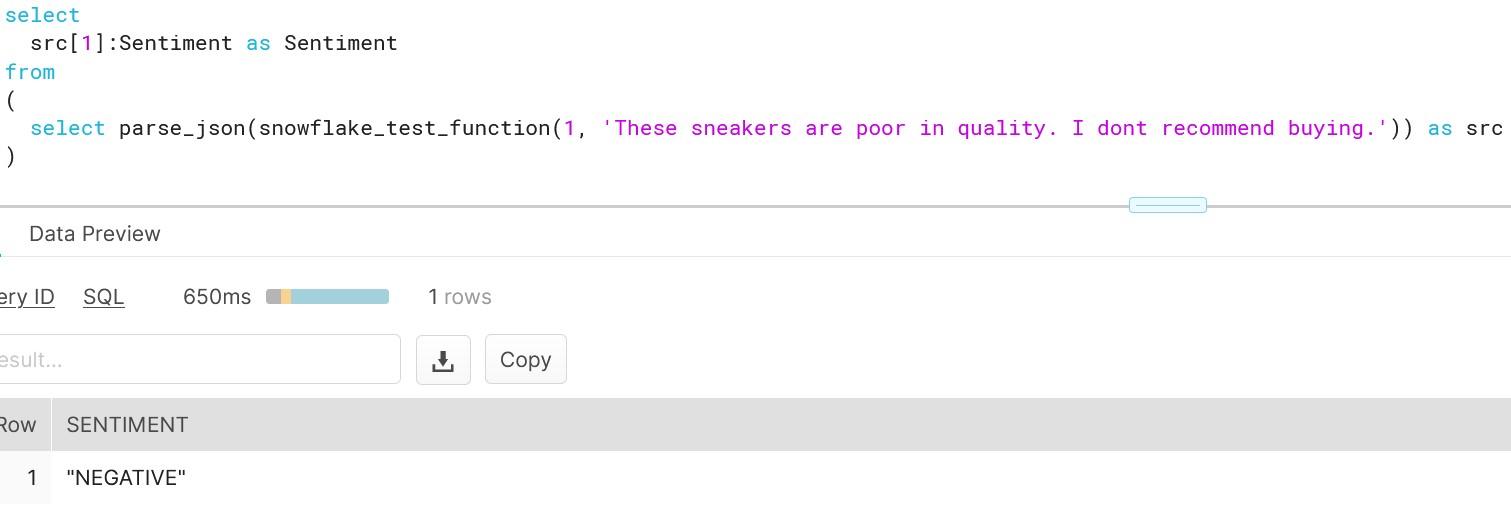
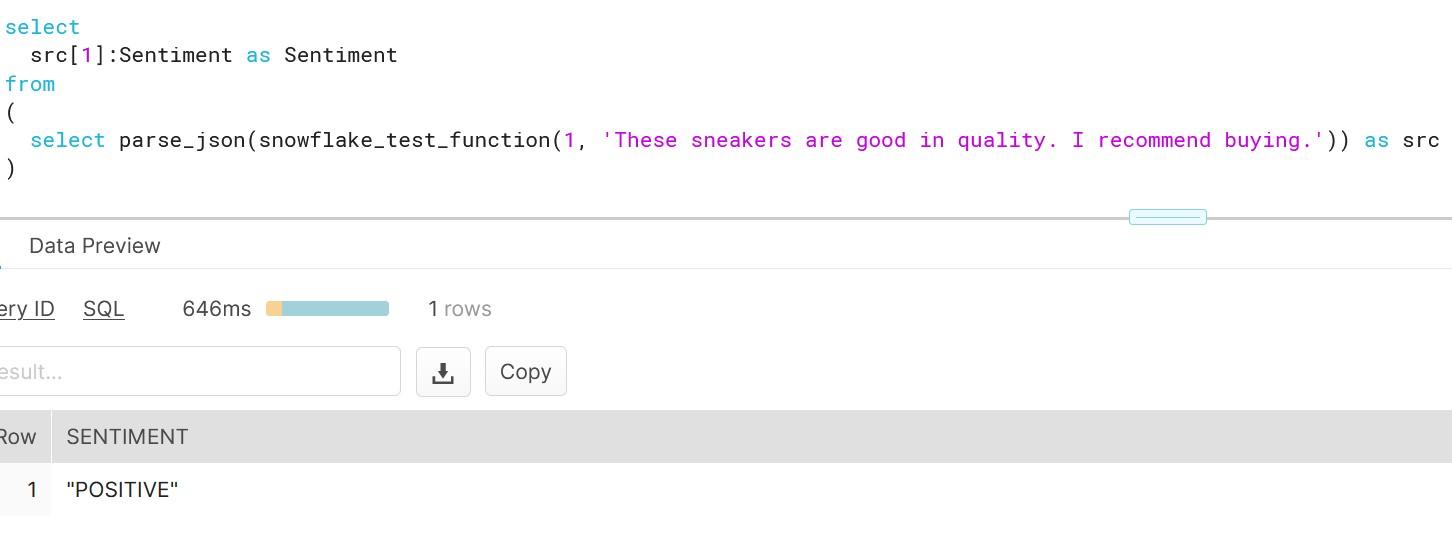
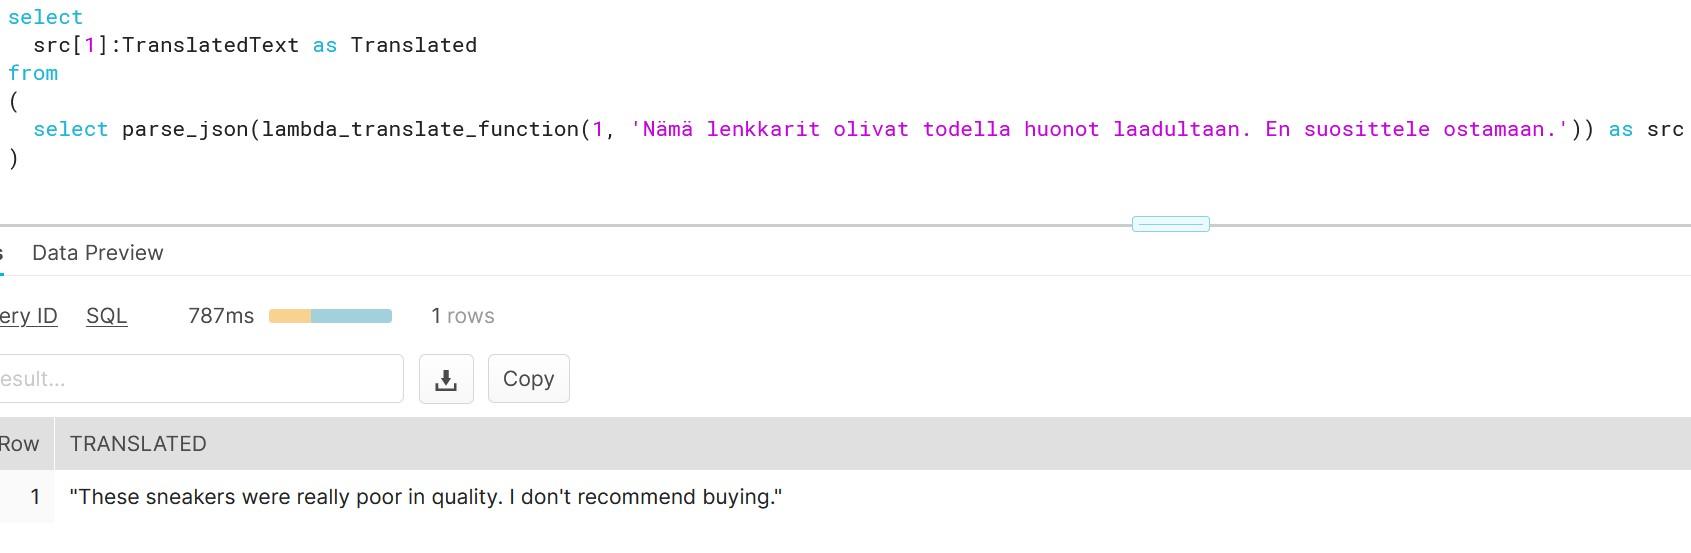
As you can see, creating functions which do more than simple calculations is easy with external functions. We could gather a list of product comments in multiple languages and translate them into one single language for better analysis e.g. understanding in this case that Finnish comment means that snickers sold are rubbish in quality.

Example – Categorizing product comments with Amazon Comprehend and Snowflake external functions

Extending the previous example, we have now translated the Finnish product comment to English -language. We can extend this furthermore by doing sentiment analysis for the comment using Amazon Comprehend. This is also straight forward job and requires only you to either create a new Python function which calls the Comprehend API or modify the existing Python code for demo purposes.

Only needed changes are needed for the Python code and to the IAM role which the Lambda uses. The Python code is again really similar as previously. This time we call comprehend service using the same boto3 class.

Snowflake external functions

To detect sentiment we use the similarly named sub-class and provide the input source language and text to analyze. You can use the same test data which was used with Translate demo and with the first blog. Comprehend will though give NEUTRAL -analysis for the test data.

Before heading to Snowflake and trying out the new Lambda -function, go to IAM -console and grant enough rights for the role that Lambda -function uses. These rights are used for demo purposes and ideally only read rights for DetectSentiment action are enough.

These are just example rights and do contain more than are needed.

Once you have updated the IAM role rights, jump into the Snowflake console and try out the function in action. As we want to stick with the previous demo data, I will translate the outcome of the previous translation. For demo purposes, I have left out the single apostrophe as those are used by Snowflake.

Snowflake external functions

As you can see, getting instant analysis for the text was right. To be sure that we getting correct results, we can test out with new test data i.e. with positive product comment.

Snowflake external functions

As you can, with Snowflake external functions it’s really easy to leverage Machine Learning, Natural Language Processing or AI -services together with Snowflake. External functions are new feature so this means that this service will only grow in the future. Adding Azure and Google compatibility is already on the roadmap, but in the meantime, you can start your DataOps and MLOps journey with Snowflake and Amazon.

Snowflake external functions, Part 1 – Hello World tutorial for triggering AWS Lambda

This tutorial is a hands-on Hello World introduction and tutorial to external functions in Snowflake and shows how to trigger basic Python code inside AWS Lambda

External functions are new functionality published by Snowflake and already available for all accounts as a preview feature. With external functions, it is now possible to trigger for example Python, C#, Node.js code or native cloud services as part of your data pipeline using simple SQL.

I will publish two blog posts explaining what external functions are in Snowflake, show how to trigger basic Hello World Python code in AWS Lambda with the result showing in Snowflake and finally show how you can trigger Amazon services like Translate and Comprehend using external functions and enable concrete use cases for external functions.

In this first blog post, I will focus on the showing on how you can set up your first external function and trigger Python code which echoes your input result back to Snowflake.

What external functions are?

At the simplest form, external functions are scalar functions which return values based on the input. Under the hood, they are much more. Compared to traditional scalar SQL function where you are limited using SQL, external functions open up the possibility to use for example Python, C# or Go as part of your data pipelines. You can also leverage third-party services and call for example Amazon services if they support the set requirements. To pass the requirements, the external function must be able to accept JSON payload and return JSON output. The external function must also be accessed through HTTPS endpoint.

Example – How to trigger AWS Lambda -function

This example follows instructions from Snowflake site and shows you in more detail on how you can trigger Python code running on AWS Lambda using external functions like illustrated below.

Snowflake External Functions

To complete this example, you will need to have AWS account where you have the necessary rights to create AWS IAM (Identity and Access Management) roles, API Gateway endpoints and Lambda -functions. You will need also a Snowflake ACCOUNTADMIN -privileges or role which has CREATE INTEGRATION rights.

These instructions consist of the following chapters.

  • Creating a remote service (Lambda Function on AWS)
  • Creating an IAM role for Snowflake use
  • Creating a proxy service on AWS API Gateway.
  • Securing AWS API Gateway Proxy
  • Creating an API Integration in Snowflake.
  • Setting up trust between Snowflake and IAM role
  • Creating an external function in Snowflake.
  • Calling the external function.

These instructions are written for a person who has some AWS knowledge as the instructions will not explain the use of services. We will use the same template as the Snowflake instruction to record authentication-related information. Having already done a few external function integrations, I highly recommend using this template.

Cloud Platform (IAM) Account Id: _____________________________________________
Lambda Function Name...........: _____________________________________________
New IAM Role Name..............: _____________________________________________
Cloud Platform (IAM) Role ARN..: _____________________________________________
Proxy Service Resource Name....: _____________________________________________
Resource Invocation URL........: _____________________________________________
Method Request ARN.............: _____________________________________________
API_AWS_IAM_USER_ARN...........: _____________________________________________
API_AWS_EXTERNAL_ID............: _____________________________________________

Creating a remote service (Lambda Function on AWS)

Before we create Lambda function we will need to obtain our AWS platform id. The easiest way to do this is to open AWS console and open “Support Center” under “Support” on the far right.

This will open a new window which will show your AWS platform id.

Record this 12-digit number into template shared previously. Now we will create a basic Lambda -function for our use. From the main console search Lambda

Once you have started Lambda, create a new function called snowflake_test using Python 3.7 runtime. For the execution role, select the option where you create a new role with basic Lambda permissions.

After pressing the “Create function” button, you should be greeted with the following view where you can paste the example code. The example code will echo the input provided and add text to confirm that the Snowflake to AWS connection is working. You can consider this as a Hello World -type of example which can be leveraged later on.

Snowflake External Functions

Copy-paste following Python code from my Github account into Function code view. We can test the Python code with following test data which should create following end result:

After testing the Lambda function we can move into creating an IAM role which is going to be used by Snowflake.

Creating an IAM role for Snowflake use

Creating an IAM role for Snowflake use is a straight forward job. Open up the Identity and Access Management (IAM) console and select “Roles” from right and press “Create role”.

You should be greeted with a new view where you can define which kind of role you want to create. Create a role which has Another AWS account as a trusted entity. In the box for Account ID, give the same account id which was recorded earlier in the instructions.

Name the new role as snowflake_role and record the role name into the template. Record also the role ARN.

Creating a proxy service on AWS API Gateway

Create an API Gateway endpoint to be used. Snowflake will use this API endpoint to contact the Lambda -service which we created earlier. To create this, choose API Gateway service from the AWS console and select “Create API”. Call this new API snowflake_test_api and remember to select “Regional” as the endpoint type as currently, they are the only supported type.

Create a Resource for the new API. Call the resource snowflake and record the same to the template as Proxy Service Resource Name.

Create Method for the new API from the “Actions” menu, choose POST and press grey checkmark to create.

During the creation choose Lambda Function as Integration type and select “Use Lambda Proxy Integration”. Finally, choose the Lambda function created earlier.

Save your API and deploy your API to a stage.

Creating a new stage can be done at the same time as the deploy happens.

Once deployed, record the Invoke URL from POST.

Now were done creating the API Gateway. Next step is to secure the API Gateway that only your Snowflake account can access it.

Securing AWS API Gateway Proxy

In the API Gateway console, go to your API method and choose Method Request.

Inside Method Request, choose “AWS_IAM” as the Authorization mode.

Record the Method Request ARN to the template to be used later on. You can get the value underneath the Method Request.

Once done, go to Resource Policy and deploy the following policy from my Github account. You can also copy the policy from the Snowflake -example. In AWS Principal, replace the <12-digit number> and <external_function_role> with your AWS platform id and with IAM role created earlier. In AWS Resource, replace the resource with the Method Request ARN recorded earlier. Save the policy once done and deploy the API again.

Creating an API Integration in Snowflake

Next steps will happen on the Snowflake console, so open up that with your user who has the necessary rights to create the integration.

With necessary rights type in following SQL where  <cloud_platform_role_ARN> is the ARN of the IAM role created previously and api_allowed_prefixes is the resource invocation URL.

CREATE OR REPLACE API INTEGRATION snowflake_test_api
api_provider = aws_api_gateway
api_aws_role_arn = ‘<cloud_platform_role_ARN>’
enabled = true
api_allowed_prefixes = (‘https://’)
;

The end result should like something like this

When done, obtain API_AWS_IAM_USER_ARN and API_AWS_EXTERNAL_ID values by describing the API.

Setting up trust between Snowflake and the IAM role

Next steps are done in the AWS console using the values obtained from Snowflake.

In the IAM console, choose the previously created role and select “Edit trust relationships” from “Trust relationships” -tab.

In Edit Trust Relationships modify the Statement.Principal.AWS field and replace the value (not the key) with the API_AWS_IAM_USER_ARN that you saved earlier.

In the Statement.Condition field Paste “StringEquals”: { “sts:ExternalId”: “xxx” } between curly brackets. Replace the xxx with API_AWS_EXTERNAL_ID. The final result should look something like this.

Update the policy when done and go back to the Snowflake console.

Creating an external function in Snowflake

In Snowflake create the external function as follows. The <api_integration name> is the same we created previously in the Snowflake console. The <invocation_url> is the resource invocation URL saved before. Include also the resource name this time.

CREATE EXTERNAL FUNCTION my_external_function(n INTEGER, v VARCHAR)
RETURNS VARIANT
API_INTEGRATION = <api_integration_name>
AS ‘<invocation_url>’
;

End result should like something like this

Calling the external function

You can now finally that the connection is working, by selecting the function with an integer value and any given string. The output should be as shown in the image. As you can see, this example is really basic and shows only that the connection is working.

If you face in errors during the execution, check the troubleshooting page at Snowflake for possible solutions. I can say from experience that you must follow the instructions really carefully and remember to deploy the API at AWS often to reflect your changes.

This blog post has now covered the basics of external functions e.g. how you can trigger basic Python code running inside AWS Lambda. Next time I will show how you can build something concrete using the same tools and Amazon services.

Are we there yet?

External functions are currently a Preview Feature and are open to all accounts, but they support currently only services behind Amazon AWS API Gateway.

A curated list of new Snowflake features released at Snowflake Summit 2020

Snowflake and Salesforce going live with their strategic partnership, Salesforce connectors coming to Snowflake, external functions, data masking support. New Web UI's going live. The list goes on. Read the following article for a curated list of new features released on Snowflake Summit 2020 a.k.a. virtual "Say Hello To The Data Cloud" -event.

Trying to go through for all the announcements for a product can be sometimes overwhelming. It takes time as you need to go through for all the individual press announcements. To ease the pain, I’ve gathered a curated list of new Snowflake features released at the second annual Snowflake Summit or as it was this year branded as “Say Hello To The Data Cloud” -event due to the event being virtual. Snowflake Summit will be held in 2021 at Caesars Forum, Las Vegas at June 7-10th.

So let’s begin.

Snowflake released new features which can be split down into to following categories: Salesforce partnership, Core Database features and UI features. I’ll list the features by categories and give a more precise description of the features released (if possible).

Salesforce strategic partnership

Most significant news this year was the announced Salesforce partnership. Snowflake CEO Frank Slootman announced together with Salesforce COO and President Bret Taylor the partnership which has been under the works for a while. The first results of this partnerships are the better integration between Salesforce and Snowflake.

Salesforce connectors

The first two visibles feature from Salesforce partnership are now released Einstein Analytics connectors will enable you to use Snowflake data directly at Einstein Analytics and the Einstein Analytics Outbound Connector for Snowflake for loading data into Snowflake.

Core Database functions

External functions

This function is going to unlock so much potential when used with DataOps tools (for example Agile Data Engine). At first sight, external functions might sound that they just add something to existing functions functionality. In reality, external functions enable you to trigger anything in Azure, AWS or Google Cloud if it’s reachable through their API Gateways. To be more precise, you can, for example, create function into Snowflake which will trigger Power BI dataset refresh through Azure API Gateway. This will mean that you can create a data pipeline which will refresh your Power BI reports right after your publish tables have been refreshed using only SQL and DataOps tool or in Snowflake – streams and tasks.

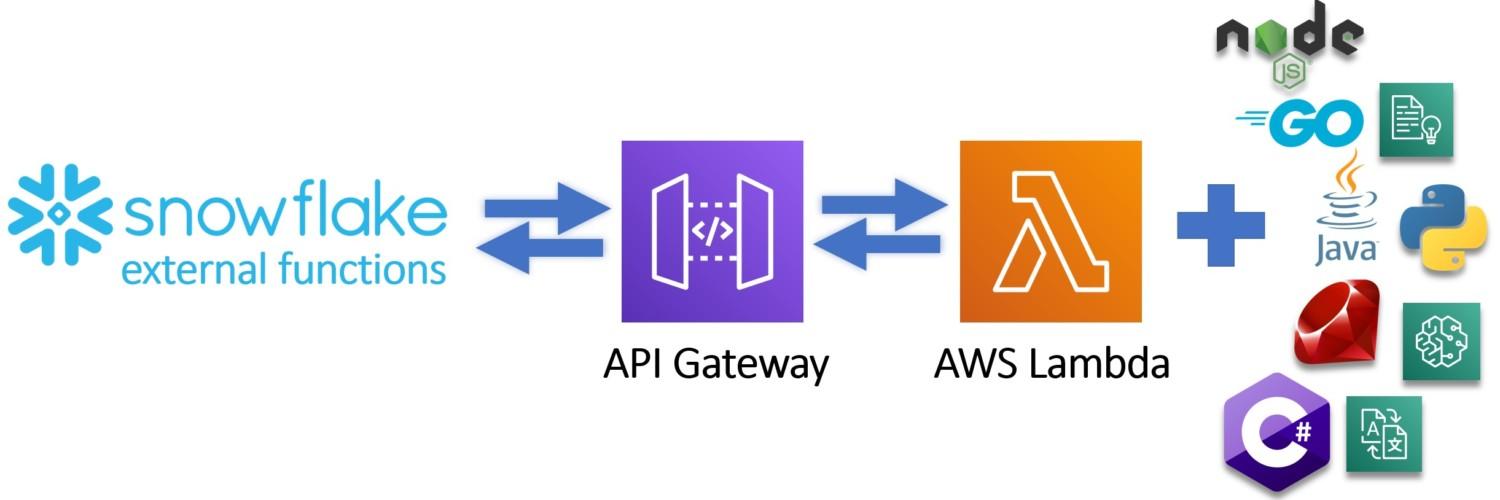
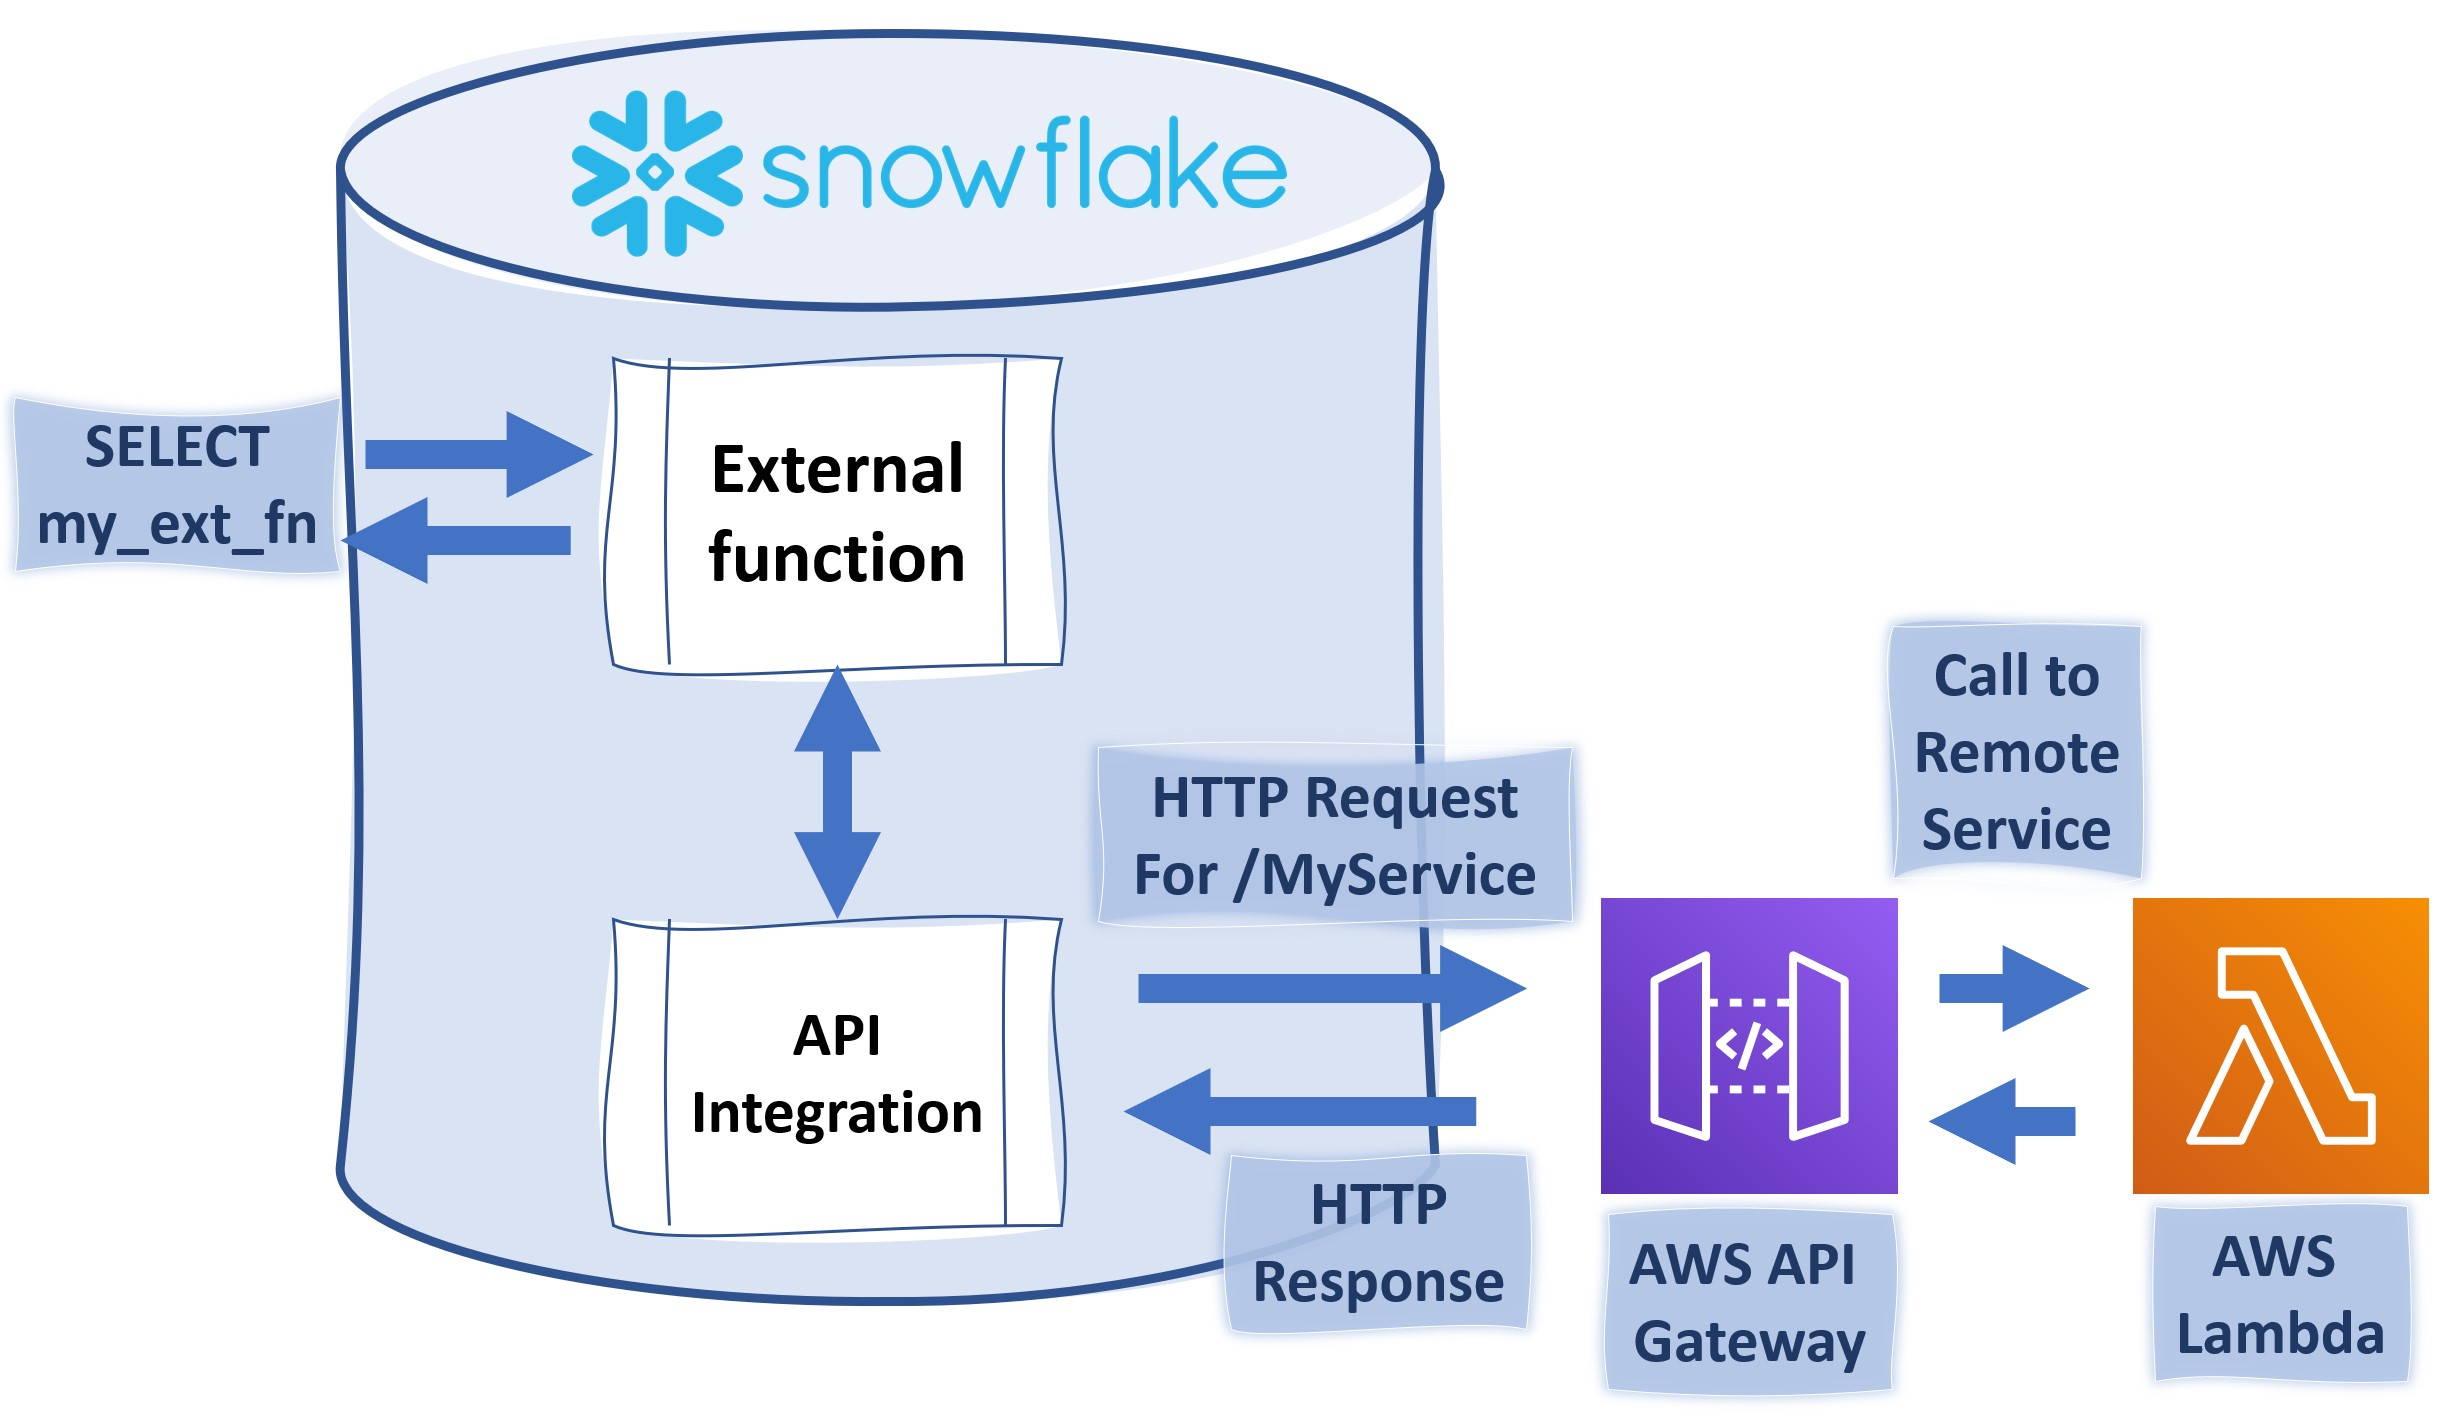
More information: https://docs.snowflake.com/en/sql-reference/external-functions.html

Search optimization service

You could call search optimization service as Snowflake’s answer to indexes. Basically you can define table-by-table basis when you want to Snowflake to pre-compute table information to used and enable faster queries for smaller dataset with smaller warehouses. More information: https://docs.snowflake.com/en/user-guide/search-optimization-service.html

Support for SQL in stored procedures

As the title says, support for SQL procedures is finally coming. JavaScript has been the chosen language for Snowflake stored procedures, but honestly, we’ve been missing SQL.

Geospatial support

As the title says, Geospatial support is now coming to Snowflake. More information: https://docs.snowflake.com/en/sql-reference/data-types-geospatial.html

Richer resource monitoring alerts to Slack and Teams

Resource Monitoring is getting richer and more useful as you can create richer resource monitoring rules and you can finally direct those alerts to Slack and Teams natively.

Programming language extensibility

You can use in the future your chosen language in the user-defined functions. The first language to be supported is going to be Java and Python support is coming. Snowflake is going also to support popular coding paradigms, in this case, Snowflake is going to support data frames with Python.

Dynamic data masking support

Data masking is nothing unusual, but finally, Snowflake has built-in support for data masking internally and with tokenization through external functions. You can now mask columns which include for example social security numbers and you can trust that to numbers are hidden from admins as well. In the age of GDPR – the possibility reduce the footprint of personal data within your databases has become a vital asset in your data toolset.

UI features

New UI’s going live and also new admin view

The Numeracy acquisition was released at March 2019 https://www.snowflake.com/blog/numeracy-investing-in-our-query-ui/ and on last year Summit we got a glimpse of the new UI and it’s now been rolled out to Snowflake customers. New Query UI will enhance the user experience with predictive typing and live data charts. The Admin UI will, for example, give more insights about Snowflake credits costs. Sadly, we will not yet get the possibility to see how much pre-bought credits have been used.

Data Marketplace
Snowflake Data Marketplace which was announced last year is now live. You can now make your data available for other to consume and data consumers can use that data as part of their data pipelines as they would use normal SQL tables. More information: https://www.snowflake.com/data-marketplace/

Hopefully, this list helps you to get a grasp on things to come on Snowflake landscape.

More information by Christian Kleinerman:
https://www.snowflake.com/blog/snowflakes-product-innovations-for-2020/

Career opportunities

Performance of semi-structured data types in Snowflake

Snowflake extends the idea of traditional relational database by having the possibility to store and handle semi-structured data types. As shown in this post, semi-structured data types have effects on query performance and results of numerical operations.

On top of the traditional relational data, Snowflake also has support for semi-structured data with flexible schema. This can be utilized with for example following data formats: JSON and XML. Inside Snowflake, these are stored as either variant, array or object data types. Let us take a closer look what these mean.

Variant is a tagged universal type that can hold up to 16 MB of any data type supported by Snowflake. Variants are stored as columns in relational tables. Array is a list-like indexed data type that consists of variant values. Object, on the other hand, is a data type that consist of key-value pairs, where key is a not-null string and value is variant type data.

Snowflake provides guidelines on handling semi-structured data on their documentation. As a baseline, they recommend to store semi-structured data as variant data type, if usage for data is unsure. However, it is stated that when the usage is known, recommendation is to perform test cases to find solution with the best performance. Let us take a look what kind of differences might occur.

Test setup

For testing purposes, we create three different tables:

  1.   Table with 500 million rows
  2.   Table with variant column having 500 million values
  3.   Table with array column having 500 million values

The traditional table includes user identifier, which is a random field between values 1 and 5 million and amount field, which is integer value between values 1 and 500 million. Variant and array tables are both grouped tables. These are created with the traditional table as their source. Schema has user identifier and variant or array typed value field, which has aggregated list of the values for certain user identity. The tables are created with following queries:

CREATE TABLE T_500M (
   user_id   INT,
   amount    INT); 

INSERT INTO T_500M
   SELECT UNIFORM (1, 5000000, random())
        , UNIFORM (1, 500000000, random())
   FROM TABLE ( GENERATOR ( ROWCOUNT => 50000000 ));
 
CREATE TABLE T_500M_VARIANT AS 
   SELECT user_id,
        , CAST(ARRAY_AGG(amount) AS VARIANT) AS variant_field
   FROM T_500M
   GROUP BY user_id;

CREATE TABLE T_500M_ARRAY AS 
   SELECT user_id
       ,  ARRAY_AGG(amount) AS array_field
   FROM T_500M
   GROUP BY user_id;

Evaluating performance

Storing values as variant or array might seem like a good idea, if we want to aggregate sums on amount field for every user identity. As a query result, we want to show user identifier, count number of occurrences for that user and aggregated sum for the amount field. We can achieve it for each table with following queries:

SELECT user_id
     , COUNT(*) AS value_count
     , SUM(amount) AS sum
FROM T_500M
GROUP BY user_id;

SELECT user_id
     , COUNT(flat_variant.value) AS value_count
     , SUM(flat_variant.value::INTEGER) AS sum
FROM T_500M_VARIANT
    , lateral flatten(INPUT => variant_field) flat_variant
GROUP BY user_id;

SELECT user_id
     , COUNT(flat_array.value) AS value_count
     , SUM(flat_array.value::INTEGER) AS sum
FROM T_500M_ARRAY
     , lateral flatten(INPUT => array_field) flat_array
GROUP BY user_id;

Select-clause takes 15.6 seconds for the traditional relational table, 22.1 seconds with variant table and 21.9 seconds with array table. The difference is significant with the queries being over 40 % slower for semi-structured tables.

Another thing to consider with semi-structured formats is that queries on semi-structured data will not use result cache. We can notice this by running the queries again. The traditional table query takes only 0.2 seconds thanks to Snowflake’s persisted query results, but the queries to other tables take the same circa 22 seconds as earlier to complete.

The tested difference in our query time between structured data table and table with semi-structured data type exists, but it is still acceptable in some cases, where loading semi-structured data is a lot easier to variant or array columns. However, it needs to be noted, as stated in Snowflake documentation, query performance for data types that are not native for JSON are even worse for tables using variant or array. Shown test included only native JSON data types, but including for example datetime as variant would make the difference even bigger.

Explicit data type conversion

It is important to pay attention to the data types when accessing array or variant data. Consider the following example, where we query total sum of the amount-field with following select-statement on the variant table:

SELECT COUNT (*) AS row_count
     , SUM(flat_variant.value) AS sum_without_cast
     , SUM(flat_variant.value)::INTEGER AS cast_after_sum
     , SUM(flat_variant.value::INTEGER) AS cast_before_sum
FROM T_500M_VARIANT
     , lateral flatten(INPUT => variant_field) flat_variant;

For query results, we get three different sums:
   No specified casting:           1.24998423949572e+17
   Casting before sum:            124998423949572384
   Casting after sum:               124998423949572368

The same sum amounts are received when running the above query for the array table. Difference comes from Snowflake’s calculations, where variant and array are handled using JavaScript. JavaScript language uses Float as data type for numeric values. As shown in the earlier blog post using floating-point numeric data types, may lead to imprecise values. Even though the table only has fixed-point numeric values, using variant or array converts them to floating points unless determined explicitly when querying data.

Conclusion

Possibility to store semi-structured data in relational tables on Snowflake comes in handy for many business needs that do not have traditional relational source data. It enables loading semi-structured data straight to Snowflake and parsing data onwards from there. Even though this is possible, it should be tested per use case whether it is the best solution.

When evaluating query performance we noticed that querying tables with semi-structured data types, the select-clauses resulted in being 40 % slower compared to similar table with structured data types. This is with JavaScript native data types, while non-native types will result in even bigger difference for execution time. Semi-structured data types can’t  utilize result cache, so re-running the queries will take similar time as the initial one.

Best practice is converting data types explicitly, when accessing variant or arrays. Snowflake engine uses JavaScript to handle these data types, so as was shown, numeric values may suffer from rounding.

New call-to-action

To float, or not to float – Choosing correct numeric data type in Snowflake

Fixed-point numerical data types should be the default choice when designing Snowflake relational tables. Using floating-point data types has multiple downsides, which are important to understand. The effect of choosing different numerical data type can be easily tested.

Snowflake numeric data types can be split in two main categories: fixed-point numbers and floating-point numbers. In this blog post we are going to look at what these mean from Snowflake database design point of view, and especially should you use floating type when dealing with numeric data?

Fixed-point numbers are exact numeric values, which include data types such as number, integer and decimal. For these data types, developer can determine precision (allowed number of digits in column) and scale (number of digits right of the decimal point). In Snowflake, all fixed-point numeric data types are actually type decimal with precision 38 and scale 0, if not specified differently. Typical use cases for fixed-point data types are natural numbers and exact decimal values, such as monetary figures, where they need to be stored precisely.

On the other side of the spectrum are floating-point numbers, which are approximate representations of numeric values. In Snowflake, floating-point columns can be created with key-words float, double, double precision or real. However, as the Snowflake documentation states, all of these data types are actually stored as double and they do not have difference in precision, but displayed as floats. Floating-point data types are mainly used in mathematics and science to simplify the calculations with scientific notation. Storing numbers with major differences in magnitude is their advantage in databases too, because zeros trailing or following the decimal sign does not consume memory as it does for decimal format. In traditional computing, floats are considered faster for computation, but is that really the case in modern database design?

Floating-point precision

First, let us explore inserting data on Snowflake into table with float as numeric data type. We create a table and insert 500 million rows of generated dummy data to the table with following query:

CREATE TABLE T_FLOAT_500M (
   id            INT,
   float_field   FLOAT );

 
INSERT INTO T_FLOAT_500M
  SELECT SEQ8()
       , UNIFORM(1, 500000000, RANDOM())::FLOAT
  FROM TABLE ( GENERATOR ( ROWCOUNT => 500000000 ) );

To see the effect of using float as the data type for big numeric values, we can run the following query:

SELECT SUM(float_field) AS NO_CONVERSION
     , SUM(float_field::INT) AS CONVERT_VALUES_SEPARATELY
     , SUM(float_field)::INT AS CONVERT_SUM_VALUE
FROM T_FLOAT_500M;

Sum without the conversion produces us a rounded number with scientific notation: 1.24997318579082e+17
Separately converted values sum produces result: 124997318579081654
Conversion made after the calculation produces sum value: 124997318579081664

From the sum results, we will notice the accuracy problem related to storing numeric values as floats as the sum results differ from each other. When dealing with large or extremely accurate numeric values, floats may cause differentiation in results due to their nature of being approximate representations. Same effect can be seen when using WHERE clauses as the approximate representations may not work as designed with conditions that point to exact numeric values.

Storage size of float

Next, we create a similar table as earlier, but with the second field being type integer and populate it without converting random figures to floats. 

CREATE TABLE T_INT_500M (
   id          INT,
   int_field   INT);

INSERT INTO T_INT_500M
  SELECT SEQ8()
       , UNIFORM(1, 500000000, RANDOM())::INT
  FROM TABLE ( GENERATOR ( ROWCOUNT => 500000000 ) );

SHOW TABLES LIKE '%_500M';

Looking at the Snowflake table statistics, we will notice integer table is smaller (3.37 GB) compared to the float table (5.50 GB). The difference in table sizes is significant with the float table being 63 % bigger. This can be explained by Snowflake reserving 64 bits of memory for every float value. Integer values on the other hand are stored in compressed format and take only the necessary amount of memory.

This difference is seen also on SELECT queries, where querying all rows with X-Small warehouse takes only 85 seconds for integer type table compared to the 160 seconds with the float type table. Difference is once again major. 

Summary

Floats still have their use cases with numbers that have majorly different magnitudes. But from the presented test cases, we can draw a conclusion that using floating-point data types will lead to bigger storage sizes and longer query times, which result as an increase to data warehousing costs. Another thing to consider is the possibility of imprecise values, when dealing with extremely accurate data. Whenever possible, it is recommended not to use float as a type for numeric data without a specific reason. Especially precise and whole numbers are not meant to be stored as floats and should be given appropriate data types. 

How to visualize Snowflake Warehouse costs in euros using Power BI

In this blog post, I'll demonstrate how you can create a Power BI report to visualize monthly Snowflake virtual warehouse costs in euros and make Snowflake costs visible even for those not having access to Snowflake console.

At the core of Snowflake are the virtual warehouses which enable unlimited scalability for computing. Data load, integration and visualization tools can have their own virtual warehouses. You can even provide a dedicated virtual warehouse for a business analyst who wants to query the raw data by himself.

You although want to ensure that Snowflake costs won’t skyrocket due to misuse of computational power what Snowflake provides so easily and the easiest way to do this is to visualize the virtual warehouse credit costs in Power BI (or similar tool) using Snowflake’s internal data dictionary and share the dashboard for relevant parties not having access to Snowflake console.

If you open any Snowflake database, you see that Snowflake databases come with INFORMATION_SCHEMA -schema included. INFORMATION_SCHEMA is Snowflake’s own data dictionary of all the stuff which are inside the database.

LOAD_HISTORY -view, for example, contains information of all files which are loaded into Snowflake. Do you want to know who has logged into Snowflake recently and what queries he or she has done? Just visit LOGIN_HISTORY and QUERY_HISTORY -views. Insides of INFORMATION_SCHEMA have been illustrated greatly in Kent Graziano’s “Using Snowflake Information Schema” so I won’t go more into details.

Our use case is to visualize the credit cost of virtual warehouses in Euros and for this, we will need:

1) Snowflake user who has access either to ACCOUNT_USAGE -schema or desired INFORMATION_SCHEMA’s.
2) PowerBI or similar BI -tool to visualize the warehouse credit usage

Finding correct schema and values which we need.

As we want to visualize credit usage of warehouses, we want to use WAREHOUSE_METERING_HISTORY -view. The view is located at two places, inside ACCOUNT_USAGE -schema and INFORMATION_SCHEMA inside every database (as information of historical and current usage of data are shared inside the account inside every INFORMATION_SCHEMA). This time we’re going to use ACCOUNT_USAGE -schema. The values which interest us are START_TIME, WAREHOUSE_NAME and CREDITS_USED.

Creating Power BI data sources

Power BI supports Snowflake, but before you can access Snowflake data, you need to download Snowflake ODBC -driver. Once you have the setup running, create a new data source using the “Get Data” -button. In my case, I have chosen “DV_WAREHOUSE_METERING_HISTORY_S” -table which is same as the WAREHOUSE_METERING_HISTORY -table, but is loaded weekly to provide historical data beyond one year.

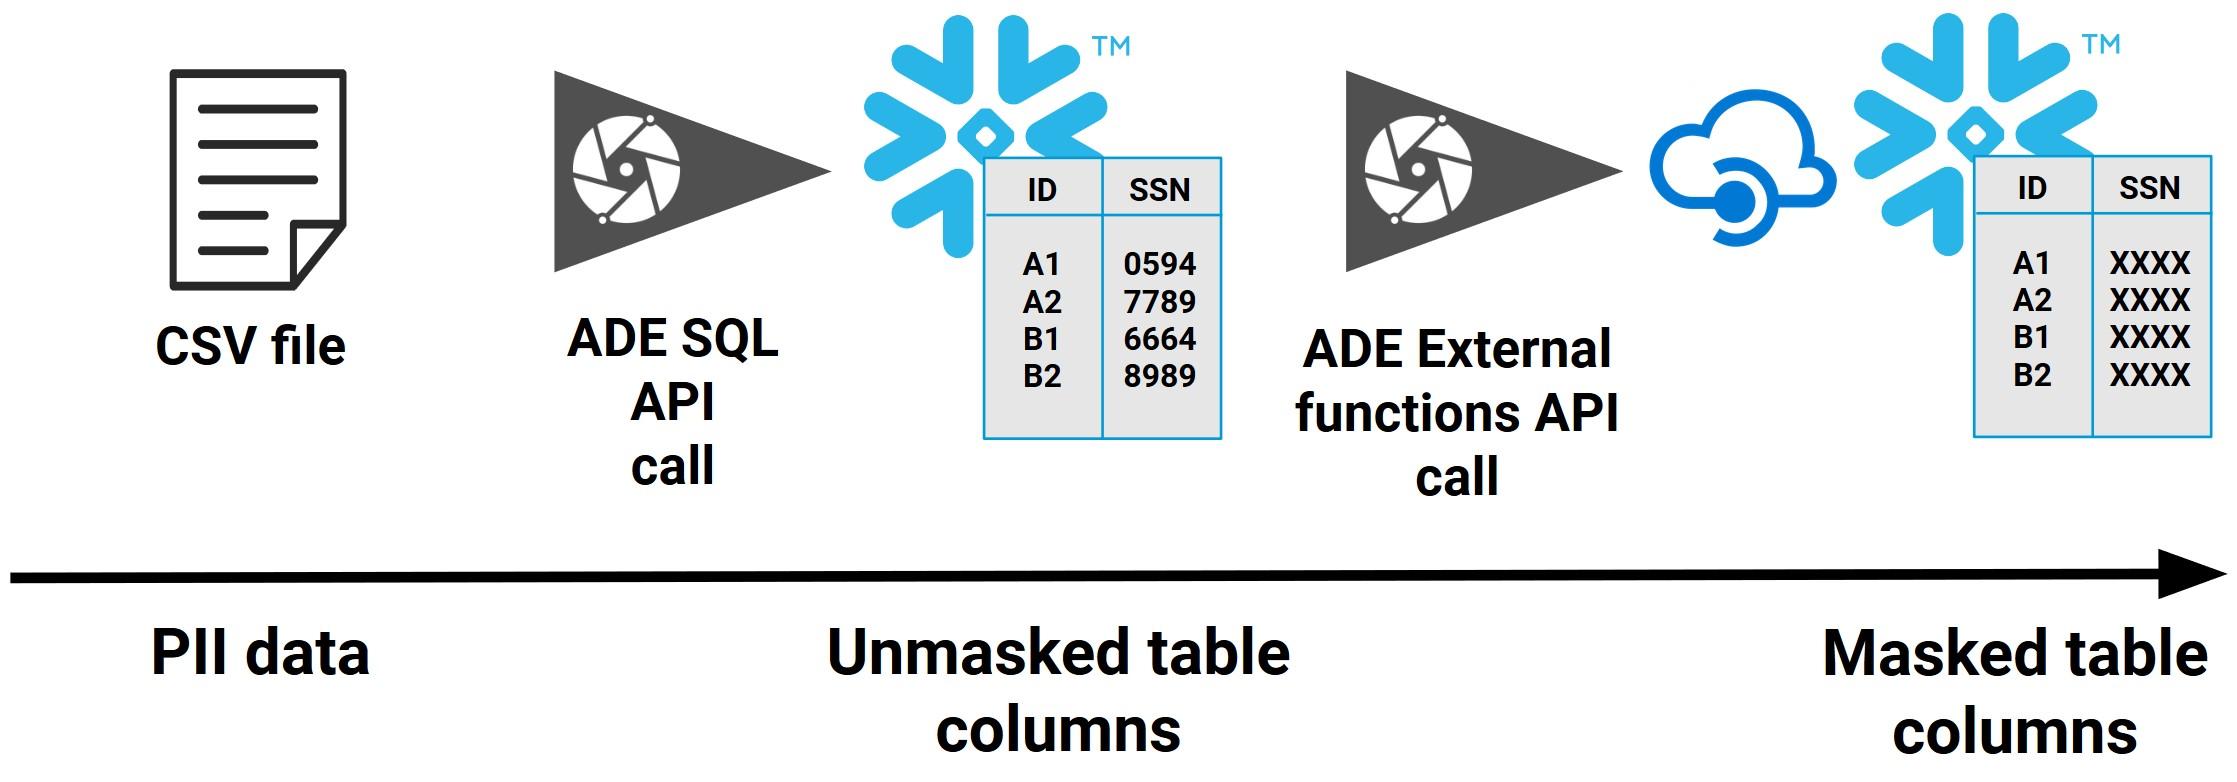
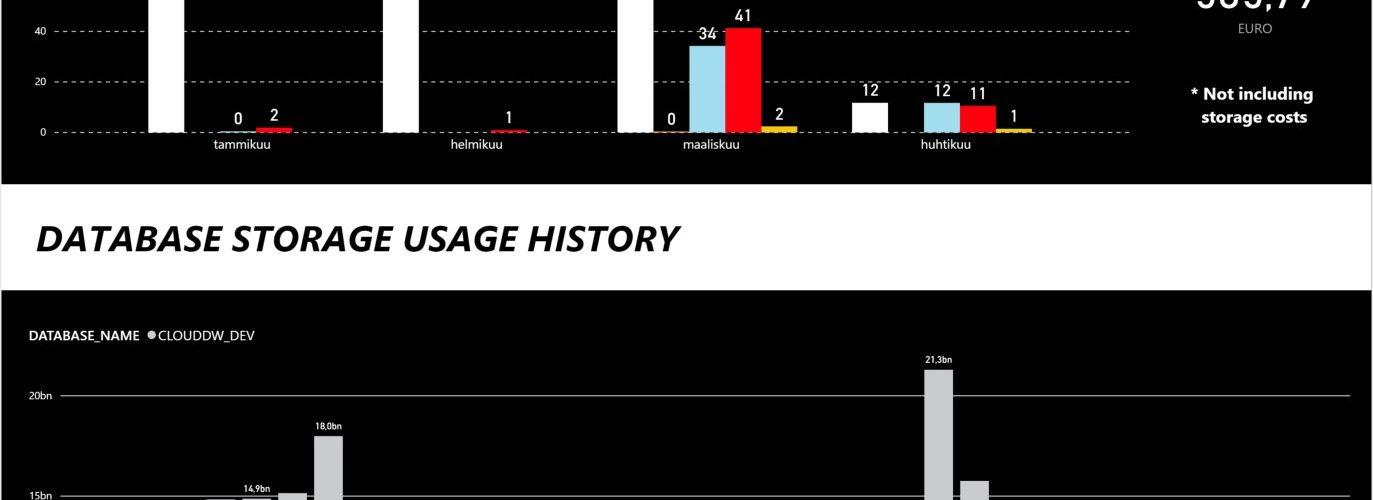
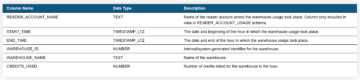
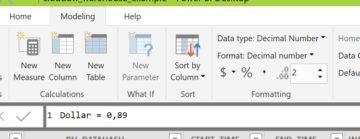
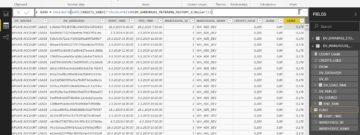
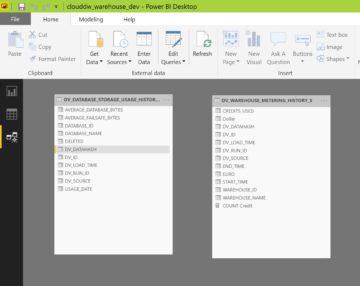
The cost of warehouses are stored inside WAREHOUSE_METERING_HISTORY -table in CREDITS_USED column, but the Snowflake credits need to be converted into dollars and euro’s and grouped accordingly.

Add two new columns to the data set. Use the Modeling -tab and the “New Column” -button. Name first column as Dollar and one more column “Dollar” to the data and give it current value for dollar in euros. Currently one dollar is valued at 0,89 euros, so will give that value. In the future we can modify this value to be updated constantly, but for getting a best estimate for costs, a fixed value works fine.

Remember to give enough decimals for column so that Power BI won’t round up the value into one.

Create second column and give it name “Euro”. For this column, use following calculation. This calculation will count the sum the used credits and multiply the with the value of dollar. Outcome is the used credits in euros.

1 EURO = CALCULATE(SUM([CREDITS_USED])*CALCULATE(SUM(DV_WAREHOUSE_METERING_HISTORY_S[Dollar])))

Creating Power BI report

Once you have data sources ready, doing the final report is really easy. Add START_TIME (on month level) to AXIS, WAREHOUSE_NAME to LEGEND and finally EURO as value.

For this visualization, I have chosen a clustered column chart. You can add SUM of EURO to the dashboard to give it a final touch. I have also added a note that this does not include storage costs. The final result should look something like below.

Hopefully this short guidance will help you to visualize your Snowflake costs and ease the task of proofing that Snowflake is really cheap if you use it correctly.

For more information
https://docs.snowflake.net/manuals/sql-reference/functions/warehouse_metering_history.html
https://docs.snowflake.net/manuals/sql-reference/account-usage/warehouse_metering_history.html
https://docs.snowflake.net/manuals/sql-reference/info-schema.html
https://docs.snowflake.net/manuals/sql-reference/account-usage.html

New call-to-action

A curated list of new Snowflake features released at Snowflake Summit 2019

Snowflake coming to Google Cloud, Data Replication, Snowflake Organizations, external tables, Data Pipelines, Data Exchange. The list goes on. Read following article for a curated list of new features released on Snowflake Summit keynote at San Francisco.

Trying to go through for all the announcements for a product can be sometimes overwhelming. It takes time as you need to go through for all the individual press announcements. To ease the pain, I’ve gathered a curated list of new Snowflake features released at the first annual Snowflake Summit at sunny California at Hotel Hilton.

So let’s begin.

Snowflake released new features which can be broken down into to following categories: Core Data Warehouse, Data Pipelines, Global Snowflake and Secure Data Sharing. I’ll list the features and give a more precise description of the feature (if possible).

Core Data Warehouse

Core Data Warehouse features are the bread and butter of Snowflake. Everybody is already familiar with Snowflake features such as virtual warehouses, separation of storage and compute so Snowflake didn’t release any announcements on those. They though said that they are working on decreasing concurrency latency and making large ad-hoc queries to work even better. In larger scale this means that the boundaries of operational databases and operational data platforms are narrowing down.

On the security side, Snowflake told that they are working with multiple vendors on enabling identity passing from BI -tools to Snowflake. Basically this means that your user id which you use to log on to for example to Tableau, is passed straight to Snowflake. This will enable even better row-level security and secure views possibilities. As of today, Snowflake reminded, that Snowflake already supports OAuth 2.0 as an authentication method.

Under the hood, JavaScript Stored Procedures support was reminded and the possibility of Geospatial capability was spoken (nothing released, rather teased).

Guys and gals at Snowflake are also keen on providing a richer experience for the end users. They told that they had gathered information from the end users, to provide better worksheets, Worksheet 3.0 so to speak. The end result of that was that during the investigation phase they encountered company called Numeracy and eventually decided to make their first acquisition as Numeracy was working on creating even better UI for Snowflake. Now the features of Numeracy UI are being ported into Snowflake UI. Numecary UI provides better editor suggestions, visualizations and provides worksheet sharing. On text this doesn’t sound anything new, but my colleague took a video of the new UI and it is awesome.

Data Pipelines

Data Pipelines is a new feature coming into Snowflake. Basically Snowflake has now the capability to auto-ingest data coming into the cloud storage layer and the possibility to do a data transformation for the data based on user-defined tasks. This means that you no longer need any external scheduler to trigger the small ELT or scheduled jobs.

This is possible due to the following new features:
– Auto-Ingest
– Streams and Tasks

During the Data Pipelines presentation a Snowflake Connector for the Kafka was also announced.

Under the Data Pipelines headline, the concept of Snowflake as a Data Lake was introduced more in detail because Snowflake will now support external tables and SQL over external tables, which means that you don’t need to load the data into Snowflake to get the insight of the data (and data structure). To make things interesting, Snowflake will now also support materialized views on external tables.

As a surprise effect, all the features which were were listed above are available today in public preview.

Global Snowflake

Under the title of Global Snowflake the new regions were introduced. AWS got Canada Central, US-Central (Ohio) and Japan. For Azure, new regions will open in US-West-2, Canada Central, Government and Singapore.

The most anticipated release was the release of Google Cloud version of Snowflake, which will be on preview at Q3 at 2019. Google Cloud supported stages are though possible already, as noted earlier.

Snowflake Organizations was published as a new way to control your Snowflake instances within a large corporation. Now you have the possibility to deploy Snowflake instances in your chosen cloud and region through Snowflake UI and you can act as organization admin. Organizations will provide a dashboard of warehouse and storage costs of all your accounts. So, if your company has multiple Snowflake accounts, this the new way to go.

Finally, Database Replication was announced. Database replication offers the possibility to replicate your data, per database level, to another Snowflake account regardless whether the account is Azure, AWS or Google Cloud. It doesn’t even matter on which region you’re planning to replicate your data as database replication supports cross-region replications.

Database replication is a point-and-click version of the traditional Oracle Data Guard or Microsoft SQL Server AlwaysOn Cluster where you define database which you want to replicate to a different location for business continuity purposes or just to provide read-only data nearer to the end users. The difference to the Oracle and Microsoft versions is that Snowflake implementation works out-of-the-box without any hassle. Database replication also supports failover and failback for client application end user point, meaning that if you have Tableau Server connected to Snowflake and you do a failover the database, Tableau Server will reconnect to the new location.

Secure Data Sharing

On Secure Data Sharing field, Snowflake introduced their concept of a data marketplace, called Data Exchange. Basically, Data Exchange is a marketplace for data that can be used through Snowflake Data Sharing. You can buy data shares (for example consumer travel data, weather data etc.) through Data Exchange and use them straight away in your SQL queries.

There are two options for this, Standard and Personalized. Standard -data is your normal data set, available for everybody. Personalized -data requires authentication between you and the data provider, but it will grant you the possibility to ingest your own data (if possible) straight from the provider using Data Sharing -functionality.
If that’s not all, Snowflake even advertised in mid-sentence, a simpler way to deploy Tableau into AWS and configure it to use Snowflake, now in 30 minutes.

Hopefully, this list helps you to get a grasp on things to come on Snowflake landscape. I will update this list if new features will be launched tomorrow or Thursday.

Link list in raw format.
https://www.snowflake.com/blog/snowflake-data-pipelines/
https://www.snowflake.com/blog/numeracy-investing-in-our-query-ui/
https://www.snowflake.com/blog/using-oauth-2-0-with-snowflake/
https://www.snowflake.com/blog/snowflake-introduces-javascript-stored-procedures/
https://www.snowflake.com/news/snowflake-and-google-cloud-announce-strategic-partnership/
https://www.snowflake.com/blog/snowflake-launches-database-replication-and-failover/
https://www.snowflake.com/news/snowflake-announces-data-exchange-to-break-down-data-barriers/
https://aws.amazon.com/about-aws/whats-new/2019/06/new-quick-start-deploys-tableau-and-snowflake-on-the-aws-cloud/

How to use Active Directory users and groups for Snowflake user and role management

In this following blog-post, I will tell you how to create asynchronous replication from Microsoft Active Directory to Snowflake Cloud Data Warehouse so you can use your existing AD users and groups (including nested groups) to manage Snowflake.

I’ve been using Snowflake for a few years now and although Snowflake is an excellent product, it lacks the possibility to use existing directories (Microsoft Active Directory, OpenLDAP, Google) for managing Snowflake users and roles. It doesn’t though mean that it’s impossible.

As of today, you can already create federated authentication against Okta, ADFS, or another (i.e. custom) SAML 2.0-compliant Identity Provider (IdP) which enables users to do a single sign-on into Snowflake using their (for example) Azure Active Directory information. We’ll come back to this later on, as federated authentication is a key piece for using AD accounts with Snowflake.

In this following blog-post, I will tell you how to use and sync Microsoft Active Directory -users and groups into Snowflake and what components are needed for this. Let’s start by going through the needs.

You’ll need following for making the synchronization possible:

1) Rights to modify Snowflake account parameters and create new users
2) Microsoft Azure -subscription for enabling AzureAD Single Sign-On to Snowflake
3) Windows Server connected to Active Directory and snowsql installed
4) This script which sync’s users from AD. Huge thanks to James Weakley.

We will create following linking between Snowflake, Azure and Microsoft Active Directory.

Active Directory syncronization illustrated

Idea is to create a similar structure within Active Directory as you want to have inside Snowflake. Users and groups are provisioned and synced into Snowflake using Powershell -script running inside Window Server joined into AD. Single Sign-On authentication happens against AzureAD. So, let’s start configuring.

Enabling Single Sign-On

Steps can be created in any order, but you can start by enabling single sign-on as a first step. Having single sign-on enabled, you can already start using AD accounts as long as you create the needed accounts manually. Enabling single sign-on is already documented really well by Microsoft in the following site. https://docs.microsoft.com/en-us/azure/active-directory/saas-apps/snowflake-tutorial so I won’t go through all steps. Shortly, the idea is to configure AzureAD as IdP for Snowflake and eventually configure the same in Snowflake as detailed below.

USE ROLE ACCOUNTADMIN ;
ALTER ACCOUNT SET SAML_IDENTITY_PROVIDER = '{
"certificate": "longhash",
"ssoUrl": "https://login.microsoftonline.com/hashedtext/saml2",
"type" : "ADFS",
"label" : "AzureAD"
}';

Set the login page (this the page what you see, when you log on to Snowflake) to have new button what user’s can now to log using their Active Directory account.

ALTER ACCOUNT SET SSL_LOGIN_PAGE = TRUE ;

Finally alter any desired test users to have LOGIN_NAME similar as their AD account information. This will map do the actual mapping. You may also remove the users.

ALTER USER mika.heino@solita.fi SET LOGIN_NAME = 'mika.heino@solita.fi' DISPLAY_NAME = 'Mika Heino, Solita '

Creating Snowflake service account for script use

Once you have single sing-on working and tested, we can move to automating the user and group (role) provisioning. For this, we need a separate Snowflake service account as we don’t want to run stuff with personal accounts.

Creating roles and users in Snowflake requires SECURITYADMIN role. You can either create a service account with securityadmin granted, or you can create your own security admin role for service account with the required rights. Either way is ok, as long as it’s documented properly.

For example create following user:
CREATE USER S_AUTOMATION_AD_SYNC PASSWORD = 'example_password' COMMENT = 'Service Account, Used to sync Active Directory users and roles' LOGIN_NAME = 'S_AUTOMATION_AD_SYNC' DEFAULT_ROLE = "SERVICE_ACCOUNTS_SECURITYADMIN" DEFAULT_WAREHOUSE = 'WH_ADE_DEV' DEFAULT_NAMESPACE = 'PUBLIC' MUST_CHANGE_PASSWORD = FALSE ;

GRANT ROLE "SERVICE_ACCOUNTS_SECURITYADMIN" TO USER S_AUTOMATION_AD_SYNC ;

GRANT ROLE "SECURITYADMIN" TO ROLE "SERVICE_ACCOUNTS_SECURITYADMIN";

Creating OU and Snowflake role structure

Choose or create a new Organizational Unit (OU) for Snowflake users. This will be the container for roles that you can use to grant rights inside Snowflake. Although this is the most straightforward phase in the whole process, use time to consider the roles (groups) to have and use. Consider at least the following structure:

1) Limited role for persons to have ACCOUNTADMIN -rights. Keep the number of people here a limited as this role can do anything inside Snowflake -account.
2) DV_ADMIN/DEVELOPER -role. Ideally, this role will have the rights to do anything inside one or more databases and meant for the persons creating the data models and loads i.e. in Solita the persons doing the Data Vault.
3) DATA SCIENTIST -role. Ideally, this role would have the rights to read anything from all the schemas inside the database having all the business data and rights to create anything inside separate development -database.
4) ANALYST -role. This role is meant for the business users and should have read rights to Publish -schema or ideally only to dimension and facts tables having business rules applied.

Same structure inside Active Directory.

Example Snowflake role set

Once you have the general structure ready, create it inside Active Directory, note the OU -structure and move to next step.

Scheduling the script

Scheduling the PowerShell – script is really straight forward. You use can the trusted Task Scheduler (ideally this would be running for example inside Azure Function, but this is the first version) for scheduling. You need to have a Windows Server joined into Active Directory, snowsql -installed and necessary firewall openings done. You’ll need to provide a few details for the script. Following is an example of the details for the script.

.\snoad.ps1 -snowflakeAccount 'ly12345' -snowflakeUser 'usersync' -snowflakeRole 'ACCOUNTADMIN' -snowflakeRegion 'ap-southeast-2' -ouIdentity 'OU=AsiaPacific,OU=Sales,OU=UserAccounts,DC=FABRIKAM,DC=COM' -createAnyMissingUsers $true

The script will retrieve all security groups and all the users from the OU you define, check whether they exist in Snowflake and create any missing users without any password to enforce AD authentication. For each security group immediately within the OU, a role in Snowflake is matched or created and all Snowflake users are granted it. The process goes also the other way, as users who have subsequently been removed from the AD group will be revoked from the corresponding role. Detailed documentation can be found in the GitHub -projects README -file.

Following is an example from script and it will create missing roles and grant roles to correct persons. In this example script you can also see a user being removed. In Snowflake the user removal is disable and revoke of his/hers roles, but no user account deletion.

As you can see from the script, you can map the role names using prefixes so that AD role snowflake-role-ADMIN is mapped to ADROLE_ADMIN. This will also help you on creating the roles in Active Directory, as you can use the existing company naming standards.

** Retrieving list of current snowflake users
Total current Snowflake SSO users: 30
**Retrieving AD security groups in OU OU=Snowflake,OU=Solutions,DC=FI,DC=Solita,DC=int
. AD Group : snowflake-role-ADMIN
. Snowflake Role : ADROLE_ADMIN
Fetching users immediately in group whose accounts aren't disabled
Fetching users nested in non-snowflake groups under group , whose accounts aren't disabled
Fetching nested role group
. AD Group : snowflake-role-DEVELOPER
. Snowflake Role : ADROLE_DEVELOPER
Fetching users immediately in group whose accounts aren't disabled
Fetching users nested in non-snowflake groups under group , whose accounts aren't disabled
Fetching nested role group
. AD Group : snowflake-role-Scientist
. Snowflake Role : ADROLE_SCIENTIST
Fetching users immediately in group whose accounts aren't disabled
Fetching users nested in non-snowflake groups under group , whose accounts aren't disabled
Fetching nested role group
. AD Group : snowflake-role-Analyst
. Snowflake Role : ADROLE_ANALYST
Fetching users immediately in group whose accounts aren't disabled
Fetching users nested in non-snowflake groups under group , whose accounts aren't disabled
Fetching nested role group
Disabling 1 users as they have no roles mapped in AD
**Retrieving list of current snowflake roles
Checking membership of current roles
Checking role ADROLE_ADMIN exists in Snowflake
Role does not exist, creating
Checking role ADROLE_DEVELOPER exists in Snowflake
Checking role ADROLE_SCIENTIST exists in Snowflake
Checking role ADROLE_ANALYST exists in Snowflake
Role does not exist, creating
. Checking role ADROLE_ADMIN has the appropriate users
missing grantees: Mika.Heino@solita.fi
superfluous grantees:
. Checking role ADROLE_DEVELOPER has the appropriate users
missing grantees:
superfluous grantees:
. Checking role ADROLE_SCIENTIST has the appropriate users
missing grantees:
superfluous grantees:
. Checking role ADROLE_ANALYST has the appropriate users
missing grantees: pappa@solita.fi seppo@solita.fi
superfluous grantees:
. Checking role ADROLE_ADMIN has the appropriate roles
missing grantees:
superfluous grantees:
. Checking role ADROLE_DEVELOPER has the appropriate roles
missing grantees:
superfluous grantees:
. Checking role ADROLE_SCIENTIST has the appropriate roles
missing grantees:
superfluous grantees:
. Checking role ADROLE_ANALYST has the appropriate roles
missing grantees:
superfluous grantees:
Without the -WhatIf flag, the script will execute the following SQL Statement:
BEGIN TRANSACTION;
ALTER USER \"teppo@solita.fi\" SET DISABLED=TRUE;
CREATE ROLE \"ADROLE_ADMIN\";
CREATE ROLE \"ADROLE_ANALYST\";
GRANT ROLE \"ADROLE_ADMIN\" TO USER \"mika.heino@solita.fi\";
GRANT ROLE \"ADROLE_ANALYST\" TO USER \"pappa@solita.fi\";
GRANT ROLE \"ADROLE_ANALYST\" TO USER \"seppo@solita.fi\";
REVOKE ROLE \"ADROLE_ANALYST\" FROM USER \"teppo@solita.fi\";
COMMIT;

Final words

I encourage you to test this script a couple of times before leaving it to run by itself. I also want to highlight that all though I’ve been using the script in production for a while, it comes without any support at all and it is a community-developed script, not an official Snowflake offering.

Also I recommend that you leave few Snowflake accounts with ACCOUNTADMIN rights as using AD accounts do not have any password and you might get yourself locked out in situations where SSO -authentication does not work. Keep in my though, that in general practice you should not have large amounts of users with ACCOUNTADMIN -rights as those accounts have highest rights on Snowflake.

For more information:
https://github.com/jamesweakley/snoad
https://docs.snowflake.net/manuals/user-guide/admin-security-fed-auth.html
https://docs.microsoft.com/en-us/azure/active-directory/saas-apps/snowflake-tutorial