A Beginner’s Guide to AutoML

In a world driven by data, Machine Learning plays the most central role. Not everyone has the knowledge and skills required to work with Machine Learning. Moreover, the creation of Machine Learning models requires a sequence of complex tasks that need to be handled by experts.

Automated Machine Learning (AutoML) is a concept that provides the means to utilise existing data and create models for non-Machine Learning experts. In addition to that, AutoML provides Machine Learning (ML) professionals ways to develop and use effective models without spending time on tasks such as data cleaning and preprocessing, feature engineering, model selection, hyperparameter tuning, etc.

Before we move any further, it is important to note that AutoML is not some system that has been developed by a single entity. Several organisations have developed their own AutoML packages. These packages cover a broad area, and targets people at different skill levels.

In this blog, we will cover low-code approaches to AutoML that require very little knowledge about ML. There are AutoML systems that are available in the form of Python packages that we will cover in the future.

At the simplest level, both AWS and Google have introduced Amazon Sagemaker and Cloud AutoML, which are low-code PAAS solutions for AutoML. These cloud solutions are capable of automatically building effective ML models. The models can then be deployed and utilised as needed.

Data

In most cases, a person working with the platform doesn’t even need to know much about the dataset they want to analyse. The work carried out here is as simple as uploading a CSV file and generating a model. We will take a look at Amazon Sagemaker as an example. However, the process is similar in other existing cloud offerings.

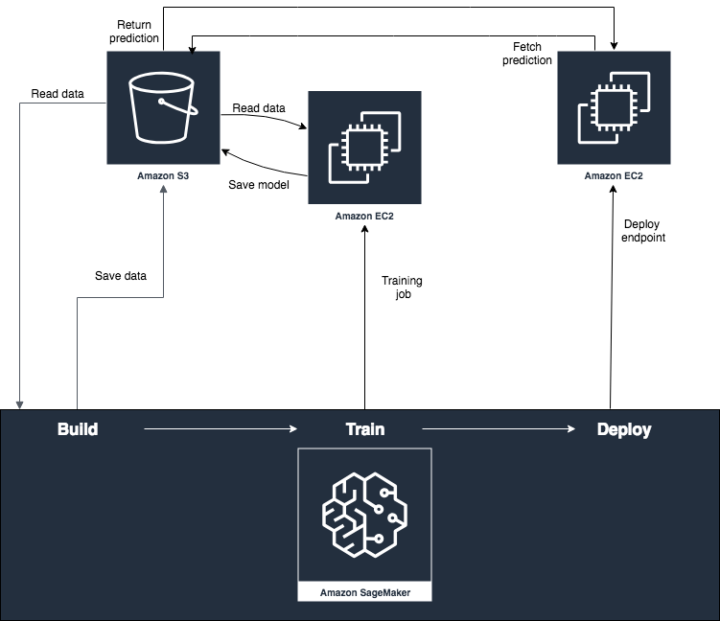
With Sagemaker, we can upload our dataset to an S3 bucket and tell our model that we want to be working with that dataset. This is achieved using Sagemaker Canvas, which is a visual, no code platform.

The dataset we are working with in this example contains data about electric scooters. Our goal is to create a model that predicts the battery level of a scooter given a set of conditions.

Creating the model

In this case, we say that our target column is “battery”. We can also see details of the other columns in our dataset. For example, the “latitude”and “longitude” columns have a significant amount of missing data. Thus, we can choose not to include those in our analysis.

Afterwards, we can choose the type of model we want to create. By default, Sagemaker suggests creating a model that classifies the battery level into 3 or more categories. However, what we want is to predict the battery level.

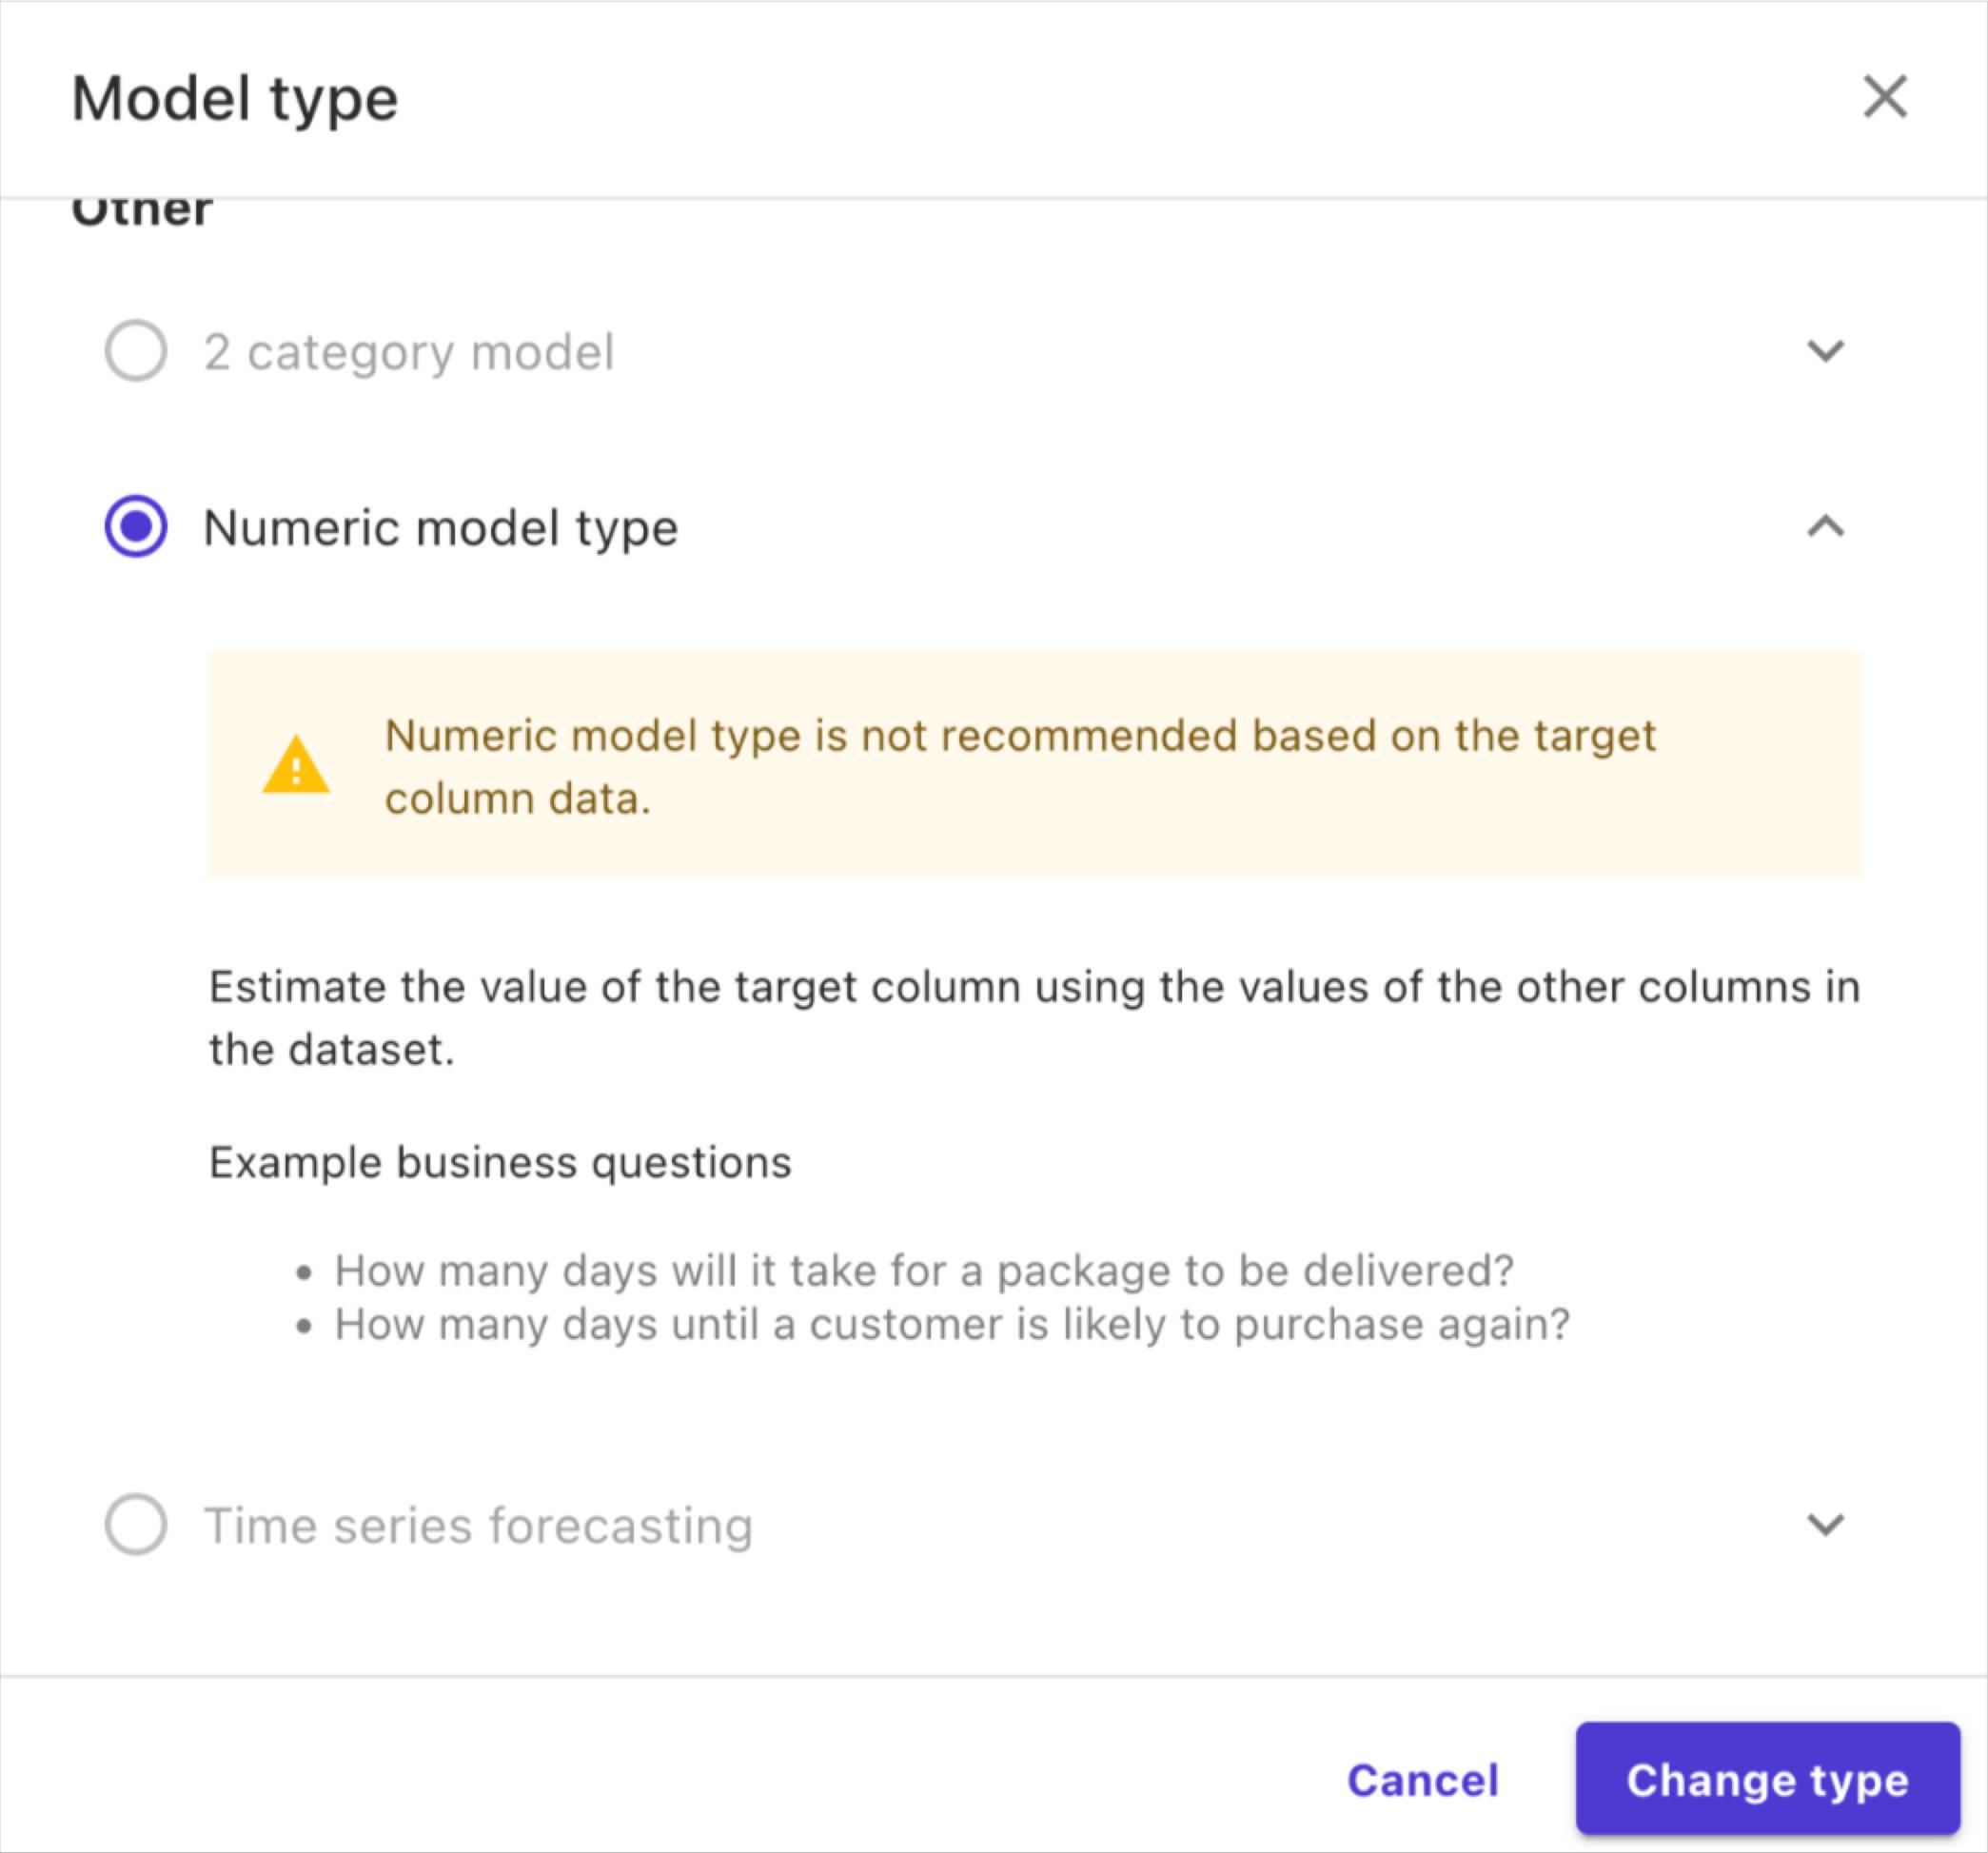
Therefore, we can change the model type to “numeric” in order to predict battery level.

Thereafter, we can begin building our models. This is a process that takes a considerable amount of time. Sagemaker gives you the option to “preview” the model that would be built before starting the actual build.

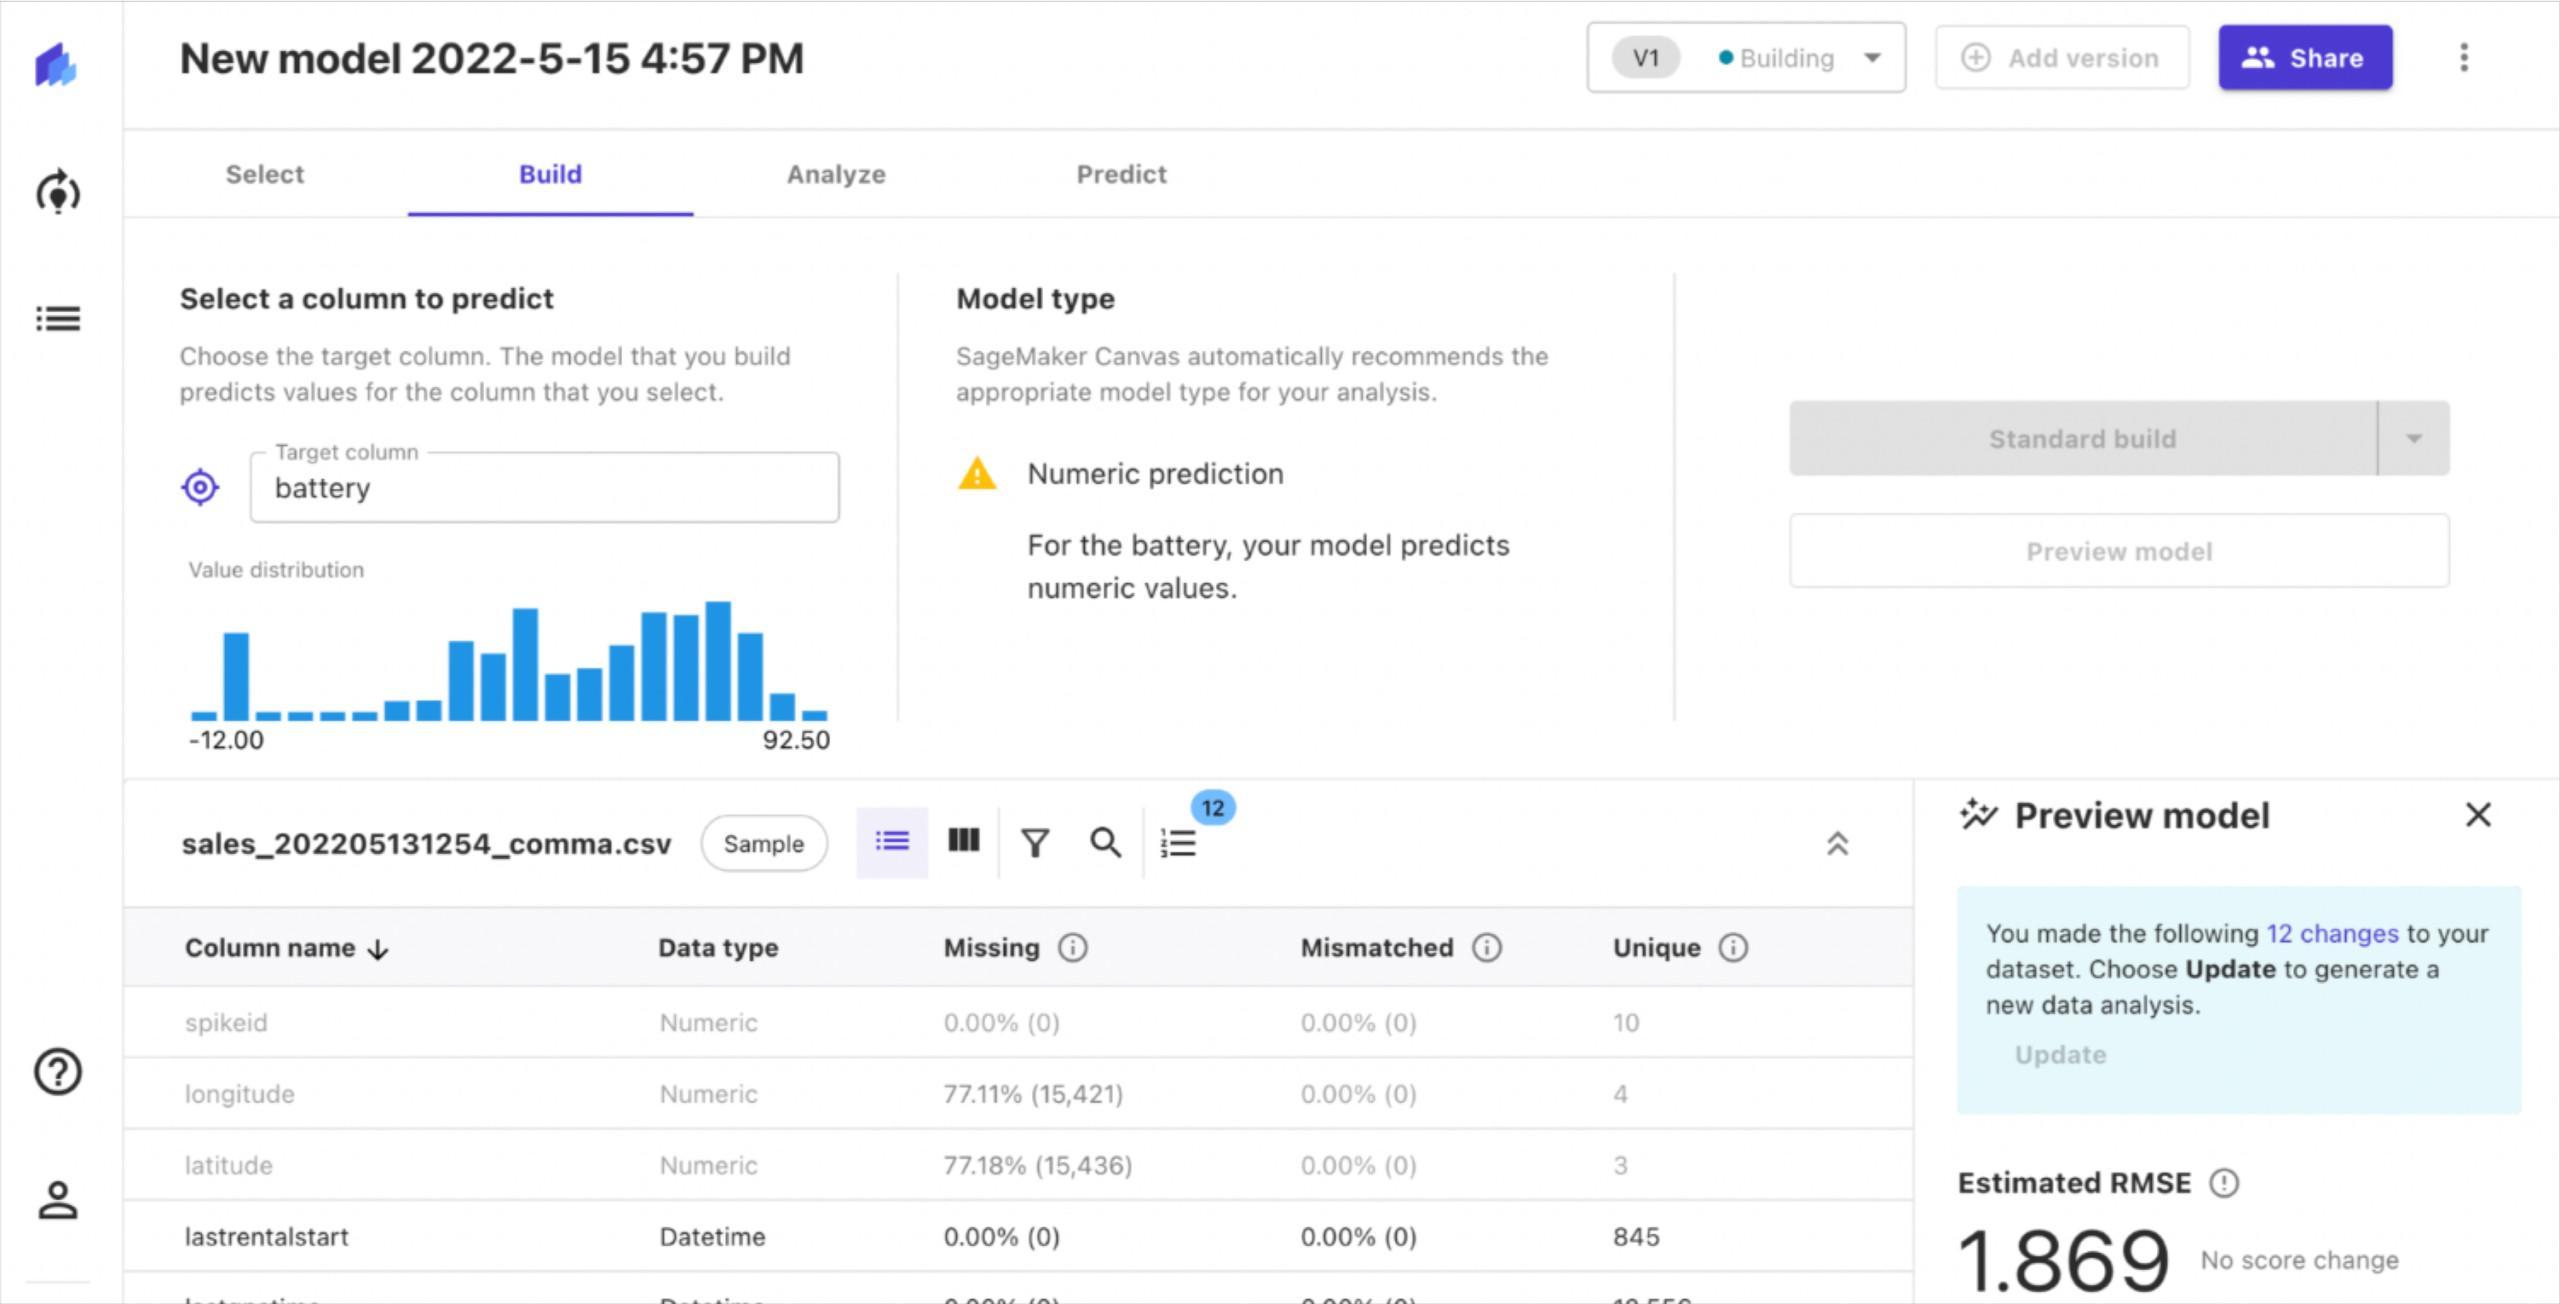
The preview only takes a few minutes, and provides an estimate of the performance we can expect from the final model. Since our goal is to predict the battery level, we will have a regression model. This model can be evaluated with RMSE (root mean square error).

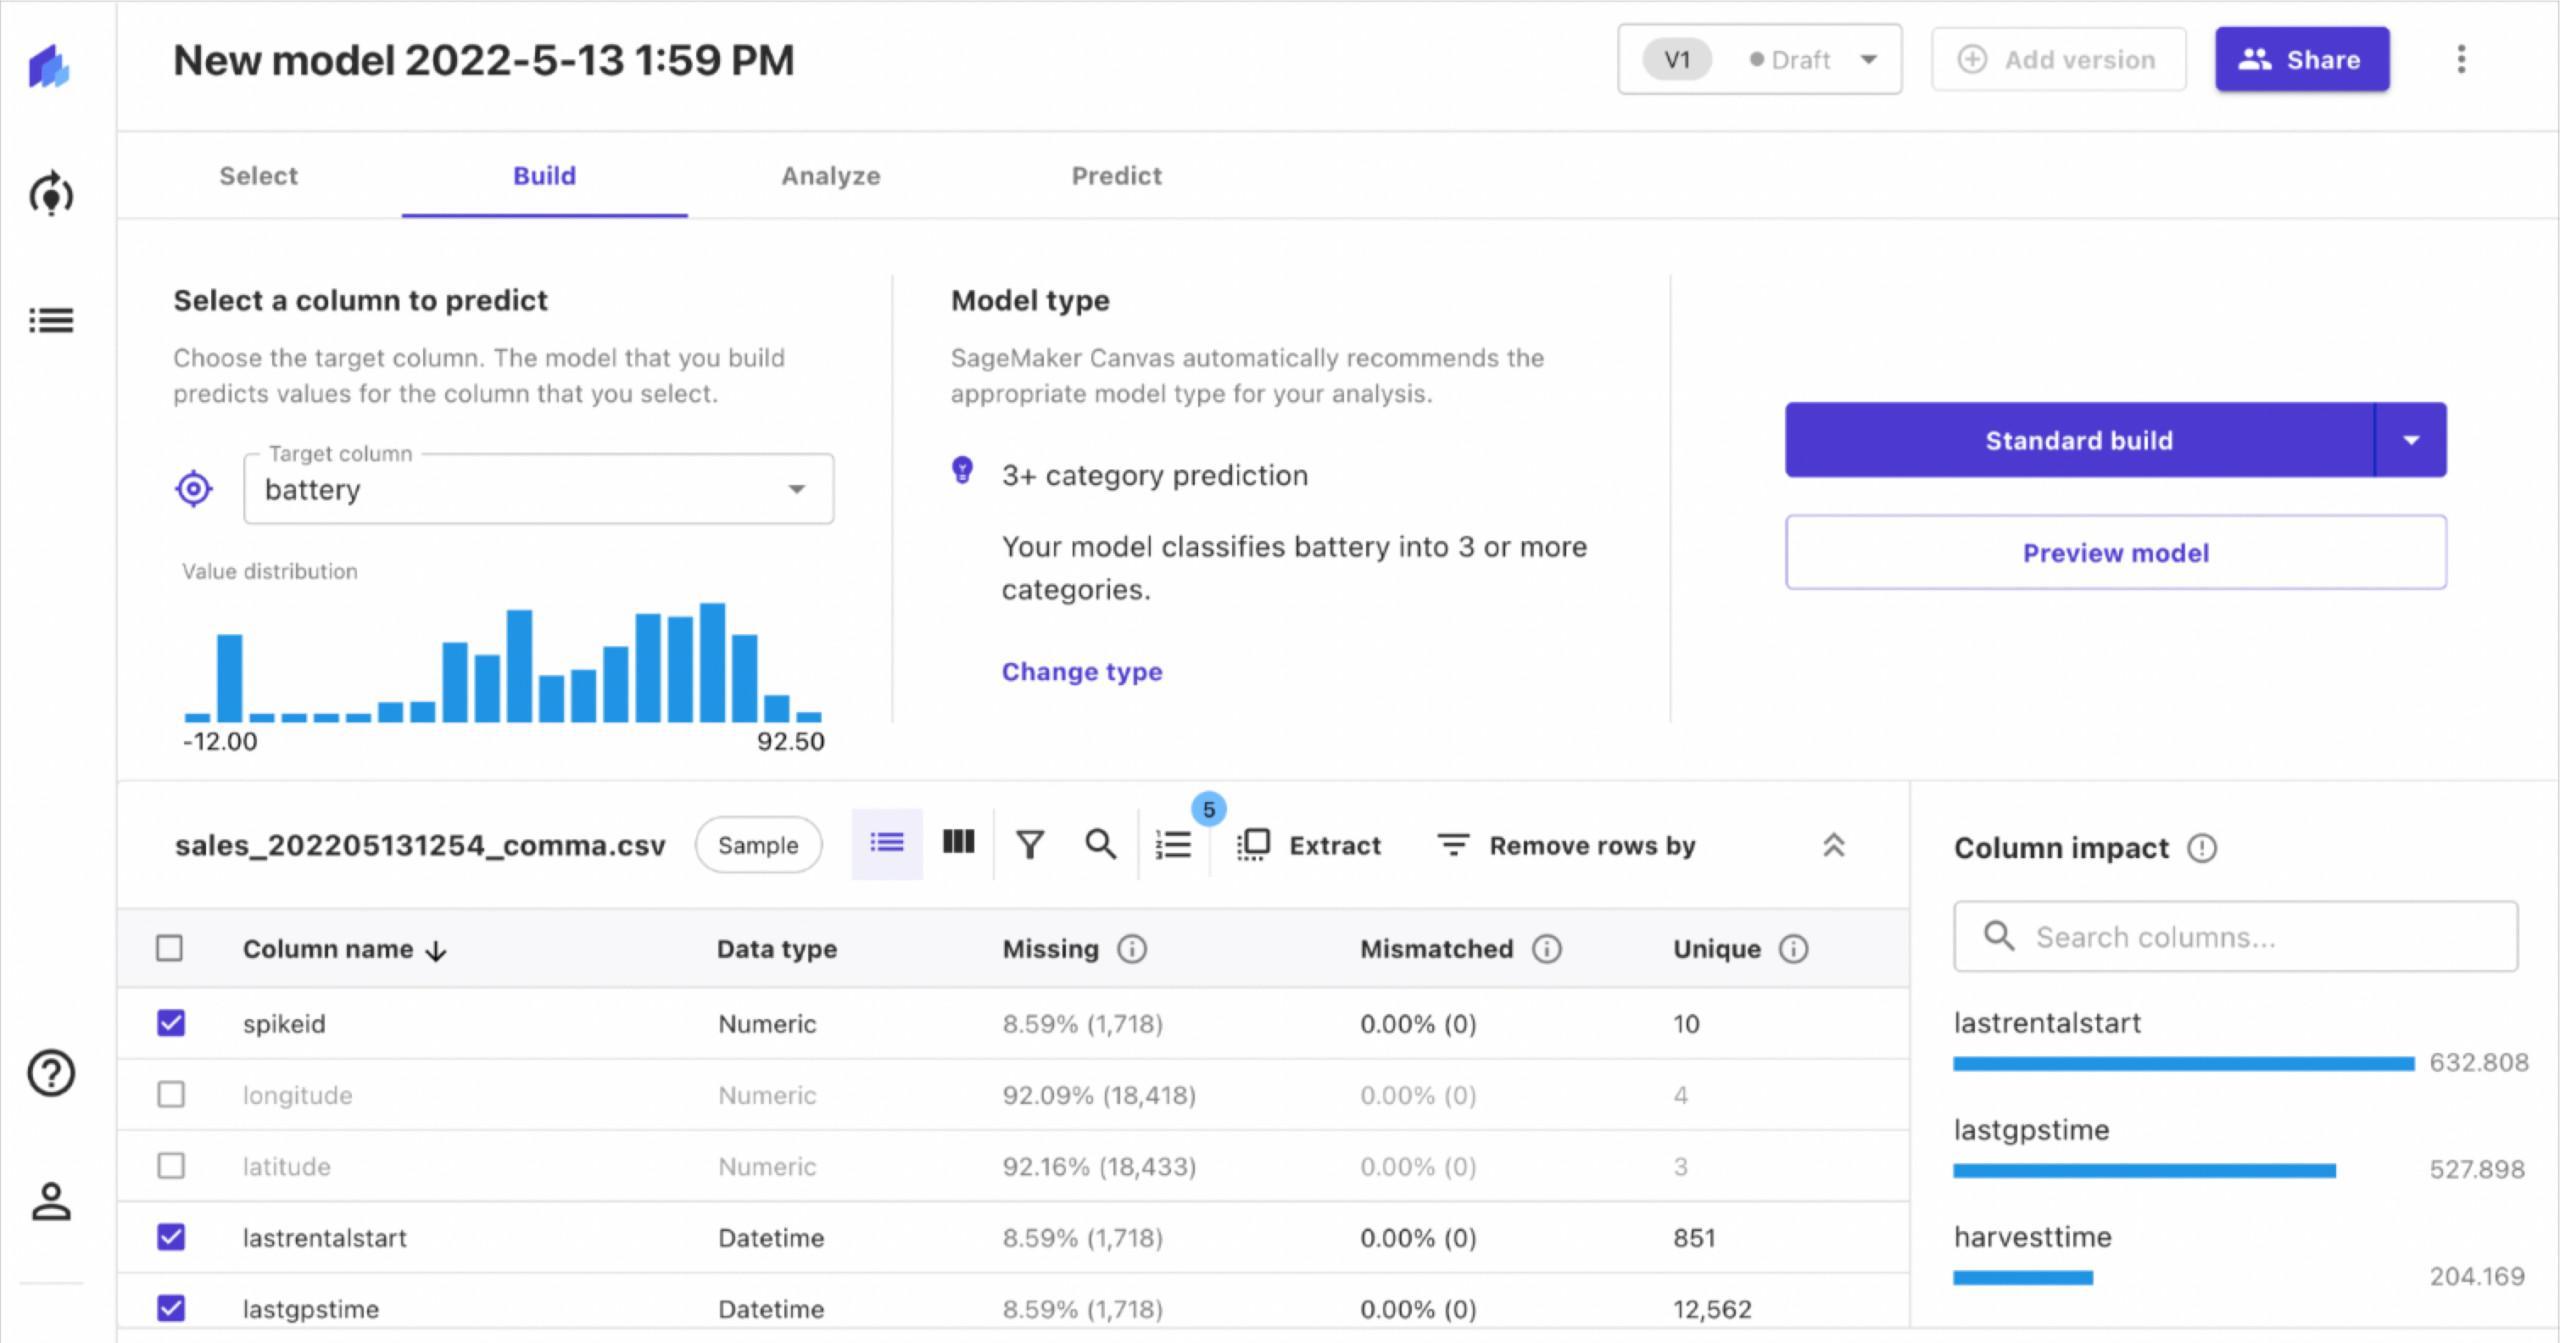
It also shows the impact different features have on the model. Therefore, we can choose to ignore features that have little or no impact.

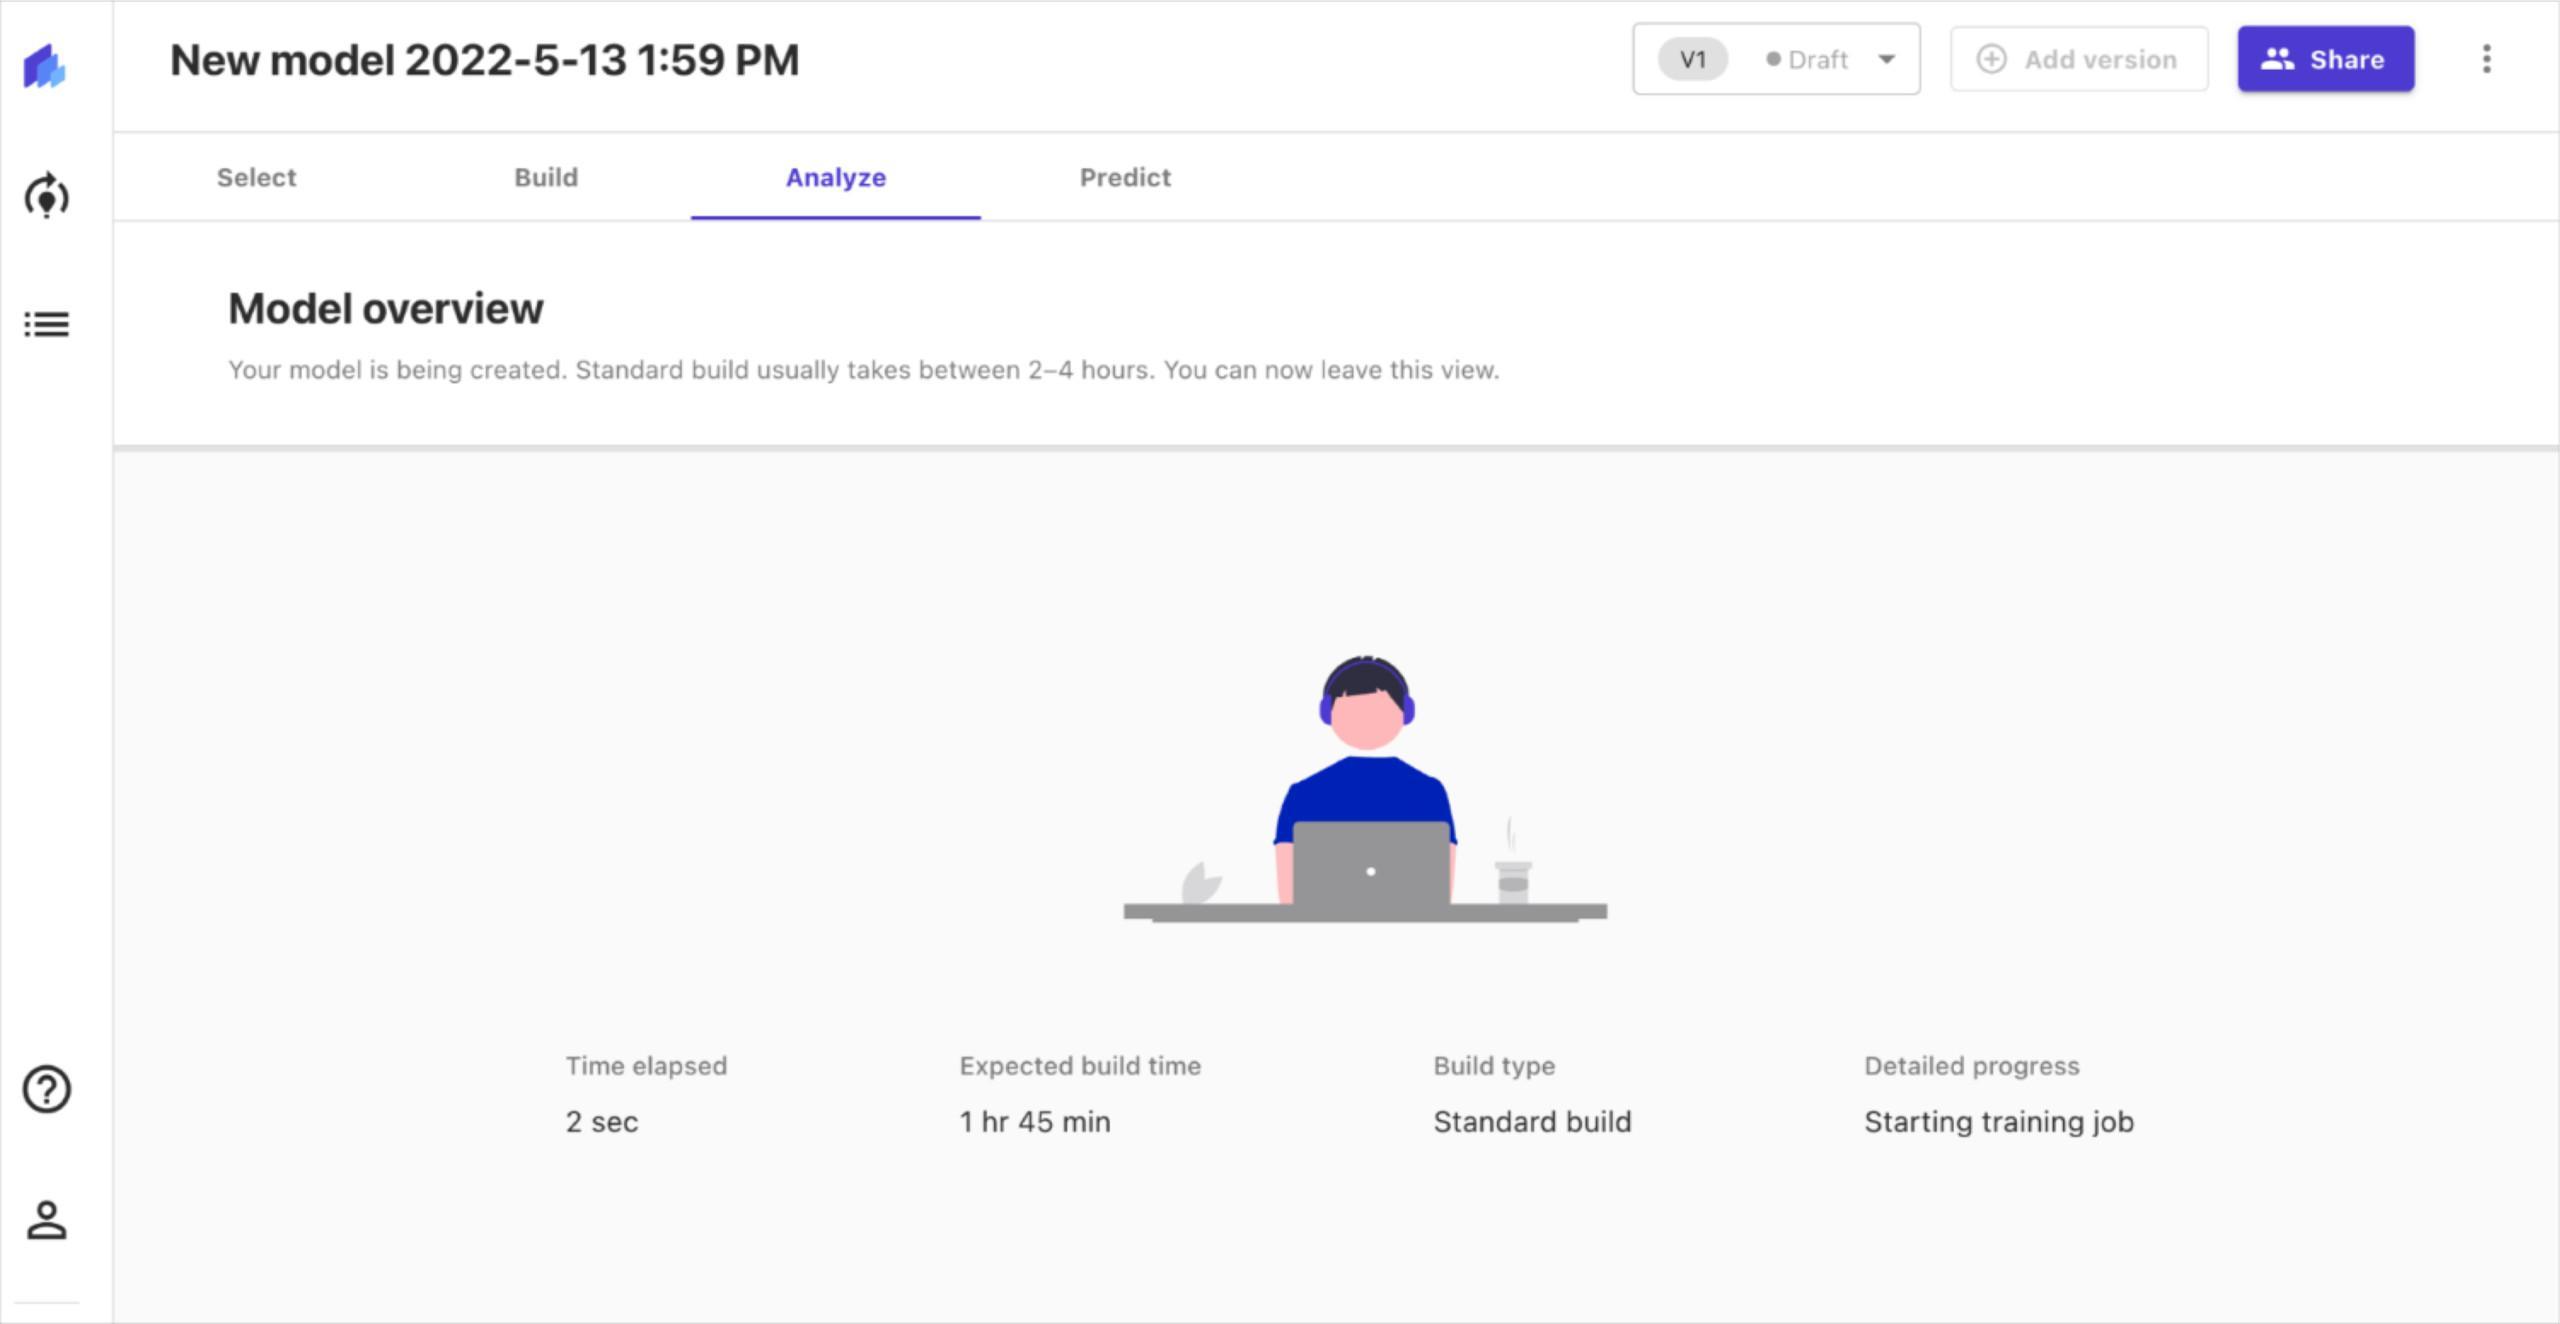
Once we have selected the features we want to analyse, we select “standard build” and begin building the model. Sagemaker trains the dataset with different models along with multiple hyperparameter values for each model. This is done in order to figure out an optimal solution. As a result, the process of building the model takes a long time.

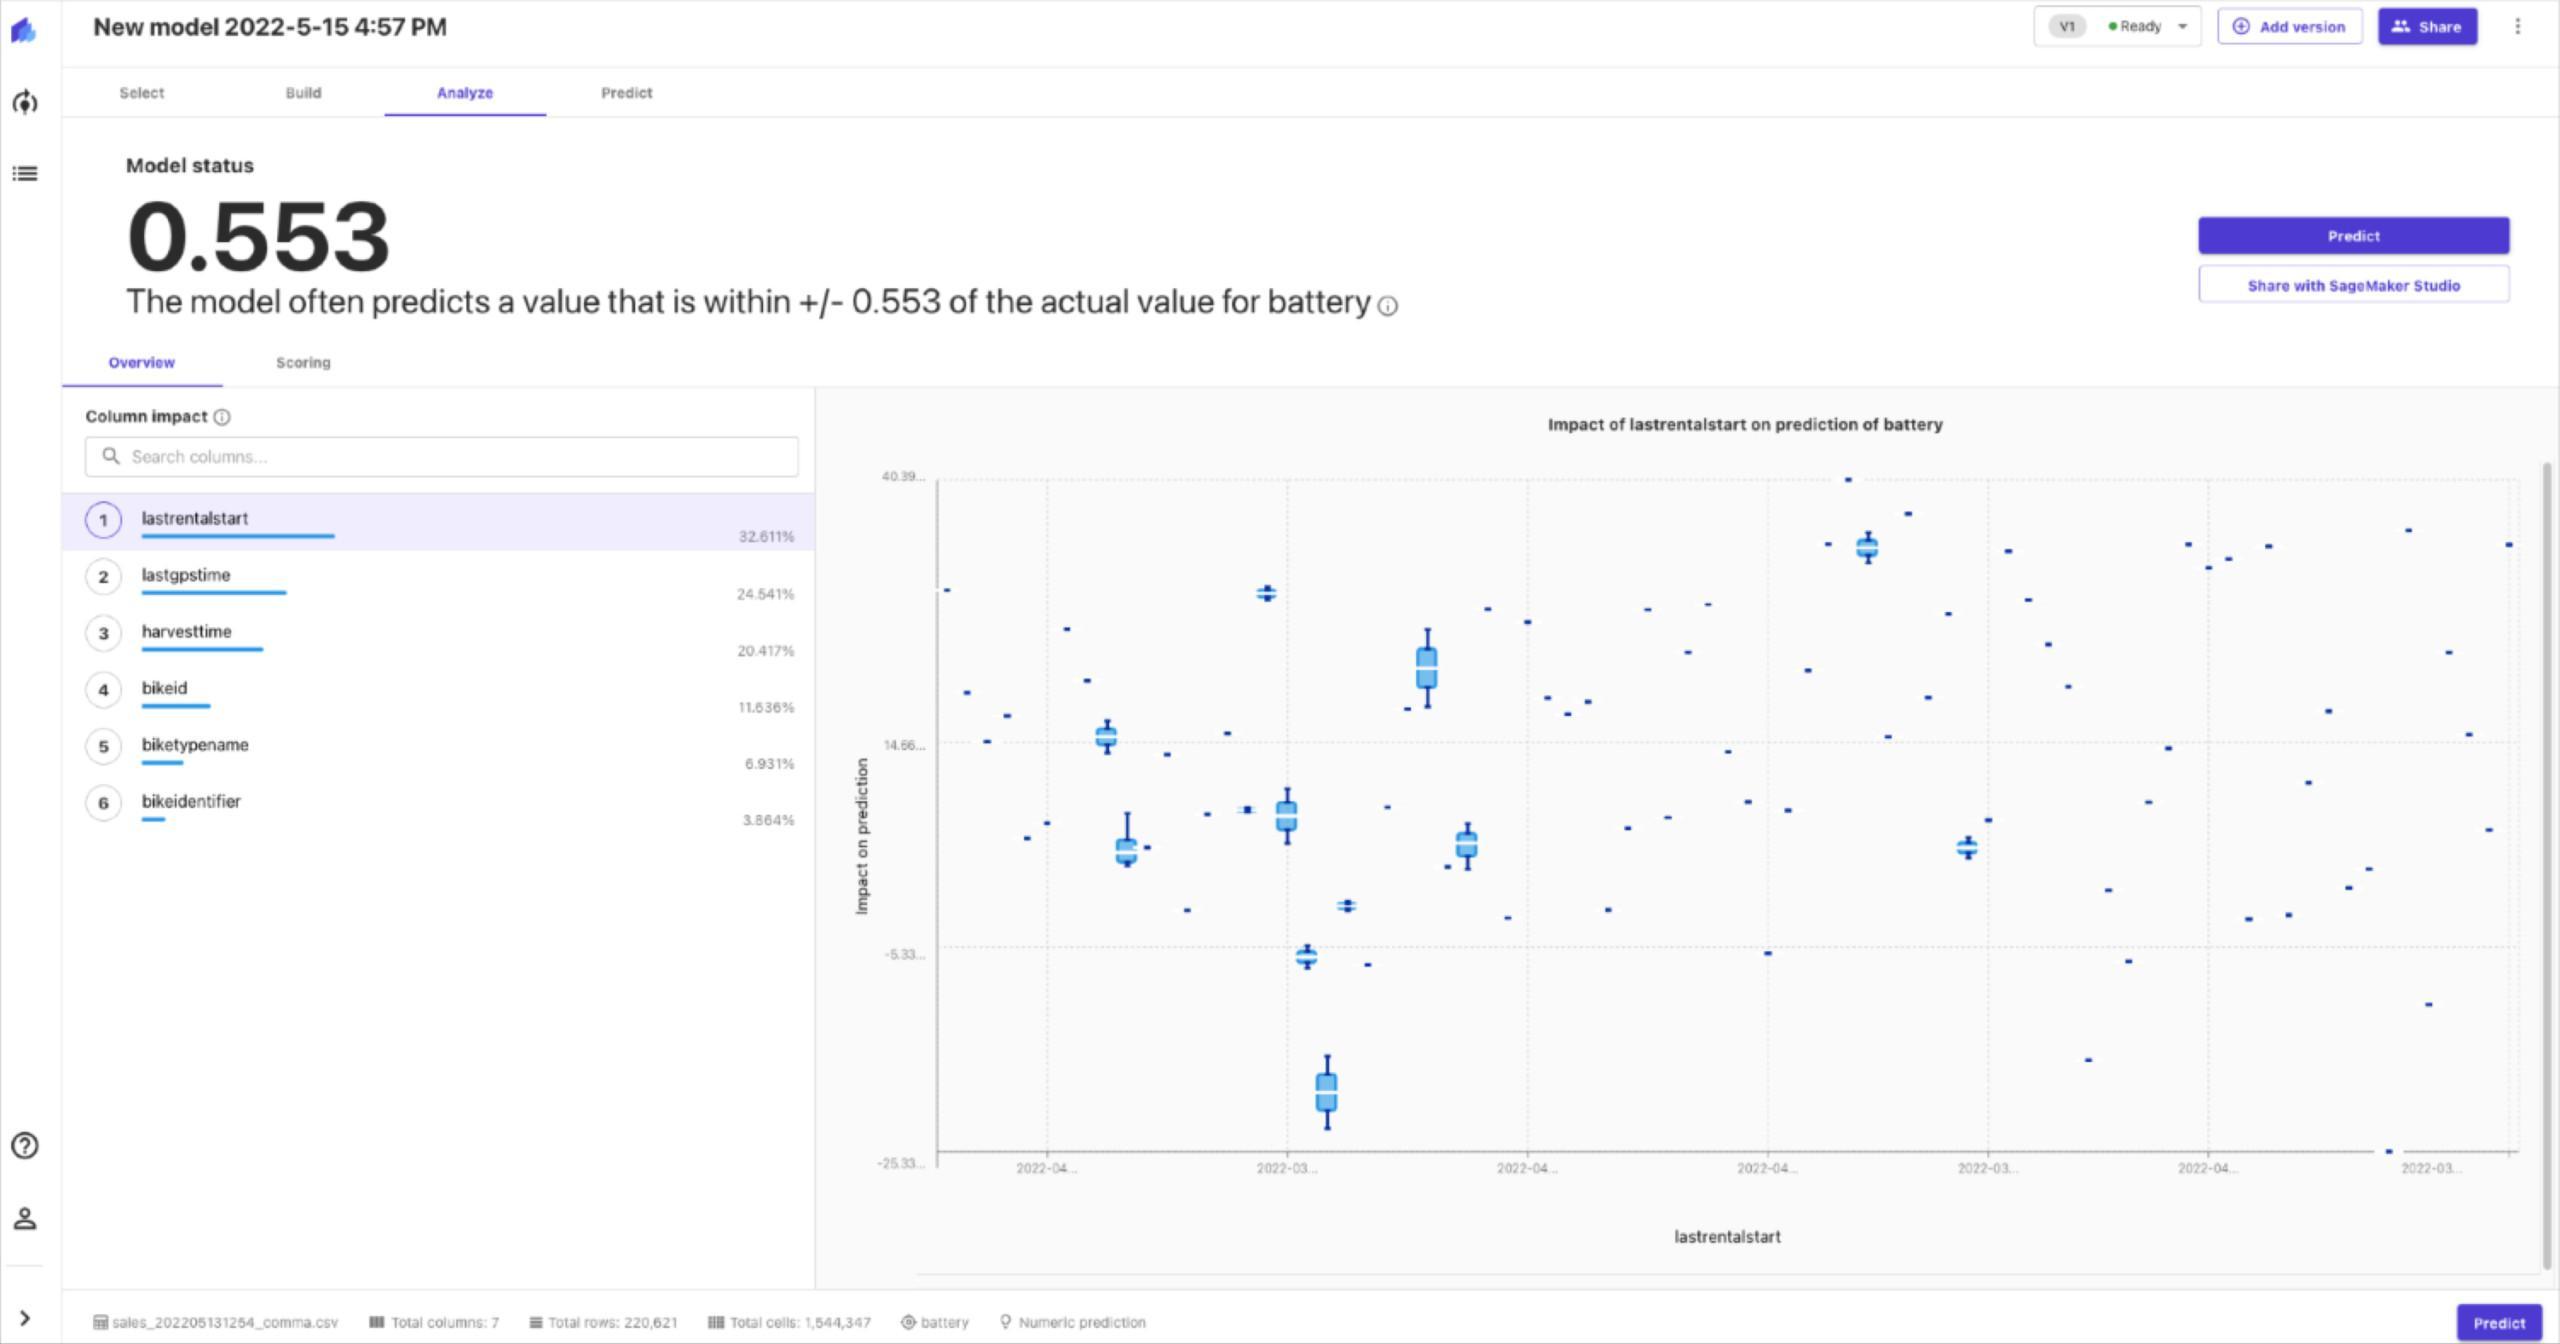
Once the build is complete, you are presented with information about the performance of the model. The model performance can be analysed in further detail with advanced metrics if necessary.

Making predictions

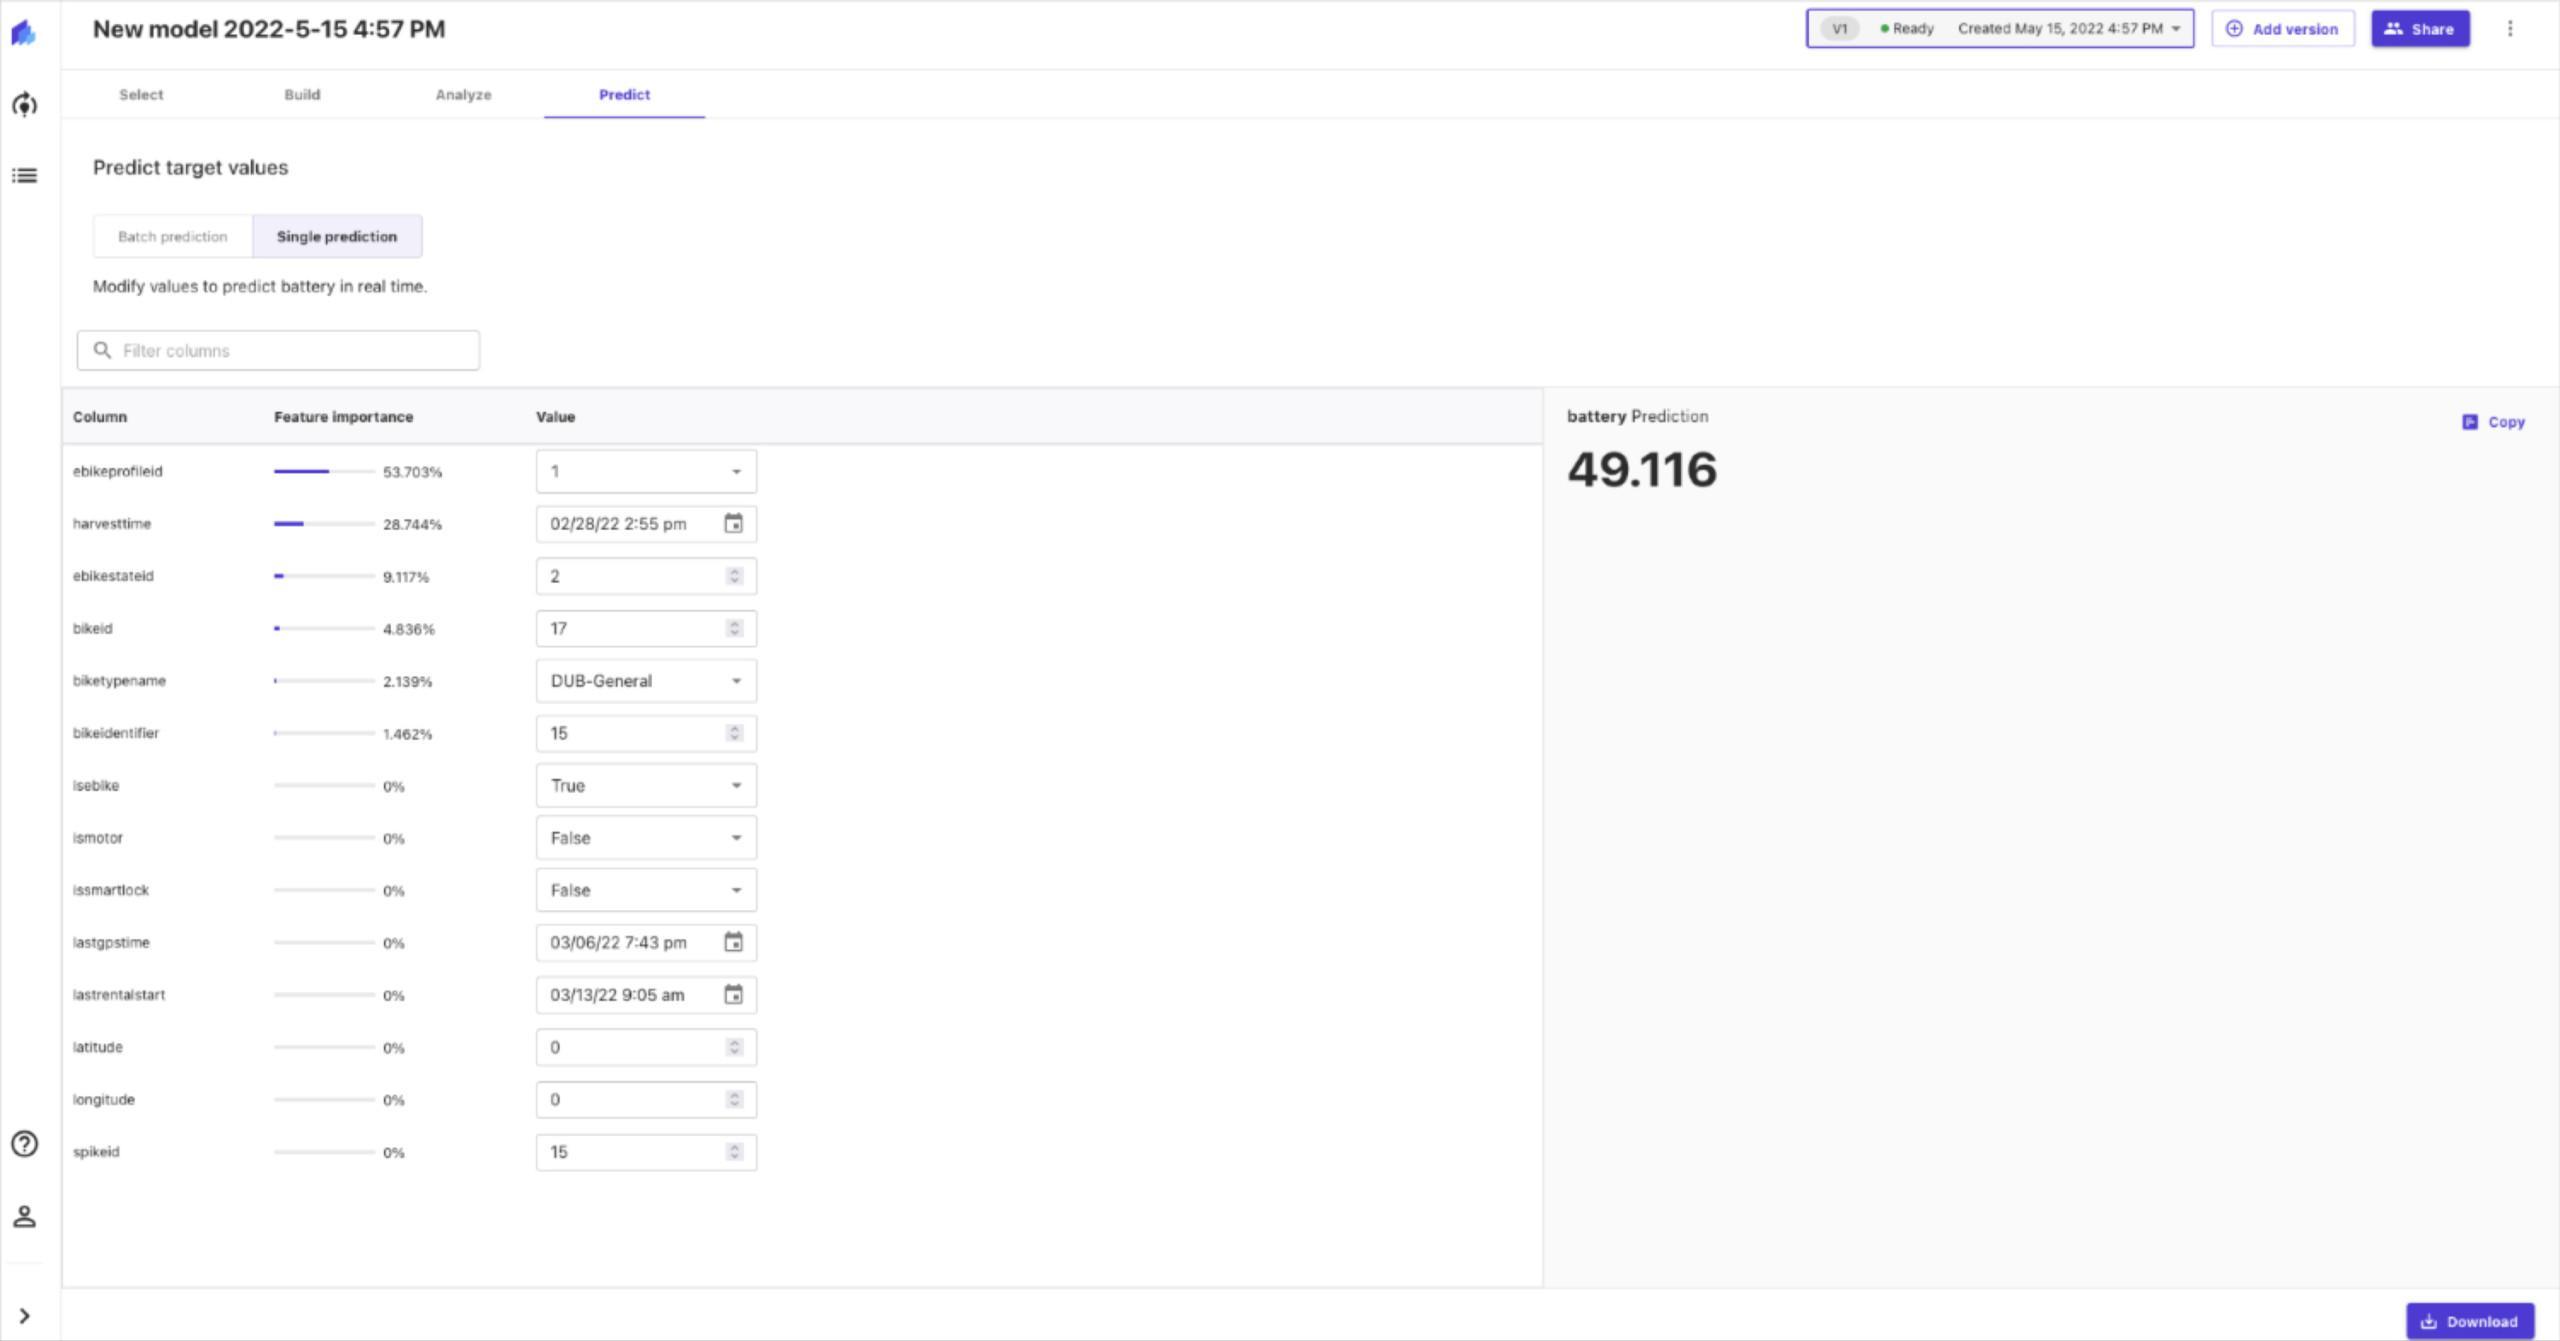
As a final step, we can use the model that was just built to make predictions. We can provide specific values and make a single prediction. We can also provide multiple data in the form of a CSV file and make batch predictions.

If we are satisfied with the model, we can share it to Amazon Sagemaker Studio, for further analysis. Sagemaker Studio is a web-based IDE that can be used for ML development. This is a more advanced ML platform geared towards data scientists to perform complex tasks with Machine Learning models. The model can be deployed and made available through an endpoint. Thereafter, existing systems can use these endpoints to make their predictions.

We will not be going over Sagemaker Studio as it is something that goes beyond AutoML. However, it is important to note that these AutoML cloud platforms are capable of going beyond tabular data. Both Sagemaker and Google AutoML are also capable of working with images, video, as well as text.

Conclusion

While there are many useful applications for AutoML, its simplicity comes with some drawbacks. The main issue that we noticed about AutoML especially with Sagemaker is the lack of flexibility. The platform provides features such as basic filtering, removal, and joining of multiple datasets. However, we could not perform basic derivations such as calculating the distance traveled using the coordinates, or measuring the duration of rentals. All of these should have been simple mathematical derivations based on existing features.

We also noticed issues with flexibility for the classification of battery levels. The ideal approach to this would be to have categories such as “low”, “medium”, and “high”. However, we were not allowed to define these categories or their corresponding threshold values. Instead, the values were chosen by the system automatically.

The main purpose of AutoML is to make Machine Learning available to those who are not experts in the field. As a benefit of this approach, this also becomes useful to people like data scientists. They do not have to spend a large amount of time and effort selecting an optimal model, and hyperparameter tuning.

Experts can make good use of low code AutoML platforms such as Sagemaker to validate any data they have collected. These systems could be utilised as a quick and easy way to produce well-optimised models for new datasets. The models would measure how good the data is. Experts also get an understanding about the type of model and hyperparameters that are best suited for their requirements.


AWS launches major new features for Amazon SageMaker to simplify development of machine learning models

Machine learning continues to grow on AWS and they are putting serious effort on paving the way for customers’ machine learning development journey on AWS cloud. The Andy Jassy keynote in AWS Re:Invent was a fiesta for data scientists with the newly launched Amazon SageMaker features, including Experiments, Debugger, Model Monitor, AutoPilot and Studio.

AWS really aims to make the whole development life cycle of machine learning models as simple as possible for data scientists. With the newly launched features, they are addressing common, effort demanding problems: monitoring your data validity from your model’s perspective and monitoring your model performance (Model Monitor), experimenting multiple machine learning approaches in parallel for your problem (Experiments), enable cost efficiency of heavy model training with automatic rules (Debugger) and following these processes in a visual interface (Studio). These processes can even be orchestrated for you with AutoPilot, that unlike many services is not a black box machine learning solution but provides all the generated code for you. Announced features also included a SSO integrated login to SageMaker Studio and SageMaker Notebooks, a possibility to share notebooks with one click to other data scientists including the needed runtime dependencies and libraries (preview).

Compare and try out different models with SageMaker Experiments

Building a model is an iterative process of trials with different hyperparameters and how they affect the performance of the model. SageMaker Experiments aim to simplify this process. With Experiments, one can create trial runs with different parameters and compare those. It provides information about the hyperparameters and performance for each trial run, regardless of whether a data scientist has run training multiple times, has used automated hyperparameter tuning or has used AutoPilot. It is especially helpful in the case of automating some steps or the whole process, because the amount of training jobs run is typically much higher than with traditional approach.

Experiments makes it easy to compare trials, see what kind of hyperparameters was used and monitor the performance of the models, without having to set up the versioning manually. It makes it easy to choose and deploy the best model to production, but you can also always come back and look at the artifacts of your model when facing problems in production. It also provides more transparency for example to automated hyperparameter tuning and also for new SageMaker AutoPilot. Additionally, SageMaker Experiments has Experiments SDK so it is possible call the API with Python to get the best model programmatically and deploy endpoint for it.

Track issues in model training with SageMaker Debugger

During the training process of your model, many issues may occur that might prevent your model from correctly finishing or learning patterns. You might have, for example, initialized parameters inappropriately or used un efficient hyperparameters during the training process. SageMaker Debugger aims to help tracking issues related to your model training (unlike the name indicates, SageMaker Debugger does not debug your code semantics).

When you enable debugger in your training job, it starts to save the internal model state into S3 bucket during the training process. A state consists of for example weights for neural network, accuracies and losses, output of each layer and optimization parameters. These debug outputs will be analyzed against a collection of rules while the training job is executed. When you enable Debugger while running your training job in SageMaker, will start two jobs: a training job, and a debug processing job (powered by Amazon SageMaker Processing Jobs), which will run in parallel and analyze state data to check if the rule conditions are met. If you have, for example, an expensive and time consuming training job, you can set up a debugger rule and configure a CloudWatch alarm to it that kills the job once your rules trigger, e.g. loss has converged enough.

For now, the debugging framework of saving internal model states supports only TensorFlow, Keras, Apache MXNet, PyTorch and XGBoost. You can also configure your own rules that analyse model states during the training, or some preconfigured ones such as loss not changing or exploding/vanishing gradients. You can use the debug feature visually through the SageMaker Studio or alternatively through SDK and configure everything to it yourself.

Keep your model up-to-date with SageMaker Model Monitor

Drifts in data might have big impact on your model performance in production, if your training data and validation data start to have different statistical properties. Detecting those drifts requires efforts, like setting up jobs that calculate statistical properties of your data and also updating those, so that your model does not get outdated. SageMaker Model Monitor aims to solve this problem by tracking the statistics of incoming data and aims to ensure that machine learning models age well.

The Model Monitor forms a baseline from the training data used for creating a model. Baseline information includes statistics of the data and basic information like name and datatype of features in data. Baseline is formed automatically, but automatically generated baseline can be changed if needed. Model Monitor then continuously collects input data from deployed endpoint and puts it into a S3 bucket. Data scientists can then create own rules or use ready-made validations for the data and schedule validation jobs. They can also configure alarms if there are deviations from the baseline. These alarms and validations can indicate that the model deployed is actually outdated and should be re-trained.

SageMaker Model Monitor makes monitoring the model quality very easy but at the same time data scientists have the control and they can customize the rules, scheduling and alarms. The monitoring is attached to an endpoint deployed with SageMaker, so if inference is implemented in some other way, Model Monitor cannot be used. SageMaker endpoints are always on, so they can be expensive solution for cases when predictions are not needed continuously.

Start from scratch with SageMaker AutoPilot

SageMaker AutoPilot is an autoML solution for SageMaker. SageMaker has had automatic hyperparameter tuning already earlier, but in addition to that, AutoPilot takes care of preprocessing data and selecting appropriate algorithm for the problem. This saves a lot of time of preprocessing the data and enables building models even if you’re not sure which algorithm to use. AutoPilot supports linear learner, factorization machines, KNN and XGBboost at first, but other algorithms will be added later.

Running an AutoPilot job is as easy as just specifying a csv-file and response variable present in the file. AWS considers that models trained by SageMaker AutoPilot are white box models instead of black box, because it provides generated source code for training the model and with Experiments it is easy to view the trials AutoPilot has run.

SageMaker AutoPilot automates machine learning model development completely. It is yet to be seen if it improves the models, but it is a good sign that it provides information about the process. Unfortunately, the description of the process can only be viewed in SageMaker Studio (only available in Ohio at the moment). Supported algorithms are currently quite limited as well, so the AutoPilot might not provide the best performance possible for some problems. In practice running AutoPilot jobs takes a long time, so the costs of using AutoPilot might be quite high. That time is of course saved from data scientist’s working time. One possibility is, for example, when approaching a completely new data set and problem, one might start by launching AutoPilot and get a few models and all the codes as template. That could serve as a kick start to iterating your problem by starting from tuning the generated code and continuing development from there, saving time from initial setup.

SageMaker Studio – IDE for data science development

The launched SageMaker Studio (available in Ohio) is a fully integrated development environment (IDE) for ML, built on top of Jupyter lab. It pulls together the ML workflow steps in a visual interface, with it’s goal being to simplify the iterative nature of ML development. In Studio one can move between steps, compare results and adjust inputs and parameters.  It also simplifies the comparison of models and runs side by side in one visual interface.

Studio seems to nicely tie the newly launched features (Experiments, Debugger, Model Monitor and Autopilot) into a single web page user interface. While these new features are all usable through SDKs, using them through the visual interface will be more insightful for a data scientist.

Conclusion

These new features enable more organized development of machine learning models, moving from notebooks to controlled monitoring and deployment and transparent workflows. Of course several actions enabled by these features could be implemented elsewhere (e.g. training job debugging, or data quality control with some scheduled smoke tests), but it requires again more coding and setting up infrastructure. The whole public cloud journey of AWS has been aiming to simplify development and take load away by providing reusable components and libraries, and these launches go well with that agenda.

Building machine learning models with AWS SageMaker

A small group of Solita employees visited AWS London office last November and participated in a workshop. There we got to know the AWS service called SageMaker. SageMaker turned out to be easy to learn and use and in this blog post I'm going to tell more about it and demonstrate with short code snippets how it works.

AWS SageMaker

SageMaker is an Amazon service that was designed to build, train and deploy machine learning models easily. For each step there are tools and functions that make the development process faster. All the work can be done in Jupyter Notebook, which has pre-installed packages and libraries such as Tensorflow and pandas. One can easily access data in their S3 buckets from SageMaker notebooks, too. SageMaker provides multiple example notebooks so that getting started is very easy. I introduce more information about different parts of SageMaker in this blog post and the picture below summarises how they work together with different AWS services.

Picture of how SageMake interacts with other AWS services during build, train and deploy phase

Dataset

In the example snippets I use the MNIST dataset which contains labeled pictures of alphabets in sign language. They are 28×28 grey-scale pictures, which means each pixel is represented as an integer value between 0-255. Training data contains 27 455 pictures and test data 7 127 pictures and they’re stored in S3.

For importing and exploring the dataset I simply use pandas libraries. Pandas is able to read data from S3 bucket:

import pandas as pd

bucket = ''
file_name = 'data-file.csv'

data_location = 's3://{}/{}'.format(bucket, file_name)

df = pd.read_csv(data_location)

From the dataset I can see that its first column is a label for picture, and the remaining 784 columns are pixels. By reshaping the first row I can get the first image:

from matplotlib import pyplot as plt
pic=df.head(1).values[0][1:].reshape((28,28))

plt.imshow(pic, cmap='gray')

plt.show()

Image with alphabet d in sign language

Build

The build phase in AWS SageMaker means exploring and cleaning the data. Keeping it in csv format would require some changes to data if we’d like to use SageMaker built-in algorithms. Instead, we’ll convert the data into RecordIO protobuf format, which makes built-in algorithms more efficient and simple to train the model with. This can be done with the following code and should be done for both training and test data:

from sagemaker.amazon.common import write_numpy_to_dense_tensor
import boto3

def convert_and_upload(pixs, labels, bucket_name, data_file):
	buf = io.BytesIO()
	write_numpy_to_dense_tensor(buf, pixs, labels)
	buf.seek(0)

	boto3.resource('s3').Bucket(bucket_name).Object(data_file).upload_fileobj(buf)

pixels_train=df.drop('label', axis=1).values
labels_train=df['label'].values

convert_and_upload(pixels_train, labels_train, bucket, 'sign_mnist_train_rec')

Of course, in this case the data is very clean already and usually a lot more work is needed in order to explore and clean it properly before it can be used to train a model. Data can also be uploaded back to S3 after the cleaning phase for example if cleaning and training are kept in separate notebooks. Unfortunately, SageMaker doesn’t provide tools for exploring and cleaning data, but pandas is very useful for that.

Train

Now that the data is cleaned, we can either use SageMaker’s built-in algorithms or use our own, provided by for example sklearn. When using other than SageMaker built-in algorithms you would have to provide a Docker container for the training and validation tasks. More information about it can be found in SageMaker documentation. In this case as we want to recognise alphabets from the pictures we use k-Nearest Neighbors -algorithm which is simple and fast algorithm for classification tasks. It is one of the built-in algorithms in SageMaker, and can be used with very few lines of code:

knn=sagemaker.estimator.Estimator(get_image_uri(
	boto3.Session().region_name, "knn"),
	get_execution_role(),
	train_instance_count=1,
	train_instance_type='ml.m4.xlarge',
	output_path='s3://{}/output'.format(bucket),
	sagemaker_session=sagemaker.Session())

knn.set_hyperparameters(**{
	'k': 10,
	'predictor_type': 'classifier',
	'feature_dim': 784,
	'sample_size': 27455
})

in_config_test = sagemaker.s3_input(
	   s3_data='s3://{}/{}'.format(bucket,'sign_mnist_test_rec'))

in_config_train = sagemaker.s3_input(
	   s3_data='s3://{}/{}'.format(bucket,'sign_mnist_train_rec'))

knn.fit({'train':in_config_train, 'test': in_config_test})

So let’s get into what happens there. Estimator is an interface for creating training tasks in SageMaker. We simply tell it which algorithm we want to use, how many ML instances we want for training, which type of instances they should be and where the trained model should be stored.

Next we define hyperparameters for the algorithm, in this case k-Nearest Neighbors classifier. Instead of the classifier we could have a regressor for some other type of machine learning task. Four parameters shown in the snippet are mandatory, and the training job will fail without them.  By tuning hyperparameters the accuracy of the model can be improved. SageMaker also provides automated hyperparameter tuning but we won’t be using them in this example.

Finally we need to define the path to the training data. We do it by using Channels which are just named input sources for training algorithms. In this case as our data is in S3, we use s3_input class. Only the train channel is required, but if a test channel is given, too, the training job also measures the accuracy of the resulting model. In this case I provided both.

For kNN-algorithm the only allowed datatypes are RecordIO protobuf and CSV formats. If we were to use CSV format, we would need to define it in configuration by defining the named parameter content_type and assigning ‘text/csv;label_size=0’ as value. As we use RecordIO protobuf type, only s3_data parameter is mandatory. There are also optional parameters for example for shuffling data and for defining whether the whole dataset should be replicated in every instance as a whole. When the fit-function is called, SageMaker creates a new training job and logs its the training process and duration into the notebook. Past training jobs with their details can be found by selecting ‘Training jobs’ in the SageMaker side panel. There you can find given training/test data location and find information about model accuracy and logs of the training job.

Deploy

The last step on our way to getting predictions from the trained model is to set up an endpoint for it. This means that we automatically set up an endpoint for real-time predictions and deploy trained model for it to use. This will create a new EC2 instance which will take data as an input and provide prediction as a response. The following code is all that is needed for creating an endpoint and deploying the model for it:

import time

def get_predictor(knn_estimator, estimator_name, instance_type, endpoint_name=None): 
    knn_predictor = knn_estimator.deploy(initial_instance_count=1, instance_type=instance_type,
                                        endpoint_name=endpoint_name)
    knn_predictor.content_type = 'text/csv'
    return knn_predictor


instance_type = 'ml.m5.xlarge'
model_name = 'knn_%s'% instance_type
endpoint_name = 'knn-ml-%s'% (str(time.time()).replace('.','-'))
predictor = get_predictor(knn, model_name, instance_type, endpoint_name=endpoint_name)

and it can be called for example in the following way:

file = open("path_to_test_file.csv","rb")

predictor.predict(file)

which would return the following response:

b'{"predictions": [{"predicted_label": 6.0}, {"predicted_label": 3.0}, {"predicted_label": 21.0}, {"predicted_label": 0.0}, {"predicted_label": 3.0}]}'

In that case we got five predictions, because the input file contains five pictures. In a real life case we could use API Gateway and Lambda functions for providing interface for real-time predictions. The Lambda function can use boto3 library to connect to the created endpoint and fetch a prediction. In the API gateway we can setup an API that calls the lambda function once it gets a POST request and returns the prediction in response.

Conclusions

AWS SageMaker is a very promising service that allows reading data, training a model and deploying the endpoint with less than a hundred lines of code. It provides many good functions for training but also allows using Docker for custom training jobs. Jupyter Notebook is familiar tool to data scientists, so it’s very nice that it is used in SageMaker. SageMaker also integrates very easily with other AWS Services and allocating resources for training and endpoints is very easy. The machine learning algorithms are optimised for AWS, so their performance is very high.

The amount of code needed for training a model is not the biggest challenge in a data scientist’s everyday job, though. There are already very good libraries for that purpose, and one of the most time consuming part is usually cleaning and altering the data so that it can be used for training. For that SageMaker doesn’t provide help.

All in all, optimised algorithms, automated hyperparameter tuning, easy integration and interaction with other AWS services saves a lot time and trouble for data scientists. Trying out SageMaker is definitely worthwhile.