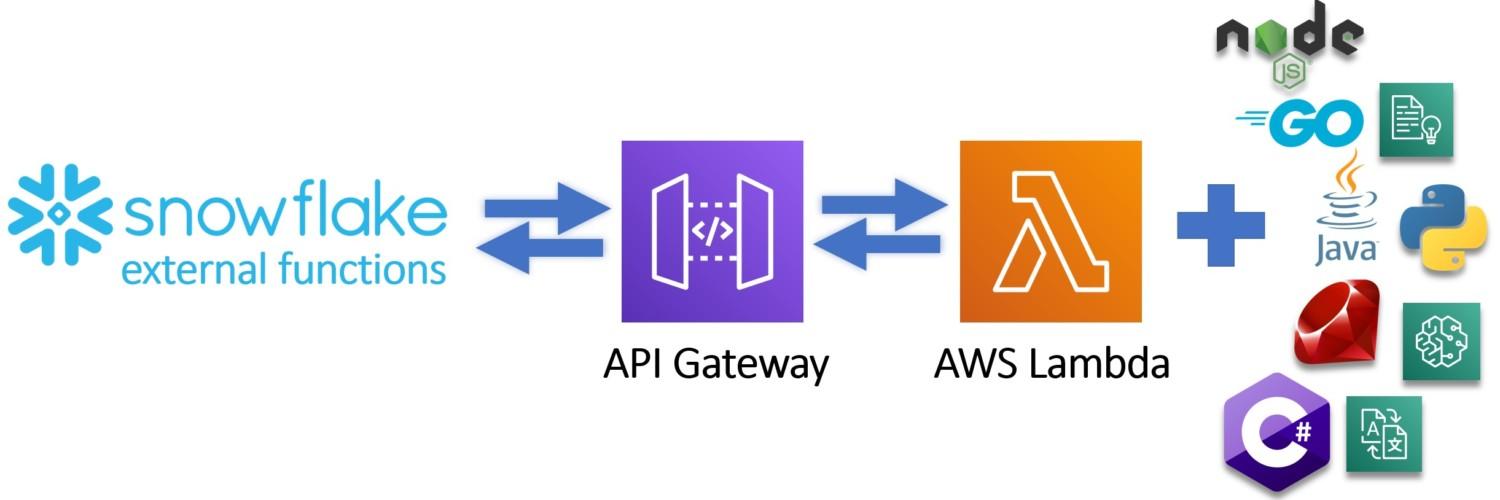
Snowflake external functions, Part 1 – Hello World tutorial for triggering AWS Lambda

This tutorial is a hands-on Hello World introduction and tutorial to external functions in Snowflake and shows how to trigger basic Python code inside AWS Lambda

External functions are new functionality published by Snowflake and already available for all accounts as a preview feature. With external functions, it is now possible to trigger for example Python, C#, Node.js code or native cloud services as part of your data pipeline using simple SQL.

I will publish two blog posts explaining what external functions are in Snowflake, show how to trigger basic Hello World Python code in AWS Lambda with the result showing in Snowflake and finally show how you can trigger Amazon services like Translate and Comprehend using external functions and enable concrete use cases for external functions.

In this first blog post, I will focus on the showing on how you can set up your first external function and trigger Python code which echoes your input result back to Snowflake.

What external functions are?

At the simplest form, external functions are scalar functions which return values based on the input. Under the hood, they are much more. Compared to traditional scalar SQL function where you are limited using SQL, external functions open up the possibility to use for example Python, C# or Go as part of your data pipelines. You can also leverage third-party services and call for example Amazon services if they support the set requirements. To pass the requirements, the external function must be able to accept JSON payload and return JSON output. The external function must also be accessed through HTTPS endpoint.

Example – How to trigger AWS Lambda -function

This example follows instructions from Snowflake site and shows you in more detail on how you can trigger Python code running on AWS Lambda using external functions like illustrated below.
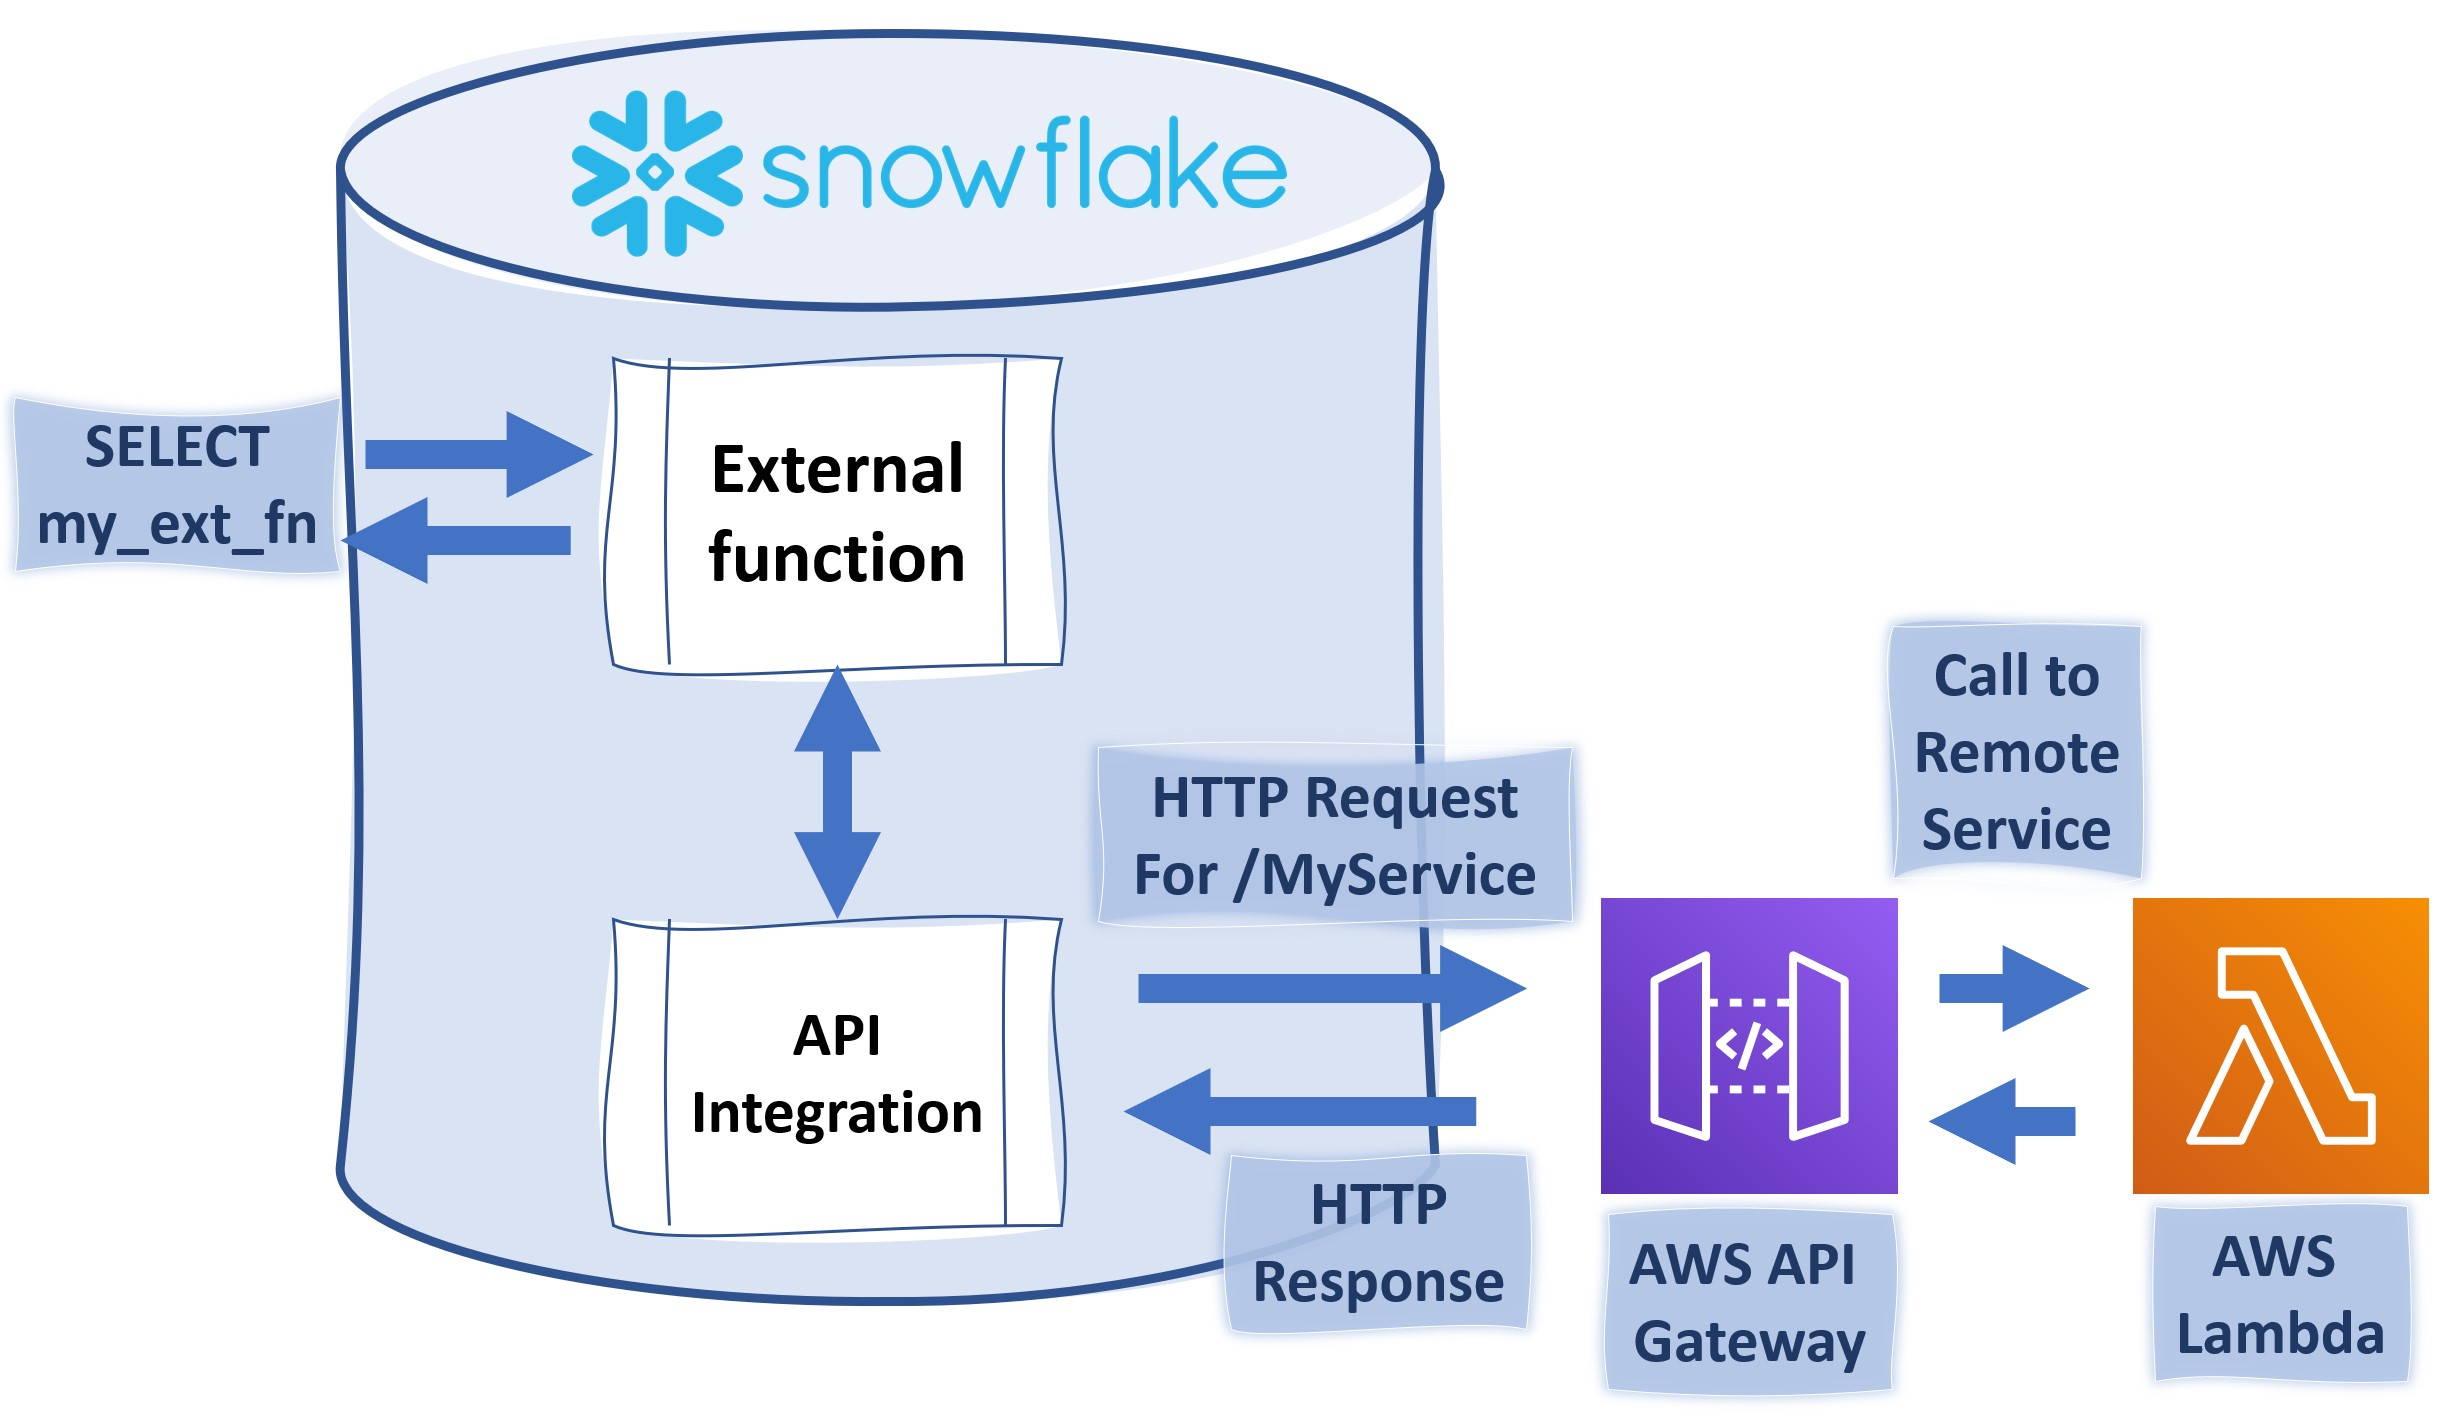
Snowflake External Functions

To complete this example, you will need to have AWS account where you have the necessary rights to create AWS IAM (Identity and Access Management) roles, API Gateway endpoints and Lambda -functions. You will need also a Snowflake ACCOUNTADMIN -privileges or role which has CREATE INTEGRATION rights.

These instructions consist of the following chapters.

  • Creating a remote service (Lambda Function on AWS)
  • Creating an IAM role for Snowflake use
  • Creating a proxy service on AWS API Gateway.
  • Securing AWS API Gateway Proxy
  • Creating an API Integration in Snowflake.
  • Setting up trust between Snowflake and IAM role
  • Creating an external function in Snowflake.
  • Calling the external function.

These instructions are written for a person who has some AWS knowledge as the instructions will not explain the use of services. We will use the same template as the Snowflake instruction to record authentication-related information. Having already done a few external function integrations, I highly recommend using this template.

Cloud Platform (IAM) Account Id: _____________________________________________
Lambda Function Name...........: _____________________________________________
New IAM Role Name..............: _____________________________________________
Cloud Platform (IAM) Role ARN..: _____________________________________________
Proxy Service Resource Name....: _____________________________________________
Resource Invocation URL........: _____________________________________________
Method Request ARN.............: _____________________________________________
API_AWS_IAM_USER_ARN...........: _____________________________________________
API_AWS_EXTERNAL_ID............: _____________________________________________

Creating a remote service (Lambda Function on AWS)

Before we create Lambda function we will need to obtain our AWS platform id. The easiest way to do this is to open AWS console and open “Support Center” under “Support” on the far right.

This will open a new window which will show your AWS platform id.

Record this 12-digit number into template shared previously. Now we will create a basic Lambda -function for our use. From the main console search Lambda

Once you have started Lambda, create a new function called snowflake_test using Python 3.7 runtime. For the execution role, select the option where you create a new role with basic Lambda permissions.

After pressing the “Create function” button, you should be greeted with the following view where you can paste the example code. The example code will echo the input provided and add text to confirm that the Snowflake to AWS connection is working. You can consider this as a Hello World -type of example which can be leveraged later on.

Snowflake External Functions

Copy-paste following Python code from my Github account into Function code view. We can test the Python code with following test data which should create following end result:

After testing the Lambda function we can move into creating an IAM role which is going to be used by Snowflake.

Creating an IAM role for Snowflake use

Creating an IAM role for Snowflake use is a straight forward job. Open up the Identity and Access Management (IAM) console and select “Roles” from right and press “Create role”.

You should be greeted with a new view where you can define which kind of role you want to create. Create a role which has Another AWS account as a trusted entity. In the box for Account ID, give the same account id which was recorded earlier in the instructions.

Name the new role as snowflake_role and record the role name into the template. Record also the role ARN.

Creating a proxy service on AWS API Gateway

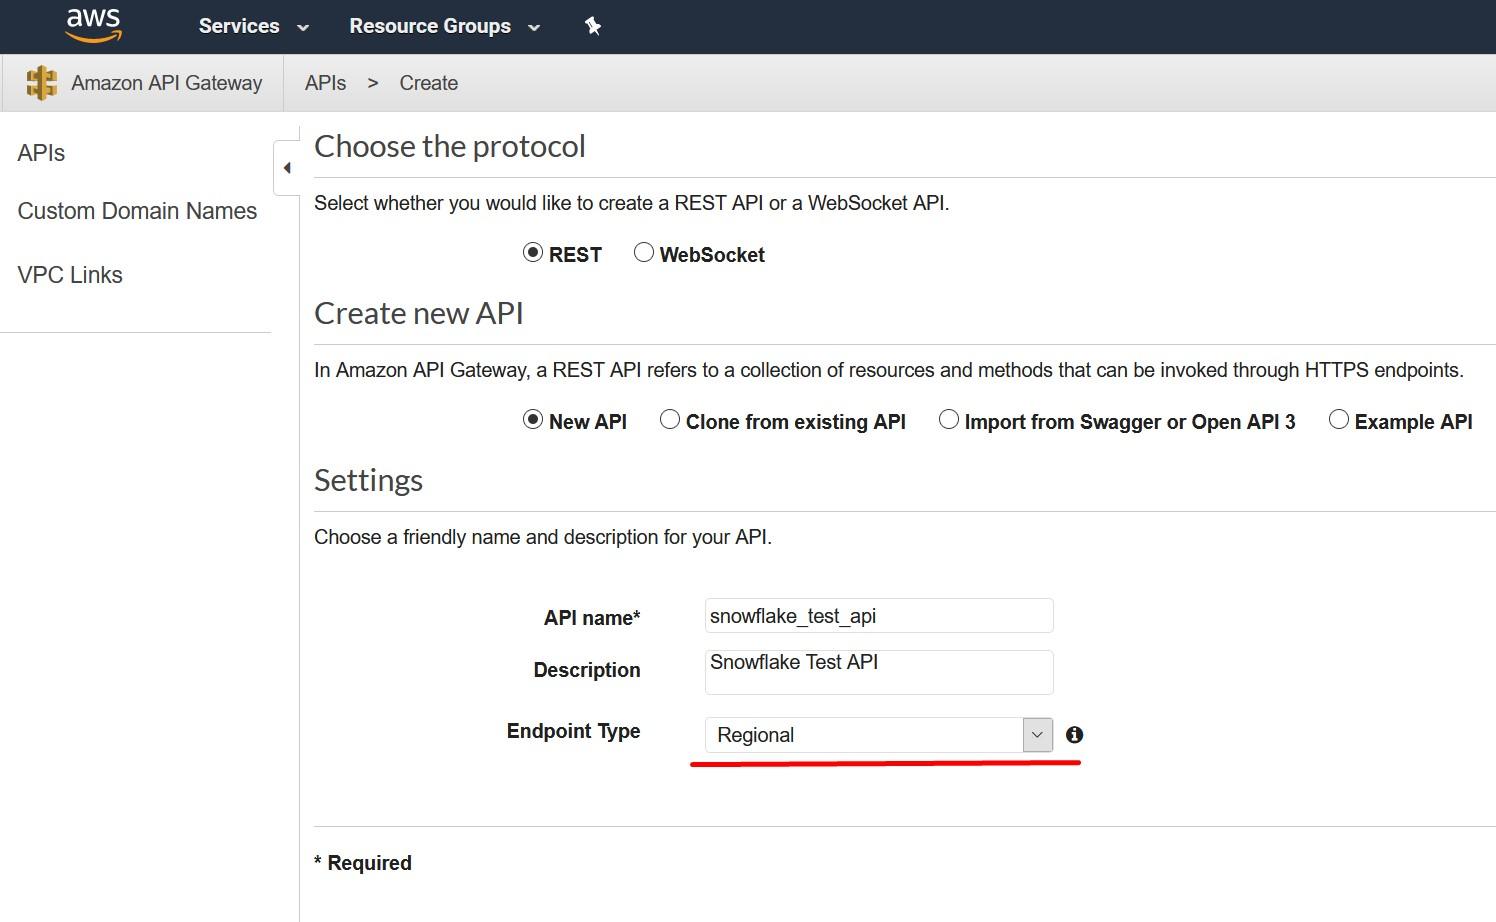
Create an API Gateway endpoint to be used. Snowflake will use this API endpoint to contact the Lambda -service which we created earlier. To create this, choose API Gateway service from the AWS console and select “Create API”. Call this new API snowflake_test_api and remember to select “Regional” as the endpoint type as currently, they are the only supported type.
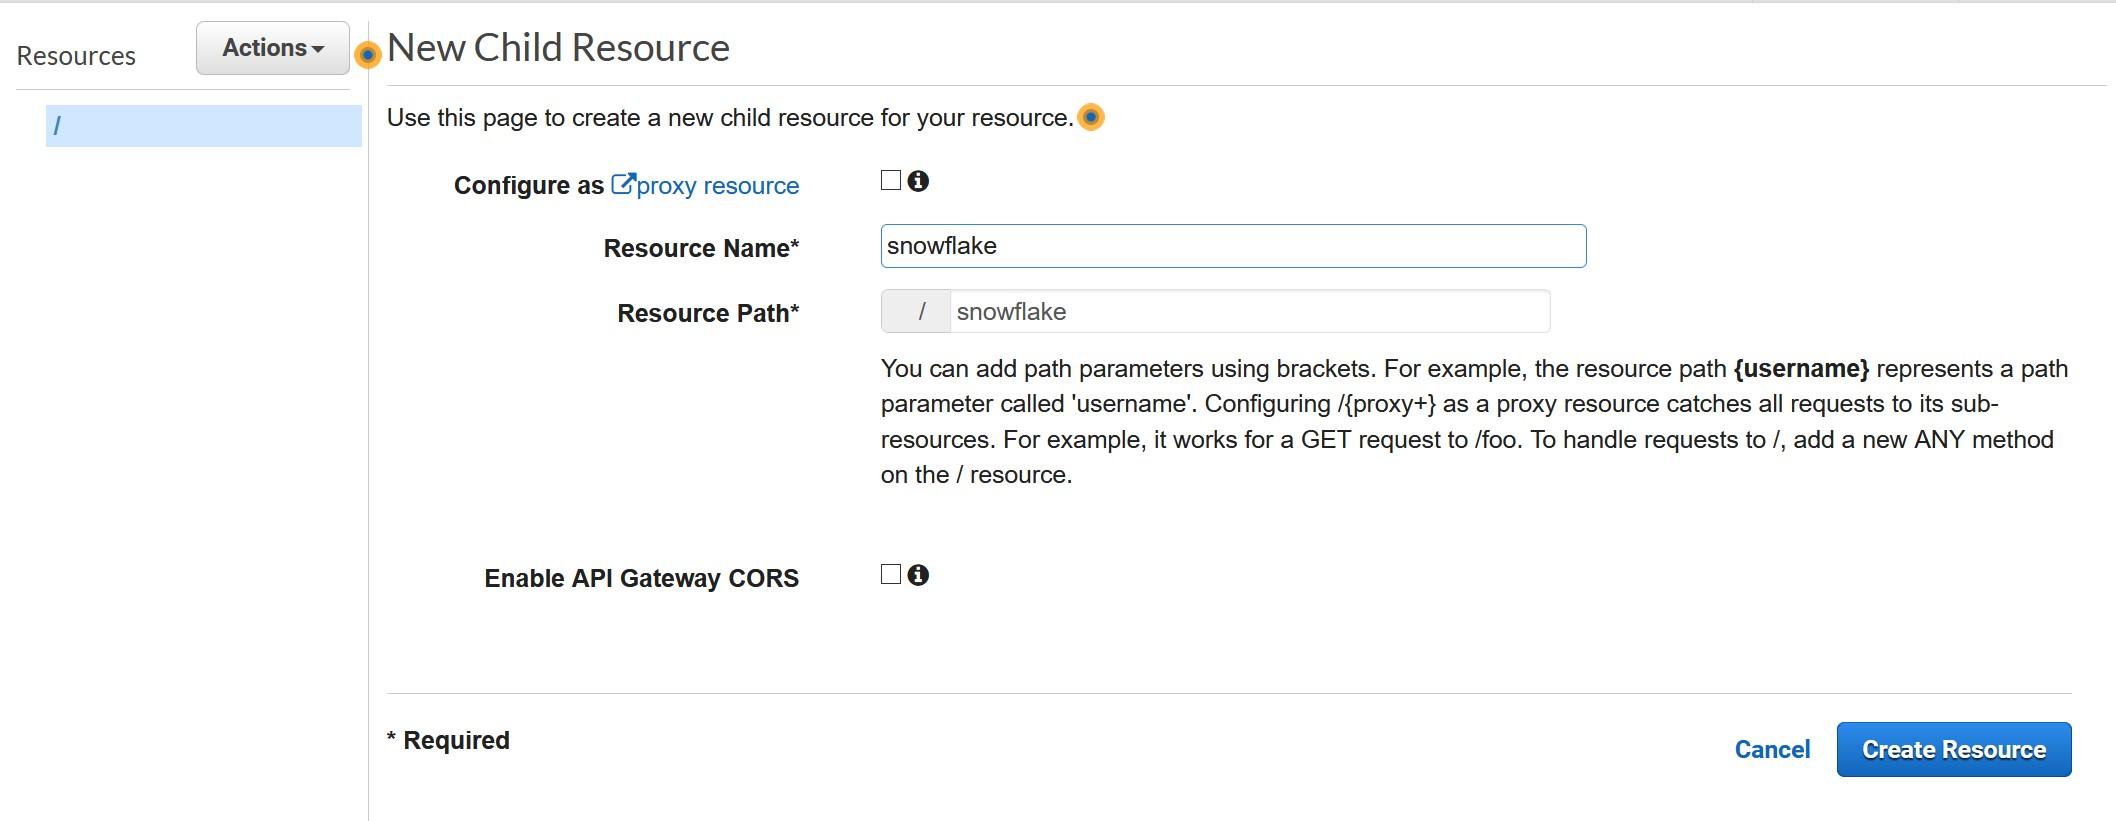
Create a Resource for the new API. Call the resource snowflake and record the same to the template as Proxy Service Resource Name.
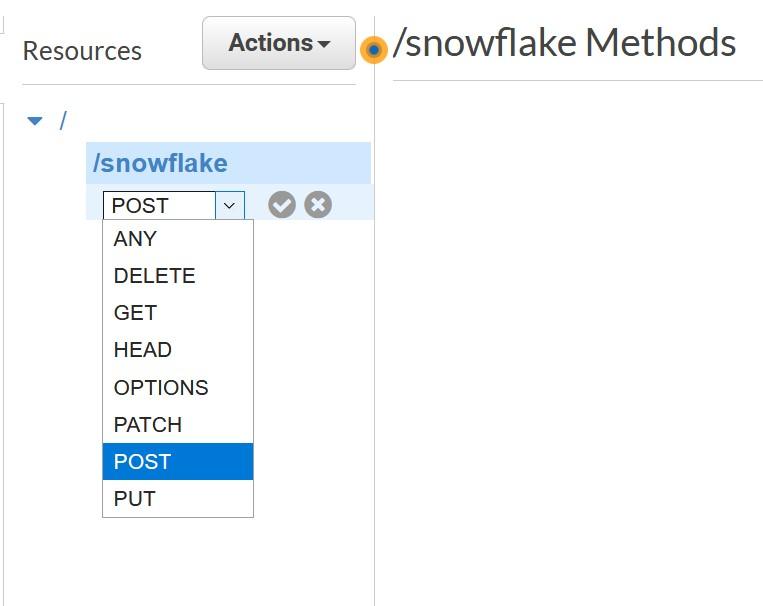
Create Method for the new API from the “Actions” menu, choose POST and press grey checkmark to create.
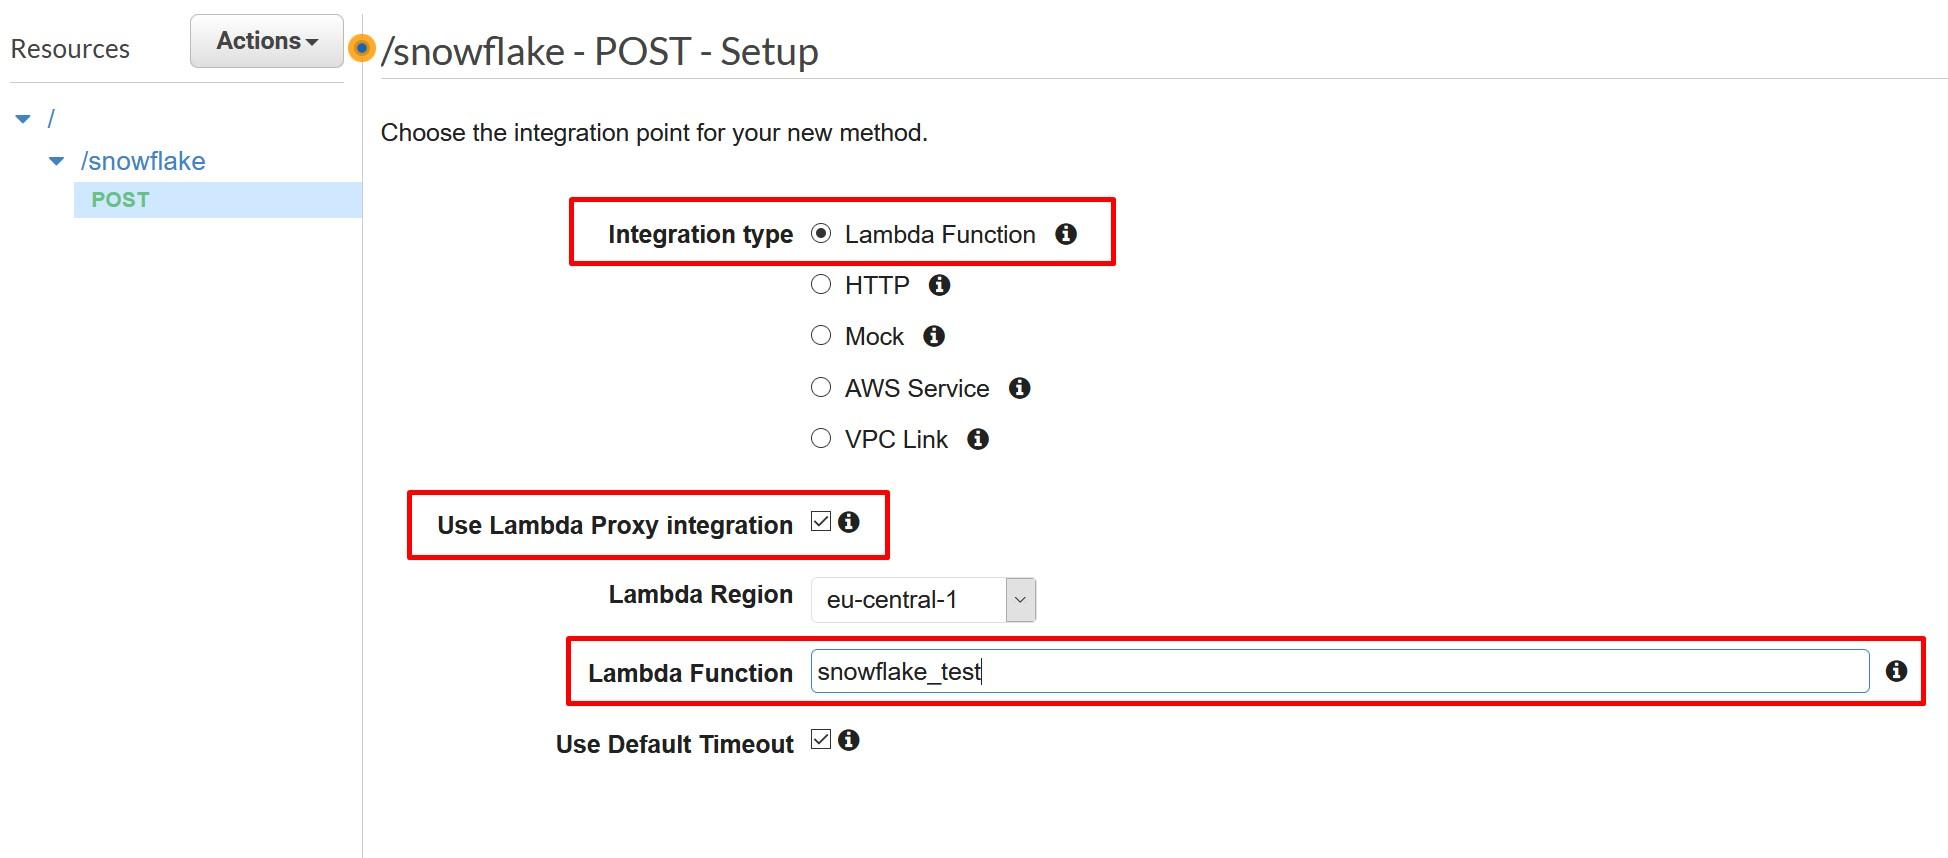
During the creation choose Lambda Function as Integration type and select “Use Lambda Proxy Integration”. Finally, choose the Lambda function created earlier.
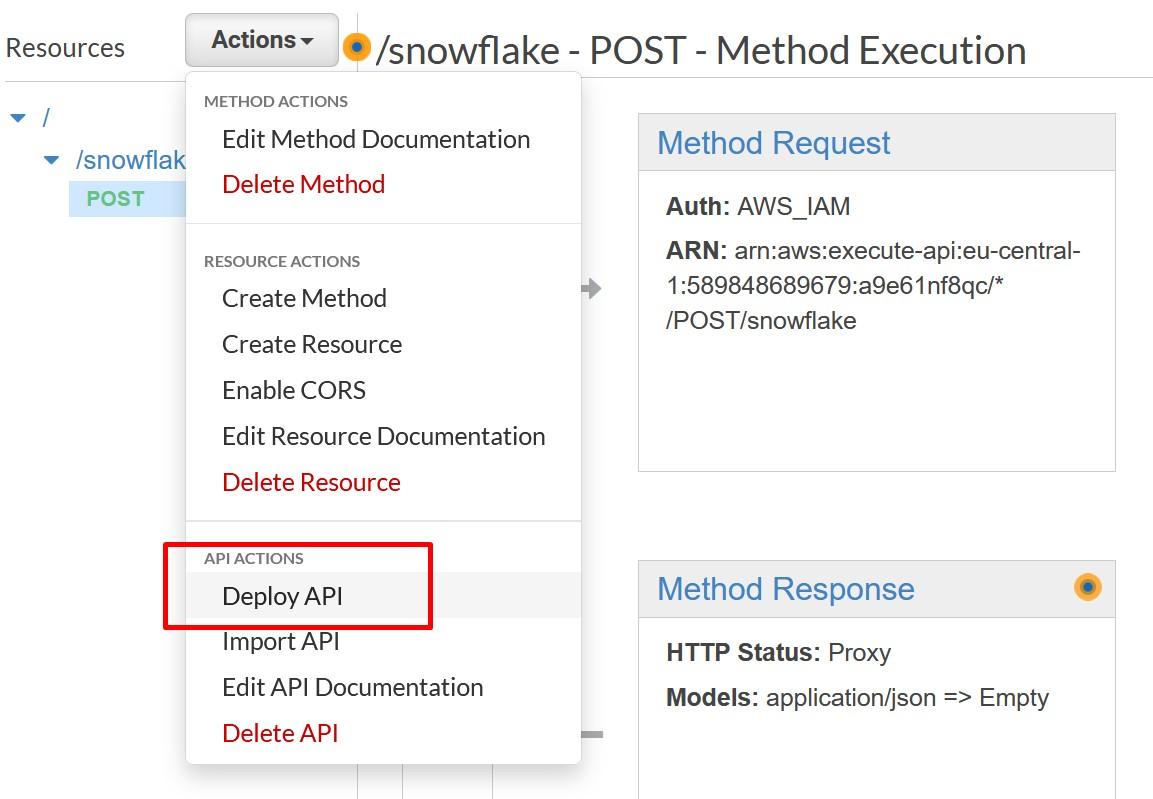
Save your API and deploy your API to a stage.
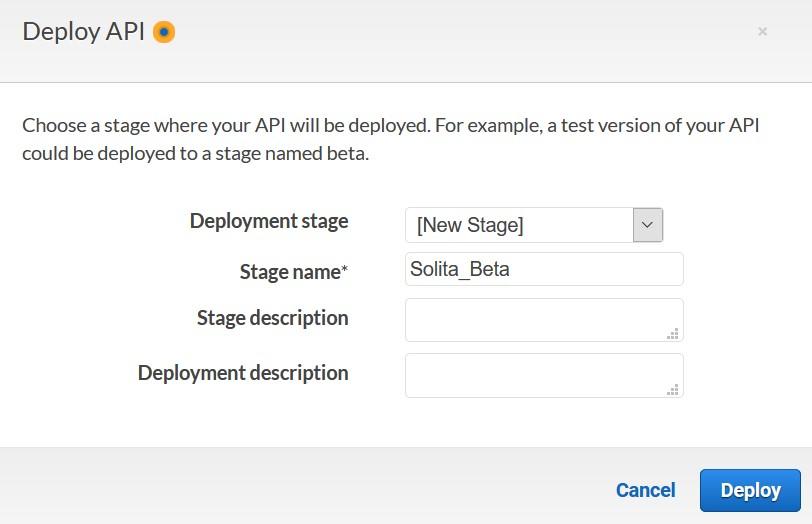
Creating a new stage can be done at the same time as the deploy happens.
Once deployed, record the Invoke URL from POST.

Now were done creating the API Gateway. Next step is to secure the API Gateway that only your Snowflake account can access it.

Securing AWS API Gateway Proxy

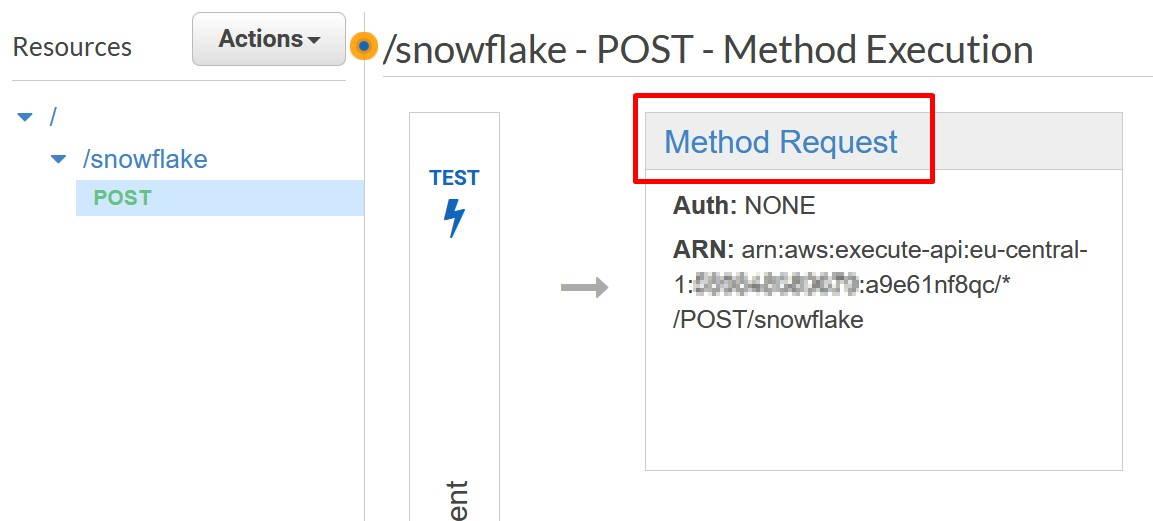
In the API Gateway console, go to your API method and choose Method Request.
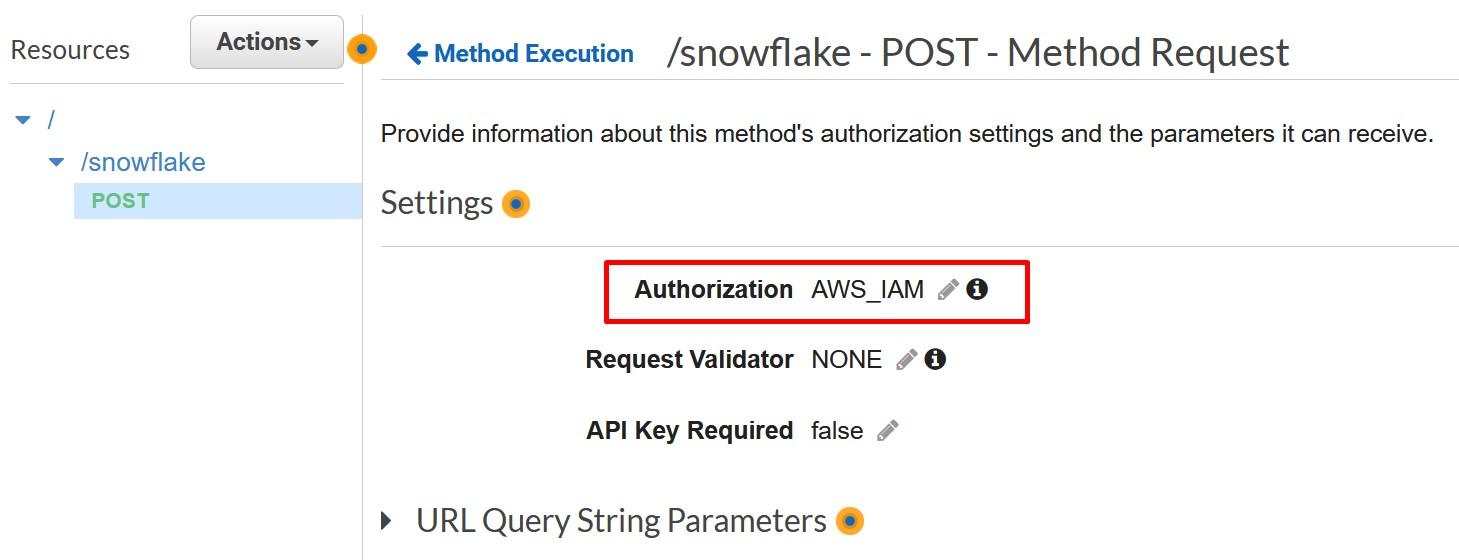
Inside Method Request, choose “AWS_IAM” as the Authorization mode.
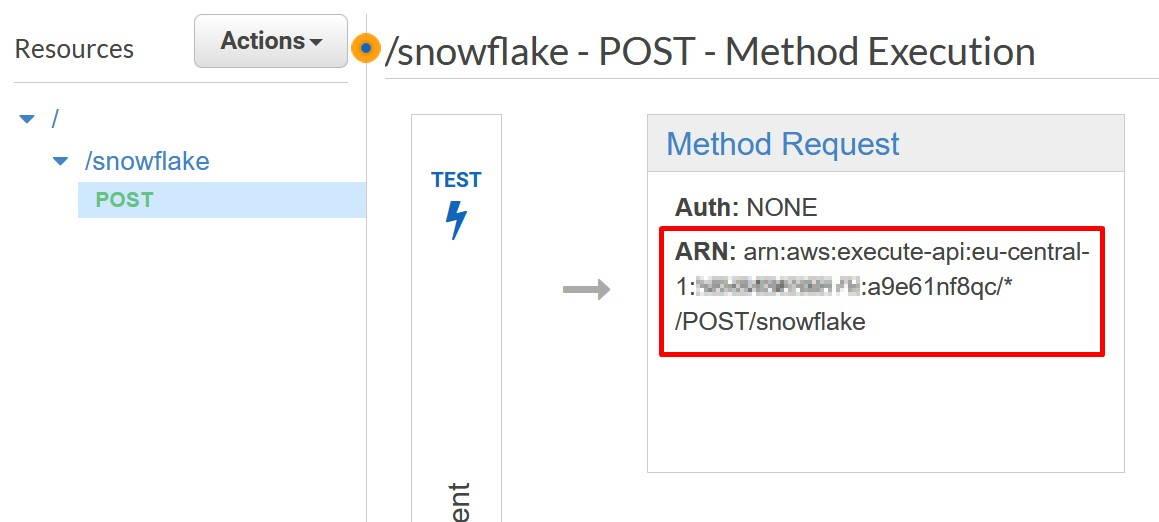
Record the Method Request ARN to the template to be used later on. You can get the value underneath the Method Request.
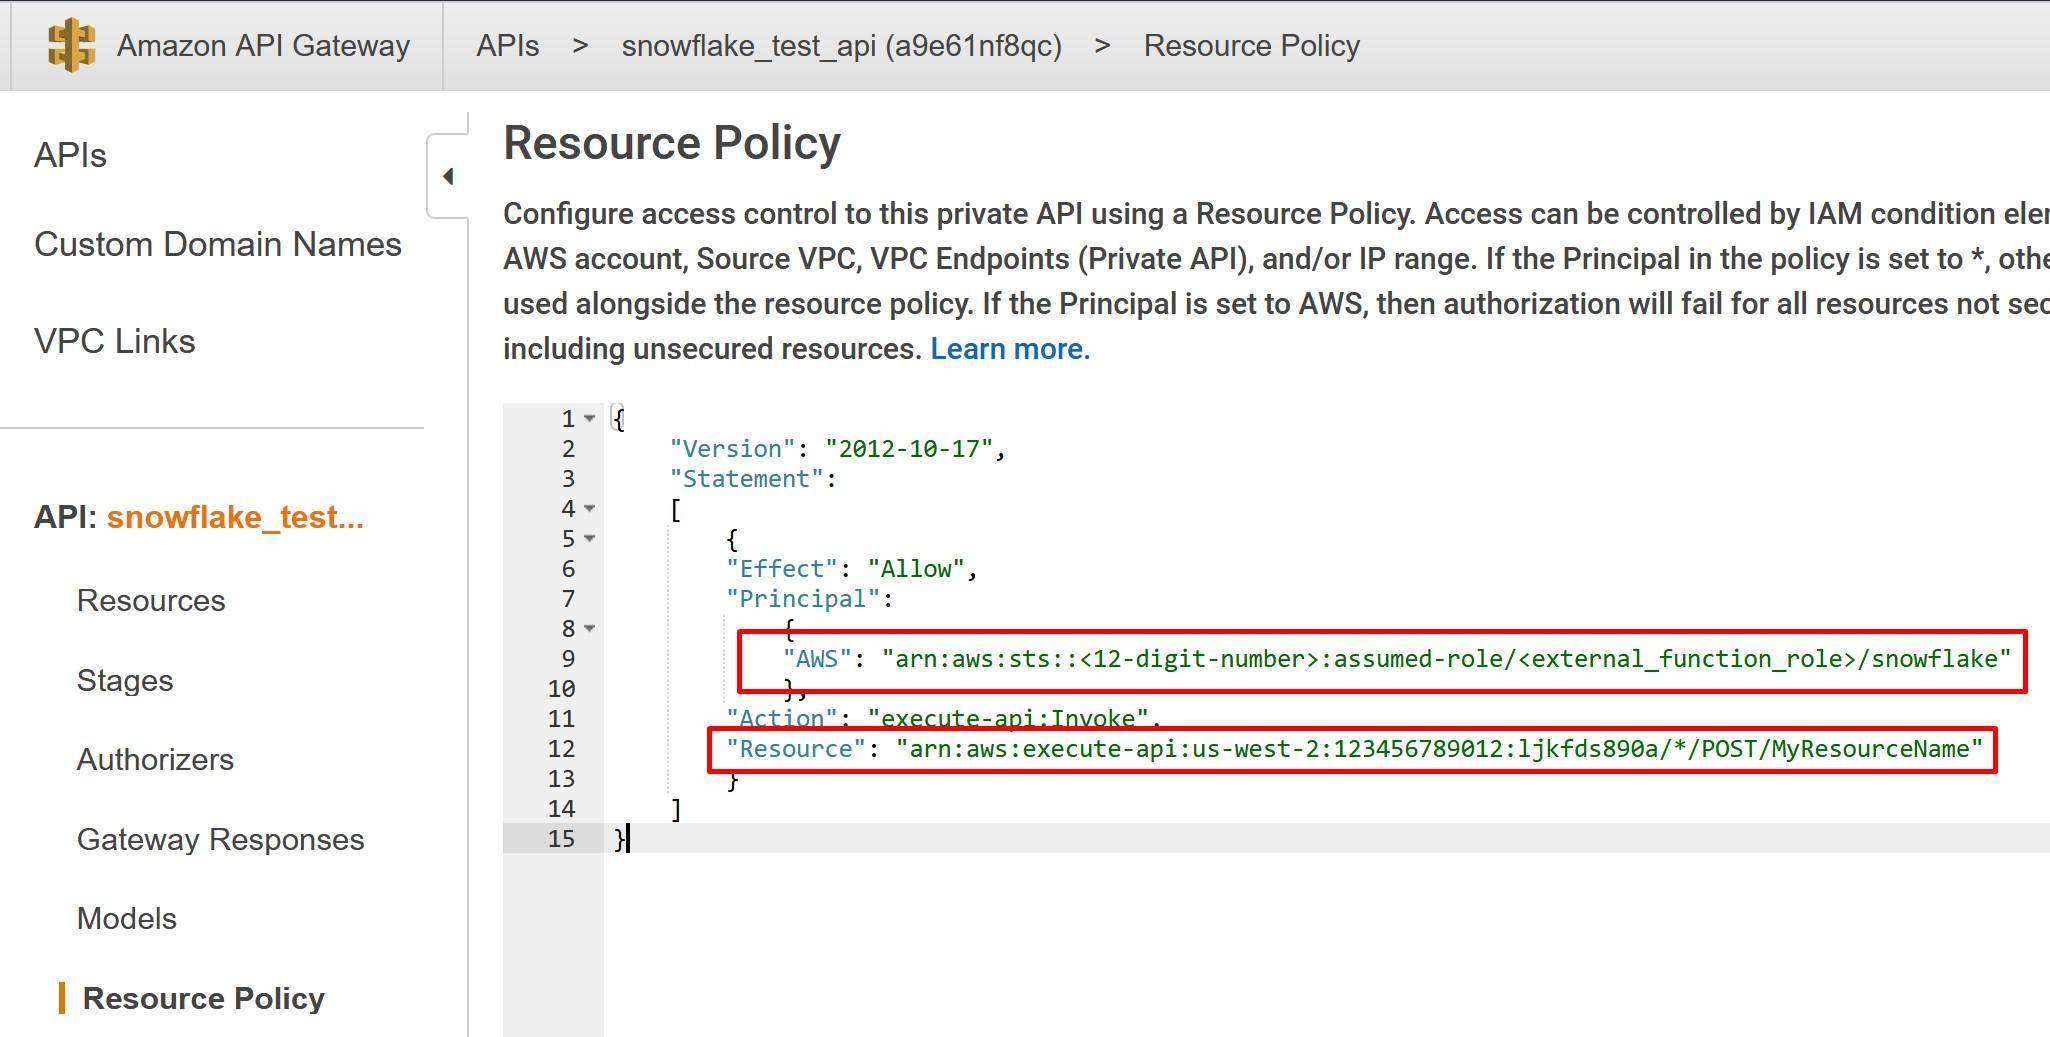
Once done, go to Resource Policy and deploy the following policy from my Github account. You can also copy the policy from the Snowflake -example. In AWS Principal, replace the <12-digit number> and <external_function_role> with your AWS platform id and with IAM role created earlier. In AWS Resource, replace the resource with the Method Request ARN recorded earlier. Save the policy once done and deploy the API again.
Creating an API Integration in Snowflake

Next steps will happen on the Snowflake console, so open up that with your user who has the necessary rights to create the integration.

With necessary rights type in following SQL where  <cloud_platform_role_ARN> is the ARN of the IAM role created previously and api_allowed_prefixes is the resource invocation URL.

CREATE OR REPLACE API INTEGRATION snowflake_test_api
api_provider = aws_api_gateway
api_aws_role_arn = ‘<cloud_platform_role_ARN>’
enabled = true
api_allowed_prefixes = (‘https://’)
;

The end result should like something like this

When done, obtain API_AWS_IAM_USER_ARN and API_AWS_EXTERNAL_ID values by describing the API.
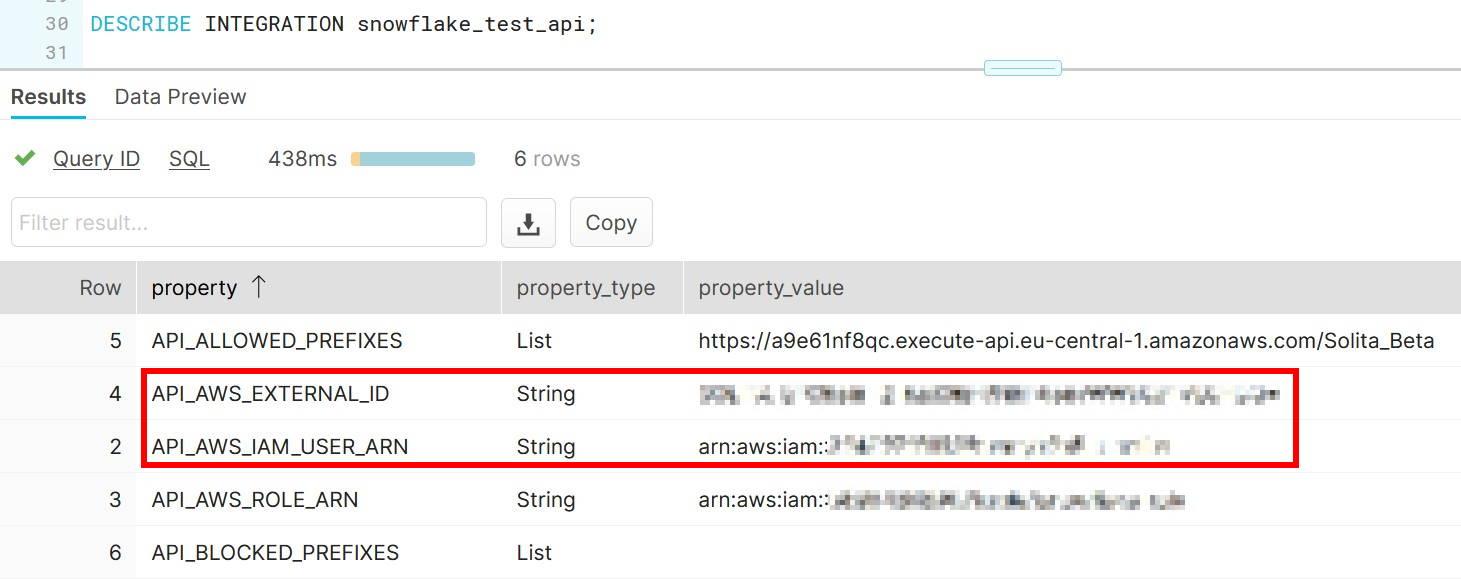
Setting up trust between Snowflake and the IAM role

Next steps are done in the AWS console using the values obtained from Snowflake.

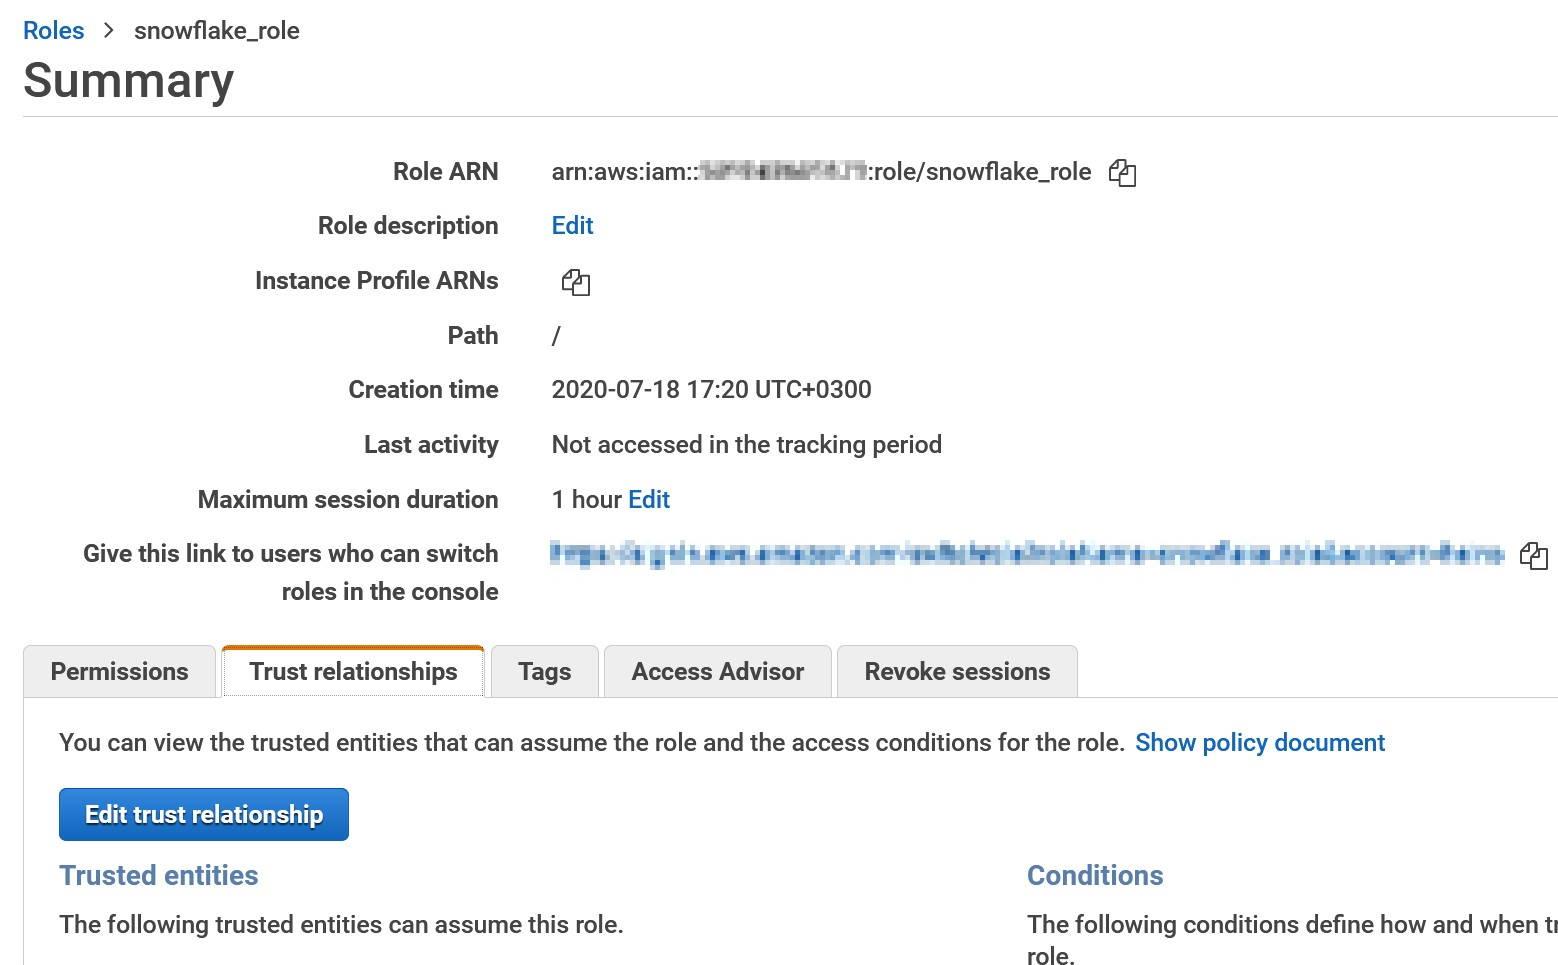
In the IAM console, choose the previously created role and select “Edit trust relationships” from “Trust relationships” -tab.
In Edit Trust Relationships modify the Statement.Principal.AWS field and replace the value (not the key) with the API_AWS_IAM_USER_ARN that you saved earlier.

In the Statement.Condition field Paste “StringEquals”: { “sts:ExternalId”: “xxx” } between curly brackets. Replace the xxx with API_AWS_EXTERNAL_ID. The final result should look something like this.
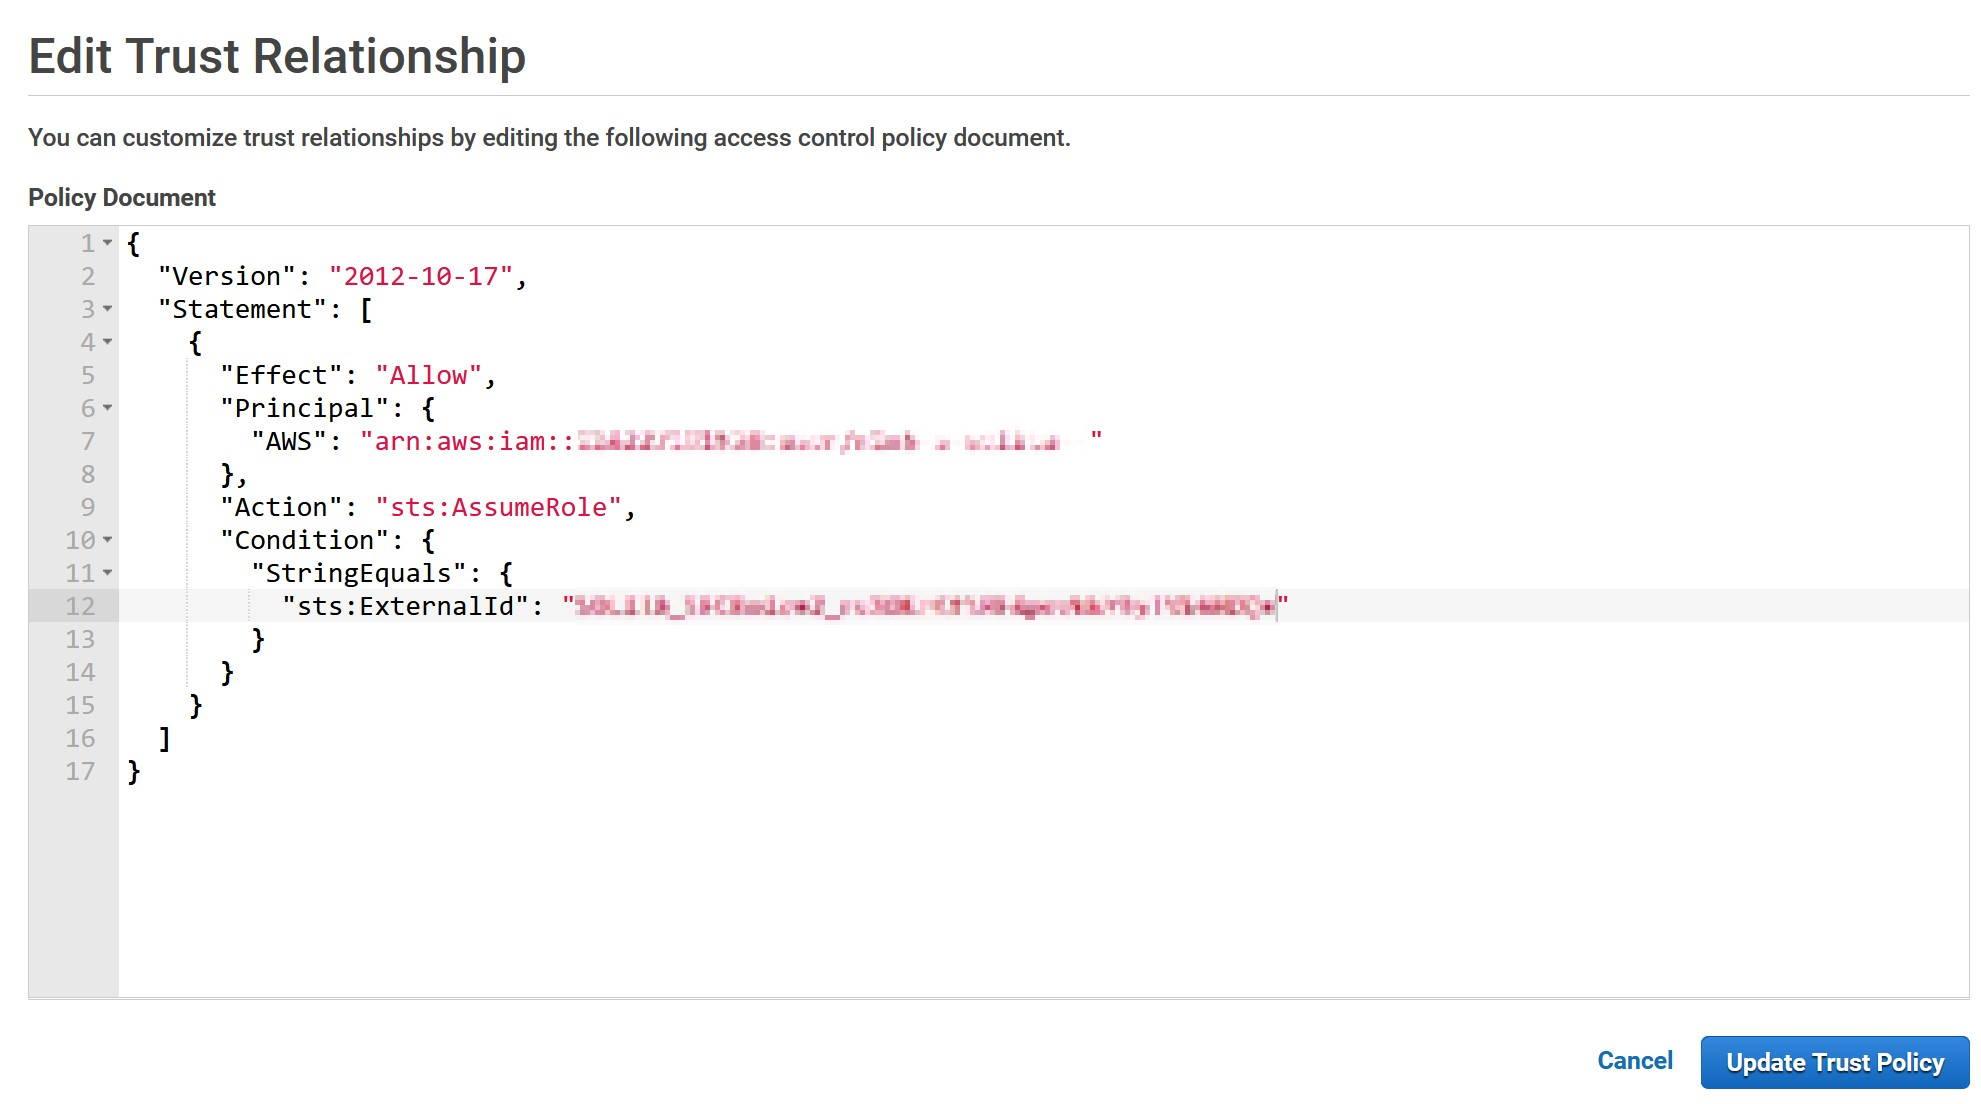
Update the policy when done and go back to the Snowflake console.

Creating an external function in Snowflake

In Snowflake create the external function as follows. The <api_integration name> is the same we created previously in the Snowflake console. The <invocation_url> is the resource invocation URL saved before. Include also the resource name this time.

CREATE EXTERNAL FUNCTION my_external_function(n INTEGER, v VARCHAR)
RETURNS VARIANT
API_INTEGRATION = <api_integration_name>
AS ‘<invocation_url>’
;

End result should like something like this

Calling the external function

You can now finally that the connection is working, by selecting the function with an integer value and any given string. The output should be as shown in the image. As you can see, this example is really basic and shows only that the connection is working.
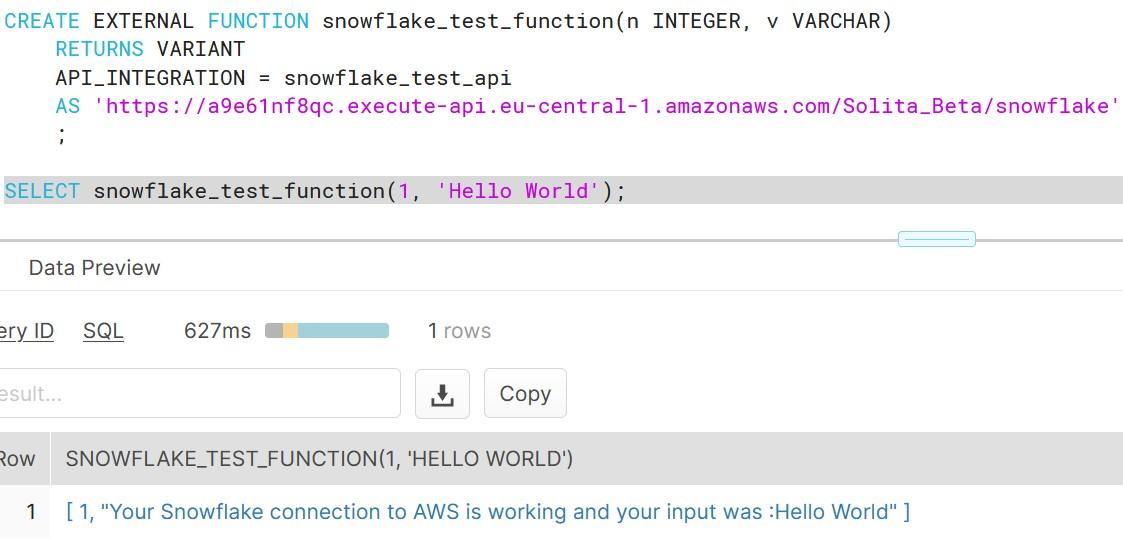
If you face in errors during the execution, check the troubleshooting page at Snowflake for possible solutions. I can say from experience that you must follow the instructions really carefully and remember to deploy the API at AWS often to reflect your changes.

This blog post has now covered the basics of external functions e.g. how you can trigger basic Python code running inside AWS Lambda. Next time I will show how you can build something concrete using the same tools and Amazon services.

Are we there yet?

External functions are currently a Preview Feature and are open to all accounts, but they support currently only services behind Amazon AWS API Gateway.

Lessons learned from combining SQS and Lambda in a data project

In June 2018, AWS Lambda added Amazon Simple Queue Service (SQS) to supported event sources, removing a lot of heavy lifting of running a polling service or creating extra SQS to SNS mappings. In a recent project we utilized this functionality and configured our data pipelines to use AWS Lambda functions for processing the incoming data items and SQS queues for buffering them. The built-in functionality of SQS and Lambda provided us serverless, scalable and fault-tolerant basis, but while running the solution we also learned some important lessons. In this blog post I will discuss the issue of valid messages ending up in dead-letter queues (DLQ) and correctly configuring your DLQ to catch only erroneous messages from your source SQS queue.

What are Amazon SQS and Lambda?

In brief, Amazon SQS is a lightweight, fully managed message queueing service, that enables decoupling and scaling microservices, distributed systems and serverless applications. With SQS, it is easy to send, store, and receive messages between software components, without losing messages.

AWS Lambda is a fully managed, automatically scaling service that lets you run code in multiple different languages in a serverless manner, without having to provision any servers. You can configure a Lambda function to execute on response to various events or orchestrate the invocations. Your code runs in parallel and processes each invocation individually, scaling with the size of the workload.

When you configure an SQS queue as an event source for your Lambda, Lambda functions are automatically triggered when messages arrive to the SQS queue. The Lambda service automatically scales up and down based on the number of inflight messages in the queue. The polling, reading and removing of messages from the queue will be thus automatically handled by the built-in functionality. Successfully processed messages will be removed and the failed ones will be returned to the queue or forwarded to the DLQ, without needing to explicitly configure these steps inside your Lambda function code.

Problems with valid messages ending up in DLQ

In the recent project we needed to process data that would be coming in daily as well as in larger batches with historical data loadings through the same data processing pipeline. In order to handle changing data loads, SQS decouples the source system from processing and balances the load for both use cases. We used SQS for queueing metadata of new data files and Lambda function for processing the messages and passing on metadata to next steps in the pipeline. When testing our solution with pushing thousands of messages rapidly to the queue, we observed many of the messages ending up in a dead-letter queue, even though they were not erroneous.

From the CloudWatch metrics, we found no execution errors during the given period, but instead there was a peak in the Lambda throttling metric. We had configured a DLQ to catch erroneous messages, but ended up having completely valid and unprocessed messages in the DLQ. How does this happen? To understand this, let’s dive deeper into how Lambda functions are triggered and scaled when they have SQS configured as the event source.

Lambda scales automatically with the number of messages arriving to SQS – up to a limit

Let’s first introduce briefly the parameters of SQS and Lambda that are relevant to this problem.

SQS

ReceiveMessageWaitTimeSeconds: Time that the poller waits for new messages before returning a response. Your messages might be arriving to the SQS queue unevenly, sometimes in bursts and sometimes there might be no messages arriving at all. The default value is 0, which equals constant polling of messages. If the queue is empty and your solution allows some lag time, it might be beneficial not to poll the queue all the time and return empty responses. Instead of polling for messages constantly, you can specify a wait time between 1 and 20 seconds.

VisibilityTimeout: The length of time during which a message will be invisible to consumers after the message is read from the queue. When a poller reads a message from the SQS queue, that message still stays in the queue but becomes invisible for the period of VisibilityTimeout. During this time the read message will be unavailable for any other poller trying to read the same message and gives the initial component time to process and delete the message from the queue.

maxReceiveCount: Defines the number of times a message can be delivered back to being visible in the source queue before moving it to the DLQ. If the processing of the message is successful, the consumer will delete it from the queue. When ever an error occurs in processing of a message and it cannot be deleted from the queue, the message will become visible again in the queue with an increased ReceiveCount. When the ReceiveCount for a message exceeds the maxReceiveCount for a queue, message is moved to a dead-letter queue.

Lambda

Reserved concurrency limit: The number of executions of the Lambda function that can run simultaneously. There is an account specific limit how many executions of Lambda functions can run simultaneously (by default 1,000) and it is shared between all your Lambda functions. By reserving part of it for one function, other functions running at the same time can’t prevent your function from scaling.

BatchSize: The maximum number of messages that Lambda retrieves from the SQS queue in a single batch. Batchsize is related to the Lambda event source mapping, which defines what triggers the Lambda functions. In this case they are triggered from SQS.

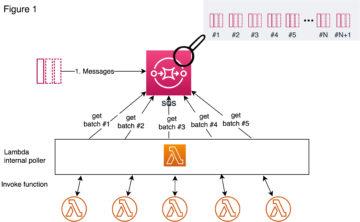
In the Figure 1 below, it is illustrated how Lambda actually scales when messages arrive in bursts to the SQS queue. Lambda uses long polling to poll messages in the queue, which means that it does not poll the queue all the time but instead on an interval between 1 to 20 seconds, depending on what you have configured to be your queue’s ReceiveMessageWaitTimeSeconds. Lambda service’s internal poller reads messages as batches from the queue and invokes the Lambda function synchronously with an event that contains a batch of messages. The number of messages in a batch is defined by the BatchSize that is configured in the Lambda event source mapping.

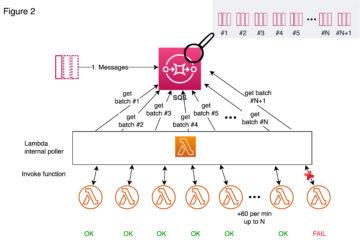
When messages start arriving to the queue, Lambda reads first up to 5 batches and invokes a function for each. If there are messages still available, the number of processes reading the batches are increased by up to 60 more instances per minute (Figure 2), until it reaches the 1) reserved concurrency limit configured for the Lambda function in question or 2) the account’s limit of total concurrent Lambda executions (by default 1,000), whichever is lower (N  in the figure).

By setting up a reserved concurrency limit for your Lambda, you guarantee that it will get part of the account’s Lambda resources at any time, but at the same time you also limit your function from scaling over that limit, even though there would be Lambda resources available for your account to use. When that limit is reached and there are still messages available in the queue, one might assume that those messages will stay visible in the queue, waiting until there’s free Lambda capacity available to handle those messages. Instead, the internal poller still tries to invoke new Lambda functions for all the new messages and therefore causes throttling of the Lambda invokes (figure 2). Why are some messages ending up in DLQ then?

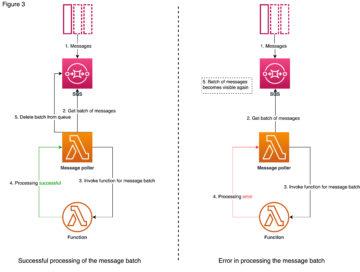
Let’s look at how the workflow goes for an individual message batch if it succeeds or fails (figure 3). First, the Lambda internal poller reads a message batch from the queue and those messages stay in the queue but become invisible for the length of the configured VisibilityTimeout. Then it invokes a function synchronously, meaning that it will wait for a response that indicates a successful processing or an error, that can be caused by e.g. function code error, function timeout or throttling. In the case of a successful processing, the message batch is deleted from the queue. In the case of failure, however, the message becomes visible again.

The SQS queue is not aware of what happens beyond the event source mapping, if the invocations are failed or throttled. It keeps the messages in the queue invisible, until they get either deleted or turned back to visible after the length of VisibilityTimeout has passed. Effectually this means that throttled messages are treated as any other failed messages, so their ReceiveCount is increased every time they are made visible in the queue. If there is a huge burst of messages coming in, some of the messages might get throttled, retried, throttled again, and retried again, until they reach the limit of maxReceiveCount and then moved to the DLQ.

The automatic scaling and concurrency achieved with SQS and Lambda sounds promising, but unfortunately like all AWS services, this combination has its limits as well. Throttling of valid messages can be avoided with the following considerations:

Be careful when configuring a reserved concurrency to your Lambda function: the smaller the concurrency, the greater the chance that the messages get throttled. AWS suggests the reserved concurrency for a Lambda function to be 5 or greater.

Set the maxReceiveCount big enough in your SQS queue’s properties, so that the throttled messages will eventually get processed after the burst of messages. AWS suggest you set it to 5 or greater.

By increasing message VisibilityTimeout of the source queue, you can give more time for your Lambda to retry the messages in the case of message bursts. AWS suggests this to be set to at least 6 times the timeout you configure to your Lambda function.

Of course, tuning these parameters is an act of balancing with what best suits the purpose of your application.

Configuring DLQ to your SQS and Lambda combination

If you don’t configure a DLQ, you will lose all the erroneous (or valid and throttled) messages. If you are familiar with the topic this seems obvious, but it’s worth stating since it is quite important. What is confusing now in this combo, is that you can configure a dead-letter queue to both SQS and Lambda. The AWS documentation states:

Make sure that you configure the dead-letter queue on the source queue, not on the Lambda function. The dead-letter queue that you configure on a function is used for the function’s asynchronous invocation queue, not for event source queues.

To understand this one needs to dive into the difference between synchronous and asynchronous invocation of Lambda functions.

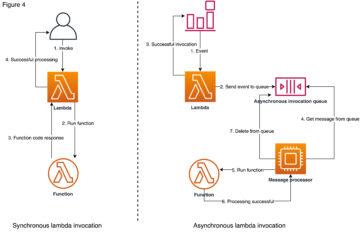
When you invoke a function synchronously Lambda runs the function and waits for a response from it. The function code returns the response, and Lambda returns you this response with some additional data, including e.g. the function version. In the case of asynchronous invocation, however, Lambda sends the invocation event to an internal queue. If the event is successfully sent to the internal queue, Lambda returns success response without waiting for any response from the function execution, unlike in synchronous invocation. Lambda manages the internal queue and attempts to retry failed events automatically with its own logic. If the execution of the function is failing after retries as well, the event is sent to the DLQ configured to the Lambda function. With event source mapping to SQS, Lambda is invoked synchronously, therefore there are no retries like in asynchronous invocation and the DLQ on Lambda is useless.

Recently, AWS launched Lambda Destinations, that makes it possible to route asynchronous function results to a destination resource that can be either SQS, SNS, another Lambda function or EventBridge. With DLQs you can handle asynchronous failure situations and catch the failing events, but with Destinations you can actually get more detailed information on function execution in both success and failure, such as code exception stack traces. Although, Destinations and DLQs can be used together and at the same time, AWS suggests Destinations should be considered a more preferred solution.

Conclusions

The described problems are all stated and deductible from the AWS documentation, but still not completely obvious. With carefully tuning the parameters of our SQS queue, mainly by increasing the maxReceiveCount and VisibilityTimeOut, we were able to overcome the problems with Lambda functions throttling. With configuring the DLQ to the source SQS queue instead of configuring it to Lambda, we were able to catch erroneous or throttled messages. Although adding a DLQ to your source SQS does not solve anything by itself, but you also need to handle the failing messages in some way. We configured a Lambda function also to the DLQ to write the erroneous messages to DynamoDB. This way we have a log of the unhandled messages in DynamoDB and the messages can be resubmitted or investigated further from there.

Of course, there are always several kinds of architectural options to solve these kind of problems in AWS environment. Amazon Kinesis, for example, is a real-time stream processing service, but designed to ingest large volumes of continuous streaming data. Our data, however, comes in uneven bursts, and SQS acts better for that scenario as a message broker and decoupling mechanism. One just needs to be careful with setting up the parameters correctly, as well as be sure that the actions intended for the Lambda function will execute within Lambda limits (including 15 minutes timeout and 3,008 MB maximum memory allocation). The built-in logic with Lambda and SQS enabled the minimal infrastructure to manage and monitor as well as high concurrency capabilities within the given limits.