Databricks is a cloud-based platform that seamlessly integrates data engineering, machine learning, and analytics to simplify the process of building, training, and deploying Machine Learning models. With its unified platform built on top of Lakehouse architecture, Databricks empowers Data Scientist and ML engineers to unleash their full potential, providing a collaborative workspace and offering comprehensive tooling that streamline the entire ML process, including tools to support DevOps to model development, deployment and management.
While many companies and businesses are investing in AI and machine learning to stay competitive and capture the untapped business opportunity, they are not reaping the benefits of those investments as their journey of operationalizing machine learning is stuck as a jupyter notebook level data science project. And that’s where MLOps comes to the rescue.
MLOps is a set of tools and practices for the development of machine learning systems. It aims to enhance the reliability, efficiency, and speed of productionizing machine learning. In the meantime,adhering to governance requirements. MLOps facilitate collaboration among data scientists, ML engineers, and other stakeholders and automate processes for a quicker production cycle of machine learning models. MLOps takes a few pages out of DevOps book; a methodology of modern software development but differs in asset management, as it involves managing source code, data, and machine learning models together for version control and model comparison, as well as for model reproducibility. Therefore, in essence, MLOps involves jointly managing source code (DevOps), data (DataOps) and Machine Learning models (ModelOps), while also continuously monitoring both the software system and the machine learning models to detect performance degradation.
MLOps = DevOps + DataOps + ModelOps
MLOps on Databricks
Recently, I had a chance to test and try out the Databricks platform. And in this blog post, I will attempt to summarise what Databricks has to offer in terms of MLOps capability.
First of all, what is Databricks ?
Databricks is a web based multi-cloud platform that aims to unify data engineering, machine learning, and analytics solutions under single service. The standalone aspect of Databricks is its LakeHouse architecture that provides data warehousing capabilities to a data lake. As a result, Databricks lakehouse eliminates the data silos due to pushing data into multiple data warehouses or data lakes, thereby providing data teams the single source of data.
Databricks aims to consolidate, streamline and standardise the productionizing machine learning with Databricks Machine Learning service. With MLOps approach built on their Lakehouse architecture, Databricks provides suits of tools to manage the entire ML lifecycle, from data preparation to model deployment.
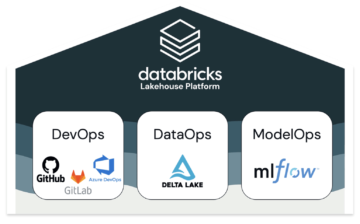
MLOps approach on Databricks is built on their Lakehouse Platform which involves jointly managing code, data, and models. Fig:Databricks
MLOps approach on Databricks is built on their Lakehouse Platform which involves jointly managing code, data, and models. Fig:Databricks
For the DevOps part of MLOps, Databricks provides capability to integrate various git providers, DataOps uses DeltaLake and for ModelOps they come integrated with MLflow: an open-source machine learning model life cycle management platform.
DevOps
Databricks provides Repos that support git integration from various git providers like Github, Bitbucket, Azure DevOps, AWS CodeCommit and Gitlab and their associated CI/CD tools. Databricks repos also support various git operations such as cloning a repository, committing. and pushing, pulling, branch management, and visual comparison of diffs when committing, helping to sync notebooks and source code with Databricks workspaces.
DataOps
DataOps is built on top of Delta Lake. Databricks manages all types of data (raw data, log, features, prediction, monitoring data etc) related to the ML system with Delta Lake. As the feature table can be written as a Delta table on top of delta lake, every data we write to delta lake is automatically versioned. And as Delta Lake is equipped with time travel capability, we can access any historical version of the data with a version number or a timestamp.
In addition, Databricks also provides this nice feature called Feature Store. Feature Store is a centralised repository for storing, sharing, and discovering features across the team. There are a number of benefits of adding feature stores in machine learning learning development cycle. First, having a centralised feature store brings the consistency in terms of feature input between model training and inference eliminating online/offline skew there by increasing the model accuracy in production. It also eliminates the separate feature engineering pipeline for training and inference reducing the technical dept of the team. As the feature store integrates with other services in Databricks, features are reusable and discoverable to other teams as well; like analytics and BI teams can use the same set of features without needing to recreate them. Databricks’s Feature store also allows for versioning and lineage tracking of features like who created features, what services/models are using them etc thereby making it easier to apply any governance like access control list over them.
ModelOps
ModelOps capability in Databricks is built on a popular open-source framework called MLFlow. MLflow provides various components and apis to track and log machine learning experiments and manage model’s lifecycle stage transition.
Two of the main components of MLFlow are MLFlow tracking and MLFlow model registry.
The MLflow tracking component provides an api to log and query and an intuitive UI to view parameters, metrics, tags, source code version and artefacts related to machine learning experiments where experiment is aggregation of runs and runs are executions of code. This capability to track and query experiments helps in understanding how different models perform and how their performance depends on the input data, hyperparameter etc.
Another core component of MLflow is Model Registry: a collaborative model hub, which let’s manage MLflow models and their lifecycle centrally. Model registry is designed to take a model from model tracking to put it through staging and into production. Model registry manages model versioning, model staging (assign “Staging” and “Production” to represent the lifecycle of a model version), model lineage (which MLflow Experiment and Run produced the model) and model annotation (e.g. tags and comments). Model registry provides webhooks and api to integrate with continuous delivery systems.
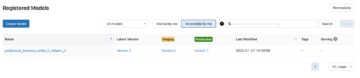
The MLflow Model Registry enables versioning of a single corresponding registered model where we can seamlessly perform stage transitions of those versioned models.
The MLflow Model Registry enables versioning of a single corresponding registered model where we can seamlessly perform stage transitions of those versioned models.
Databricks also supports the deployment of Model Registry’s production model in multiple modes: batch and streaming jobs or as a low latency REST API, making it easy to meet the specific requirements of an organisation.
For model monitoring, Databricks allows logging the input queries and predictions of any deployed model to Delta tables.
Conclusion
MLOps is a relatively nascent field and there are a myriad of tools and MLOps platforms out there to choose from. Apples to apples comparison of those platforms might be difficult as the best MLOps tool for one case might differ to another case. After all, choosing the fitting MLOps tools highly depends on various factors like business need, current setup, available resources at disposal etc.
However, with the experience of using a few other platforms, personally, I find Databricks the most comprehensive platform of all. I believe Databricks make it easy for organisations to streamline their ML operations at scale. Platform’s collaboration and sharing capabilities should make it easy for teams to work together on data projects using multiple technologies in parallel. One particular tool which I found pleasing to work with is Databricks notebook. It is a code development tool, which supports multiple programming languages (R, SQL, Python, Scala ) in a single notebook, while also supporting real time co-editing and commenting. In addition, as the entire project can be version controlled by a tool of choice and integrates very well with their associated CI/CD tools, it adds flexibility to manage, automate and execute the different pipelines.
To sum up, Databricks strength lies in its collaborative, comprehensive and integrated environment for running any kind of data loads whether it is data engineering, data science or machine learning on top of their Lakehouse architecture. While many cloud based tools come tightly coupled with their cloud services, Databricks is cloud agnostic making it easy to set up if one’s enterprise is already running on a major cloud provider (AWS, Azure or Google cloud).
Finally, if you would like to hear more about Databricks as an unified Analytics, Data, and Machine Learning platform and learn how to leverage Databricks services in your Data journey, please don’t hesitate to contact me our Business Lead – Data Science, AI & Analytics, Mikael Ruohonen at +358414516808 or mikael.ruohonen@solita.fi or me at jyotiprasad.bartaula@solita.fi.
Target audience are data practitioners looking for a method to practice DataOps with a simple method even in restricted environments. A walk-through of the code is detailed in the appendix.
The linked code repository contains a minimal setup to automatize infrastructure and code deployment simultaneously from Azure DevOps Git Repositories to Databricks.
TL;DR:
Import the repo into a fresh Azure DevOps Project,
get a secret access token from your Databricks Workspace,
paste the token and the Databricks URL into a Azure DevOps Library’s variable group named “databricks_cli”,
Create and run two pipelines referencing the YAML in the repo’s pipelines/ directory.
Any Databricks compatible (Python, Scala, R) code pushed to the remote repository’s workspace/ directory will be copied to the Databricks workspace with an interactive cluster waiting to execute it.
Background
Azure DevOps and Databricks have one thing in common – providing industry standard technology and offering them as an intuitive, managed platform:
Databricks for running Apache Spark
DevOps for Git repos and build pipelines
Both platforms have much more to offer then what is used in this minimal integration example. DevOps offers wiki, bug-, task- and issue tracking, canban, scrum and workflow functionality among others.
Databricks is a fully managed and optimized Apache Spark PaaS. It can natively execute Scala, Python, PySpark, R, SparkR, SQL and Bash code; some cluster types have Tensorflow installed and configured (inclusive GPU drivers). Integration of the H2O machine learning platform is quite straight forward. In essence Databricks is a highly performant general purpose data science and engineering platform which tackles virtually any challenge in the Big Data universe.
Both have free tiers and a pay-as-you-go pricing model.
Databricks provides infrastructure as code. A few lines of JSON consistently deploy an optimized Apache Spark runtime.
After several projects and the increasing need to build and prototype in a managed and reproducible way the DevOps-Databricks combination became very appreciated: It enables quick and responsive interactive runtimes and provides best industry practice for software development and data engineering. Deployment into (scheduled), performant, resilient production environments is possible without changes to the platform and without any need for refactoring.
The core of the integration uses Databricks infrastructure-as-code (IaC) capability together with DevOps pipelines functionality to deploy any kind of code.
the Databricks CLI facilitates programmatic access to Databricks and
the managed Build Agents in DevOps deploy both infrastructure and analytic code.
Azure pipelines deploy both the infrastructure code and the notebook code from the repository to the Databricks workspace. This enables version control of both the runtime and the code in one compact, responsive repository.
All pieces of the integration are hosted in a single, compact repository which make all parts of a data and modeling pipeline fully reproducible.
Prerequisites
Log into Azure DevOps and Databricks Workspace. There are free tiers for both of them. Setup details are explained extensively in the canonical quick start sections of either service:
For the integration Databricks can be hosted in either the Azure or AWS cloud.
1. Import the Repository
To use this demo as a starting point for a new project, prepare a Azure DevOps project:
create a new project (with an empty repository by default)
select the repository tab and choose “Import a repository”
paste the URL of this demo into the Clone URL field: https://dev.azure.com/reinhardseifert/DatabricksDevOps/_git/DatabricksDevOps
wait for the import to complete
clone the newly imported repository to your local computer to start deploying your own code into the workspace directory
Then create two Azure pipelines which create the runtime and sync any code updates into it (see below).
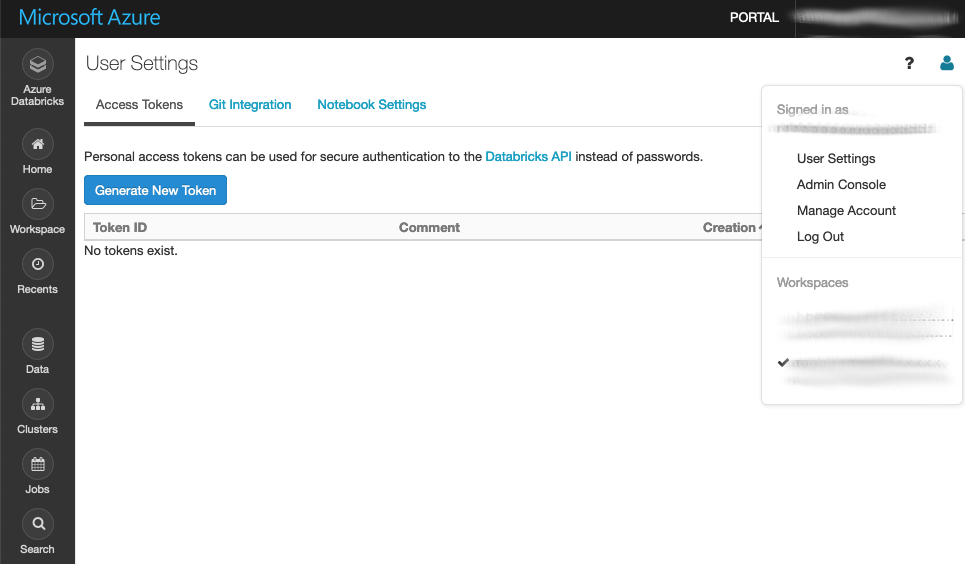
2. Create Databricks Secret Token
Log into the Databricks Workspace and under User settings (icon in the top right corner) and select “Generate New Token”. Choose a descriptive name (“DevOps Build Agent Key”) and copy the token to a notebook or clipboard. The token is displayed just once – directly after creation; you can create as many tokens as you wish.
Databricks > User Settings > Create New Token
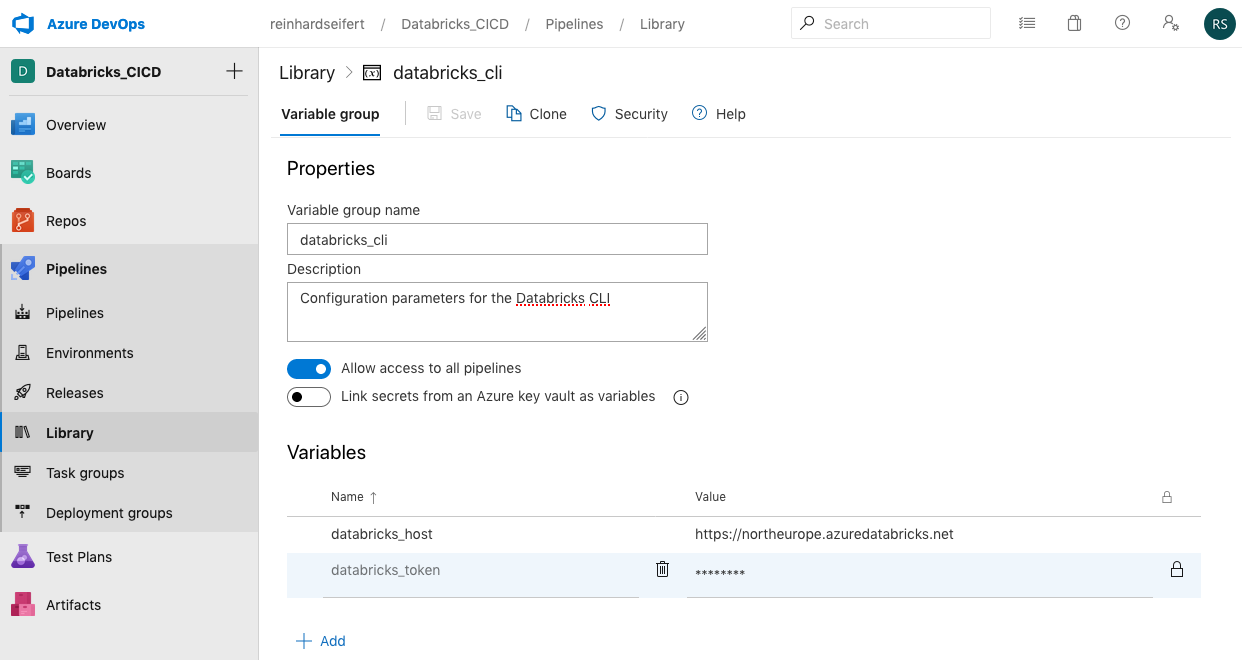
3. Add the token to the Azure DevOps Library
The Databricks Secret Token has to be added to a Variable Group named “databricks_cli”. Variable groups are created under Pipelines > Library. Note that the name of the variable group is referenced in both pipeline definitions (/pipelines/build-cluster.yml and /pipelines/build-workspace.yml). Two variables have to be defined: 1. databricks_host and 2. databricks_token
The variable names are referenced in the .yml file – changing them in the DevOps library requires also changing them correspondingly in the .yml files. When clicking the lock icon after defining the variable it is treated as a secret and not visible after that action in the DevOps project. Neither in the Library nor in the Build servers (even when accidentially echo-ing them. But of course writing them to the Databricks environment would potentially expose them. This is a security concern when collaborating with non-trusted parties on a Project.
Pipelines > Library > Add Variable Group
Azure DevOps
Generally the Azure DevOps portal offers as minimal functionality a git repository to maintain code and pipelines to deploy the code from the repository into runtimes.
Azure Repositories
The Azure repo contains the full logic of the integration:
the actual (Python) code to run,
the JSON specification of the Spark-cluster which will run the code,
shell build scripts which are executed in the pipeline/ build server,
the YAML configuration which define the pipelines.
The complete CI/CD pipeline is contained in a single Git repository in a very compact fashion. Following Databricks’ terminology the Python code (1) is located in the workspace/ directory. The runtime specification .json (2), build scripts .sh (3) and the pipeline configuration .yml (4) are located in the pipelines/ directory according to the Azure DevOps paradigm.
Azure Pipelines
The Pipelines menu provides the following functionality:
Pipelines (aka build pipelines),
Environments (needed to group Azure resources – not used here),
Releases (aka release pipelines – not used here)
Library (containing the variable groups)
The build pipelines exclusively used in this demo project are managed under the “Pipelines > Pipelines” menu tab – not really intuitive.
Azure Build Pipelines
The pipeline’s build agents are configured via YAML files (e.g. build-cluster.yml). In this case they install the Databricks CLI on the build machine and then execute CLI commands to create runtimes and move code notebooks to the runtime. The Databricks cluster is configured by a single JSON file (see config.cluster.json).
This minimal integration requires creation of two pipelines:
cluster creation – referencing pipelines/build-cluster.yml and
select the imported repository from the drop-down menu
select Existing Azure Pipeline YAML file
select the YAML file from the drop-down menu
Run the pipeline for the first time – or just save it and run it later.
At this point the Databricks secret access token mentioned in the prerequisite paragraph need to be present in a “databricks_cli” variable group. Otherwise the pipeline run will fail and warn; in this case just create the token (in Databricks) and the variable group (in DevOps) and re-run the pipeline.
After creating the pipelines and saving them (or running them initially), the default pipeline names reference the source repository name which triggers them. For easier monitoring the pipelines should be renamed according to their function, like “create-cluster” and “sync-workspace” in this case.
Summary
This concludes the integration of analytic code from an Azure DevOps repository into a hosted Databricks runtime.
Any change to the config.cluster.json deletes the existing cluster and creates a new one according to the specifications in the JSON file.
Any change to workspace/ will copy the notebook file(s) (R, Python, Scala) to the Databricks workspace for execution on the cluster.
The Databricks workspace in this example was hosted on Azure. Only minor changes are required to use an AWS hosted workspace. On all cloud platforms the host URL and security token is specific for the chosen instance and region. The cloud specific parameter is the node_type_id in the cluster configuration .json file.
Using this skeleton repo as a starting point, it is immediately possible to run interactive workloads on a performant Apacke Spark cloud cluster – instead of “cooking” the local laptop with analytic code – transparently maintained on a professional DevOps platform.
Appendix
Following, a detailed walk-through of the .yml pipeline configurations, .sh build scripts and .json configuration files.
In general, the YAML instructs the build server to 1. start up when a certain file is changed (trigger), 2. copy the contents of the repository to the build server and 3. execute a selection of shell scripts (tasks) from the repository
Pipeline: Create cluster
This is a detailed walk through for the build-cluster.yml pipeline. The .yml files have a hierachical structure and the full hierarchy of the DevOps build pipeline is included although stages could be omitted.
Trigger
The first section of the pipeline YAML specifies the trigger. Any changes to the specified branch of the linked repo will automatically run of the Build Agent.
Without the paths: section, any change to the master branch will run the pipeline. The cluster is rebuild when the configuration changes or the selection of installed Python- or R-libraries changes.
Stages
The stage can be omitted (for a single stage pipeline) and the pool, variables and jobs directly defined. Then the stage would be implicit. It is possible to add testing steps to the pipeline and build fully automated CI/CD pipelines accross environments within on .yml file.
Selects the type of virtual machine to start when the trigger files are changed. At the time of writing ubuntu_latest will start a Ubuntu 18.04 LTS image.
Variables
variables:-group: databricks_cli
This section references the variable group created in the Prerequisite section. The secret token is transfered to the build server and authorizes the API calls from the server to the Databricks workspace.
Jobs, Steps and Tasks
A job is a sequence of steps which are executed on the build server (pool). In this pipeline only task steps are used (see the docs for all step operations).
The first step is selecting the Python version for all following Python command on the build server; the Databricks CLI is written in Python and installed via Pip in the following task.
Task: Install and configure the Databricks CLI
        - task: ShellScript@2
          inputs:
            scriptPath: pipelines/databricks-cli-config.sh
            args: "\$(databricks_host) \$(databricks\_token)"
          displayName: "Install and configure the Databricks CLI"
Note that the path is relative to the root of the repo. The secret access token and host URL from the DevOps library are copied into environment variables which can be passed to the script in the args section.
The shell script executes the installation of the Databricks CLI and writes the neccessary CLI configuration on the build server.
Task: “Delete previous cluster version (if existing)”
This task will remove any cluster with the name provided in the args: section. This allows for updating the cluster when the configuration file is changed. When no such cluster is present the script will fail. Usually the pipeline will break at this point but here continueOnError is true, so the pipeline will continue when creating a cluster for the first time.
-task: ShellScript@2inputs:scriptPath: pipelines/databricks-cluster-delete.shargs:"HelloCluster"continueOnError:"true"displayName:"Delete previous cluster version (if existing)"
The shell script called by this task is a wrapper around the Databricks CLI. First it queries for the cluster-id of any cluster with the name passed.
CLUSTER_ID=$(databricks clusters list --output json |jq -r --arg N "$CLUSTER_NAME"'.clusters[] | select(.cluster_name == $N) | .cluster_id')
It is possible to create multiple clusters with the same name. In case there are multiple all of them are deleted.
forID in $CLUSTER_IDdoecho"Deleting $ID"databricks clusters permanent-delete --cluster-id $IDdone
Task: Create new cluster
-task: ShellScript@2inputs:scriptPath: pipelines/databricks-cluster-create.shargs:"HelloCluster"displayName:"Create new cluster"
The build script reads the config.cluster.json and adds the cluster name passed from the pipeline .yml
Now the configuration .json file can be passed to the Databricks CLI. The complete Apache Spark infrastructure is configured in the json. CLUSTER_NAME will be replaced with the name passed from the .yml.
Updating the runtime to another version requires only modifying the spark_version parameter with any supported runtime.
A Spark cluster consists of one driver node and a number of worker nodes and can be scaled horizontally by adding nodes (num_workers) or vertically by choosing larger node types. The node types are cloud provider specific. The Standard_DS3_v2 node type id references the minimal Azure node.
The autotermination feature shuts the cluster down when not in use. Costs are billed per second up time per processing unit.
Any reconfigurations triggers the pipeline and rebuilds the cluster.
The cluster create call returns the cluster-id of the newly created instance. Since the last step of this pipeline installs additional Python and R libraries (via Pip and CRAN respectively) it is necessary to wait for the cluster to be in pending state.
STATE=$(databricks clusters list --output json |jq -r --arg I "$CLUSTER_ID"'.clusters[] | select(.cluster_id == $I) | .state')echo"Wait for cluster to be PENDING"while [["$STATE"!="PENDING" ]]doSTATE=$(databricks clusters list --output json |jq -r --arg I "$CLUSTER_ID"'.clusters[] | select(.cluster_name == $I) | .state')done
Task: Install Python and R dependencies on the cluster
The final step is to add additional Python and R packages to the cluster. There are many ways to install packges in Databricks. This is just one way to do it.
-task: ShellScript@2inputs:scriptPath: pipelines/databricks-library-install.shargs:"HelloCluster"displayName:"Install Python and R dependencies"
Again the shell script wraps the Databricks CLI, here the library install command. The cluster name (“DemoCluster” in this example) has to be passed again.
All CLI calls to Databricks need the cluster-id to delete, create and manupulate instances. So first fetch it with a cluster list call:
CLUSTER_ID=$(databricks clusters list --output json |jq -r --arg N "$CLUSTER_NAME"'.clusters[] | select(.cluster_name == $N) | .cluster_id')
Then install the packages – one call to library install per package:
For additional Python or R package add a line in this build script – this will trigger the pipeline and the cluster is rebuild.
Pipeline: Import workspace
This is a detailed walk through for the build-workspace.yml pipeline. The first part of the pipeline is identical to the build-cluster.yml pipeline. The trigger include differs, since this pipeline is triggered by code pushes to the workspace/ directory. The choice of the build server (pool), the variable reference to the databricks_cli variable group for the Databricks access tokens and the Python version task are identical, also installing and configuring the Databricks CLI with the same build script as above.
The only build task is importing all files in the workspace/ directory to the Databricks Workspace. The args passes a sub-directory name for the /Shared/ folder in Databricks ( /Shared/HelloWorkspace/ in the example).
-task: ShellScript@2inputs:scriptPath: pipelines/databricks-workspace-import.shargs:"HelloWorkspace"displayName:"Import updated notebooks to workspace to dev"
The specified directory is first deleted. When the directory does not exist, the CLI prints and error in JSON format, but does not break the pipeline. The args: parameter is passed to the $SUBDIR variable in the build script.
Remember that the repo is copied into the pipeline build agent/server and the working directory of the pipeline agent points to the location of the .yml file which defines the pipeline.