
Creating an http proxy server to cloud – A hobby project
Why I wanted to create a proxy server to cloud?
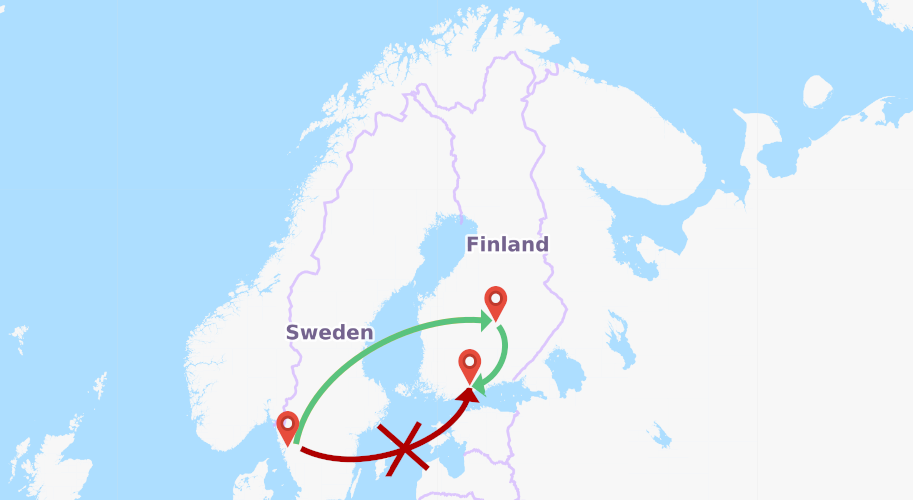
While I was on a business trip in Sweden I had some lazy time to watch a documentary from a video streaming service. Unfortunately the web service was available only in Finland, so I had to come up with other ways to spend my evening. The obvious choice was to try whether it would be theoretically possible to hack my location to watch such programs abroad.
To stay on the brighter side of the law, I decided to only validate approach in the conceptual level. I never tried the hack in the actual service, and you should neither.
And yes, there are tons of software products to make this easier. Rather, my goal was to learn new skills and sharpen my developer competence. The focus was more in the functionality rather than in the cyber security.
Disclaimer. Use this article on for legally valid business purposes such as rerouting traffic in your own web service. Always read the rules of the web services that you are using.
Choosing the cloud provider for the proxy server
I needed a virtual server located physically in Finland. Initially I planned to use Google Cloud virtual machines as Google has a data center in Finnish soil. Microsoft Azure and Amazon Web Services do not have data centers in Finland.
Well, the first attempt failed quickly, because Google Cloud did not assign the IP address of the proxy server to Finland. So I switched the focus on creating a general purpose http proxy server on AWS to fake the location for web services.
Next comes the instructions to replicate my approach. The examples are primarily for Windows users.
Creating a virtual server to AWS for http proxy
Create an AWS account if you don’t have one. Login to AWS console from the browser.
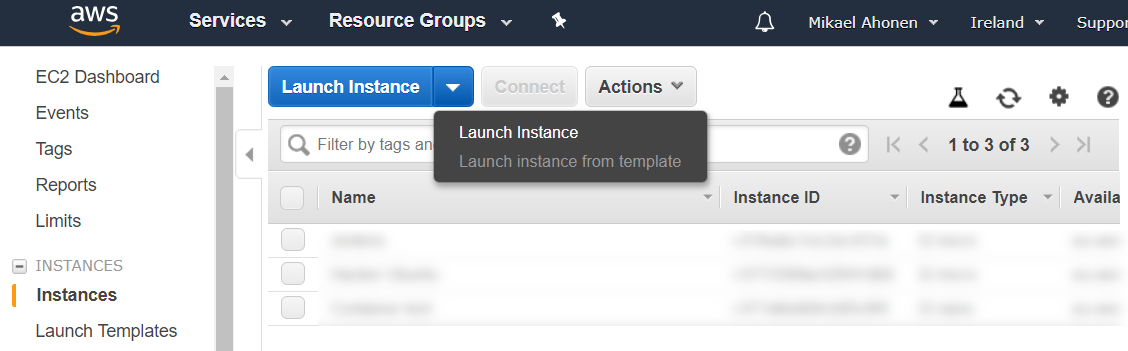
From services select EC2. Select the preferred region from the top right corner. I usually choose Ireland because it has one of the the most comprehensive service selections in Europe. By this choice the traffic would be rerouted through Ireland.
Click Launch instance.
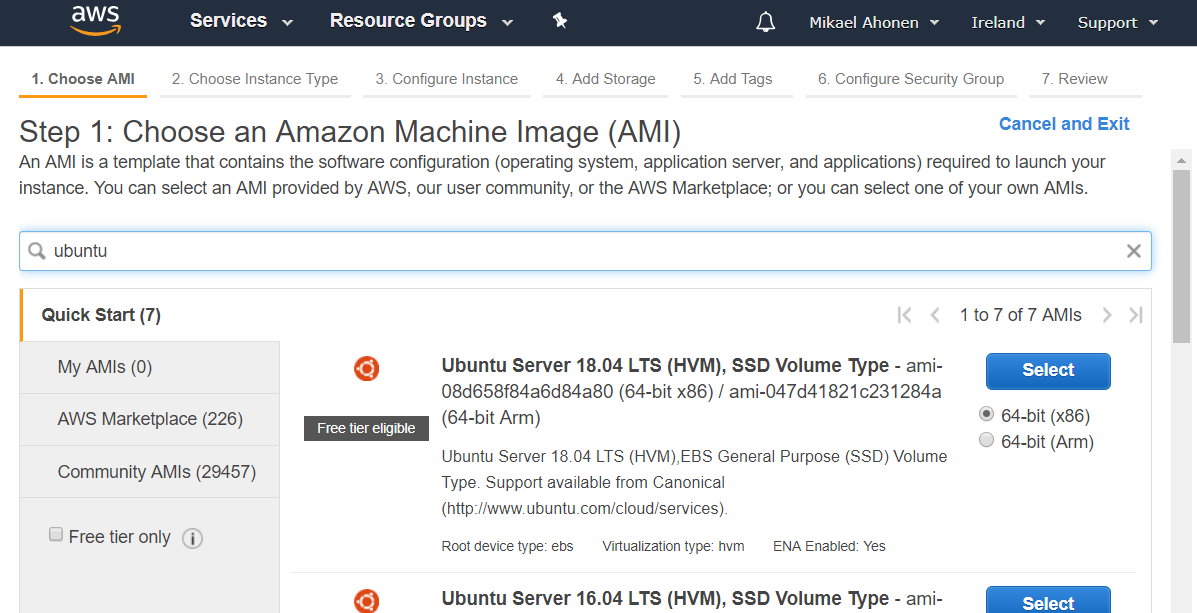
Select Ubuntu 18.04 LTS as the image for the EC2 instance.
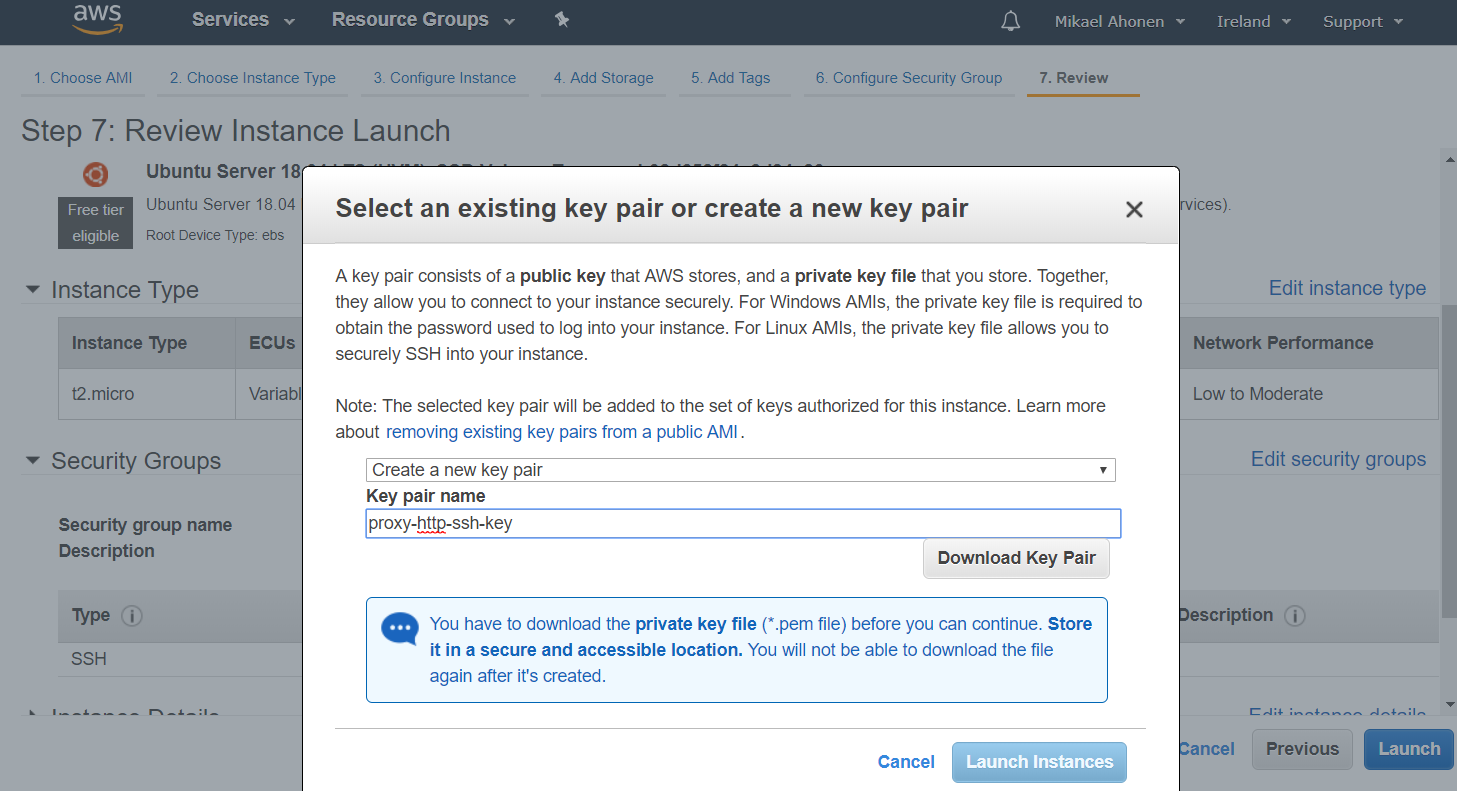
Click next until you are prompted to create an SSH key. Name the key as you wish, download it and launch the instance.
Go back to EC2 instance view and note the IP address. In my case it was 18.203.111.131. It is safe to publish the info here, as the virtual machine is already destroyed.

Connect to AWS EC2 instance and create a tunnel
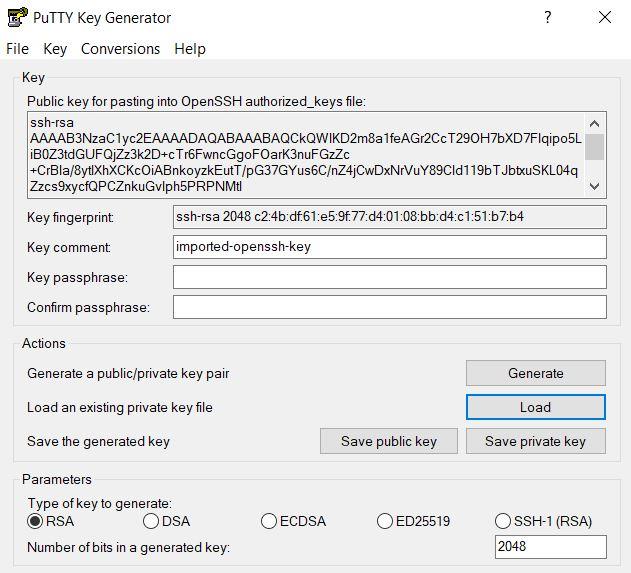
You need to have PuTTY Key Generator and PuTTY installed. The key file was downloaded in pem format from AWS. Convert the pem file to ppk using PuTTY Key Generator. Load the pem file and click Save private key.
Normally you would never want to show the private key to anyone. The key and the EC2 instance for this tutorial have already been destroyed.
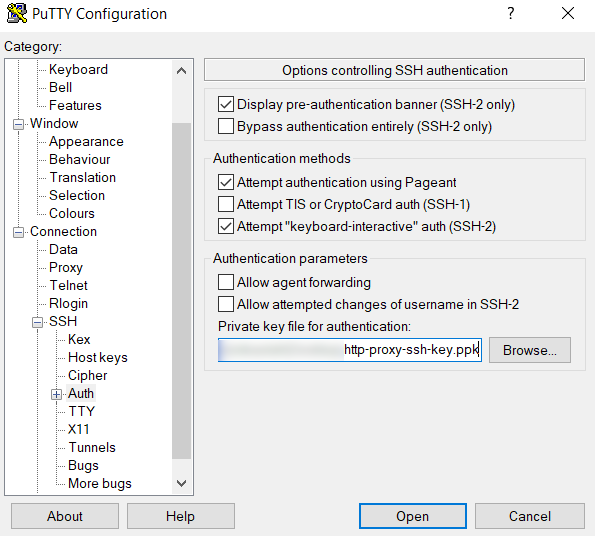
Go to PuTTY and give the username and IP address of the remote machine for PuTTY. For AWS EC2 Ubuntu instance the default user is ubuntu.

Go to Connection > SSH > Auth and browse the ppk file that you just saved.
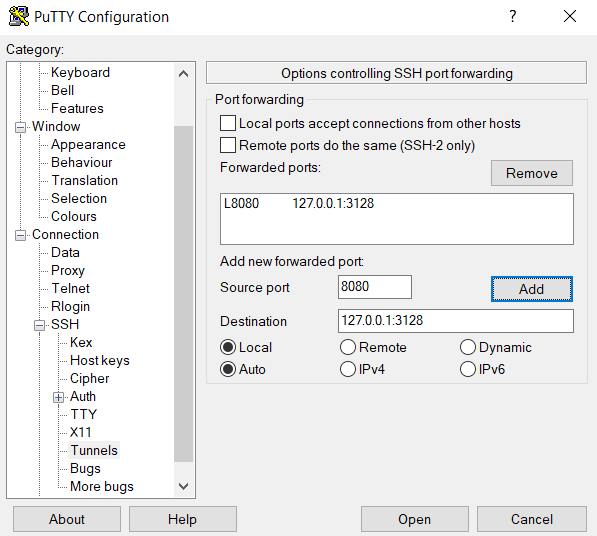
Create a tunnel that will route all traffic in your local machine port 8080 to port 3128 of the remote EC2 Ubuntu instance. 3128 is the default port for the squid proxy tool in Linux that we will install soon.
Click Open from the bottom of PuTTY. The terminal window appears.

Install squid in the virtual machine to make it an http proxy server
Install squid to the remote Ubuntu machine.
sudo apt update
sudo apt install squid
Find the line from the squid configuration file where the http access has been denied by default.
![]()
grep -n 'http_access deny all' /etc/squid/squid.conf
Open the squid configuration file for editing.
sudo nano /etc/squid/squid.conf
Simultaneously press CTRL and – to enter the line number to find the correct line.

Change the value to:
http_access allow localhost
Press CTRL and x to save. Choose y to confirm. Hit Enter to overwrite.

Finally restart the squid service.
sudo service squid restart
The proxy server is now successfully configured.
Configure Google Chrome browser for http proxy
Go to Google Chrome settings in your laptop. Find the settings having keyword proxy.
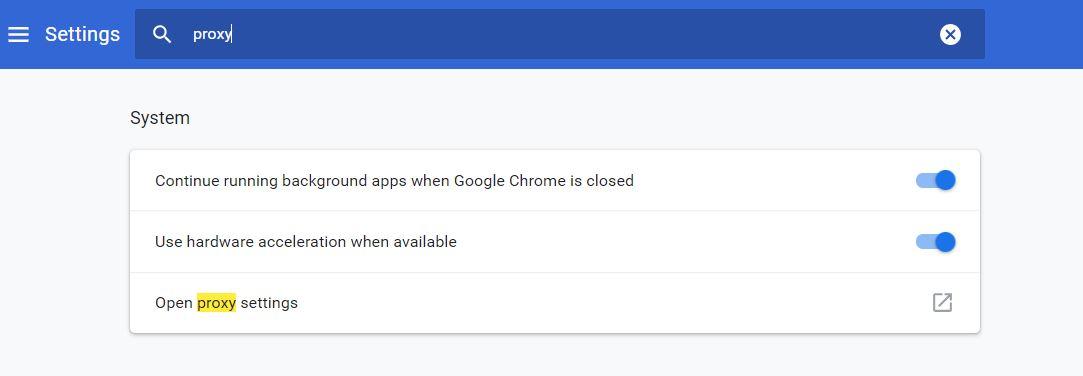
Click Open proxy settings. The browser opens Windows settings for the Internet Properties. Click LAN settings.

Route all traffic through your local machine’s (127.0.0.1) port 8080. That port again was tunneled to AWS EC2 port 3128 where the squid proxy server is running on top of the Ubuntu operating system.
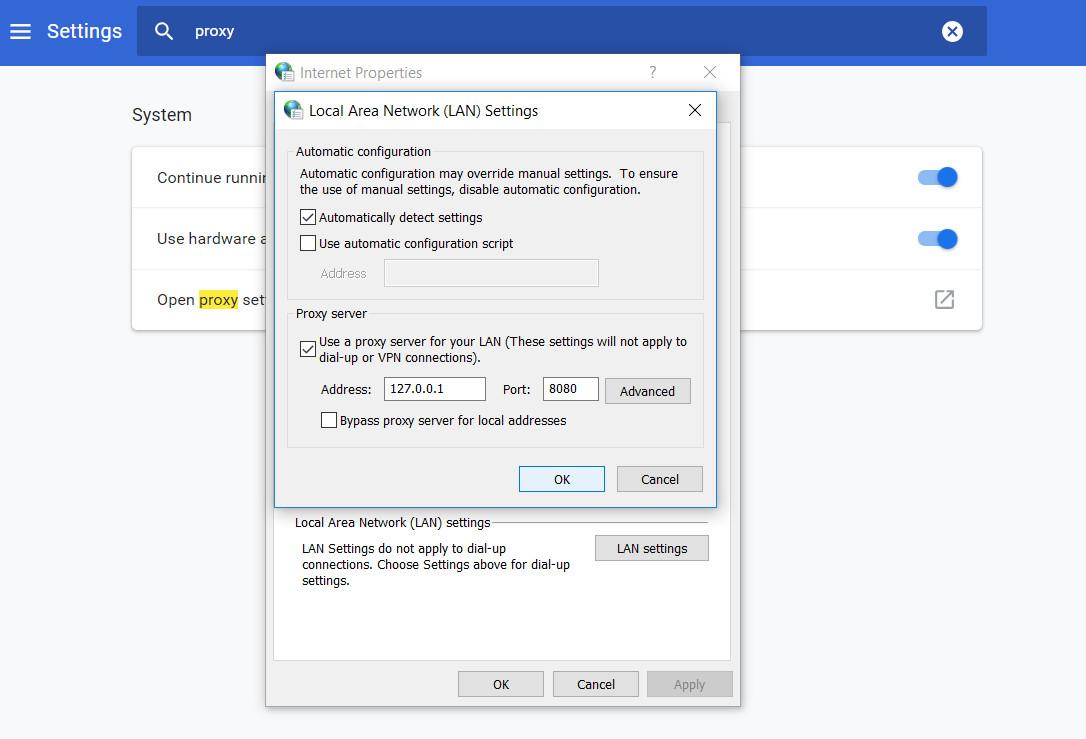
Click Ok to see the magic happening.
Checking if the http proxy server works in the browser
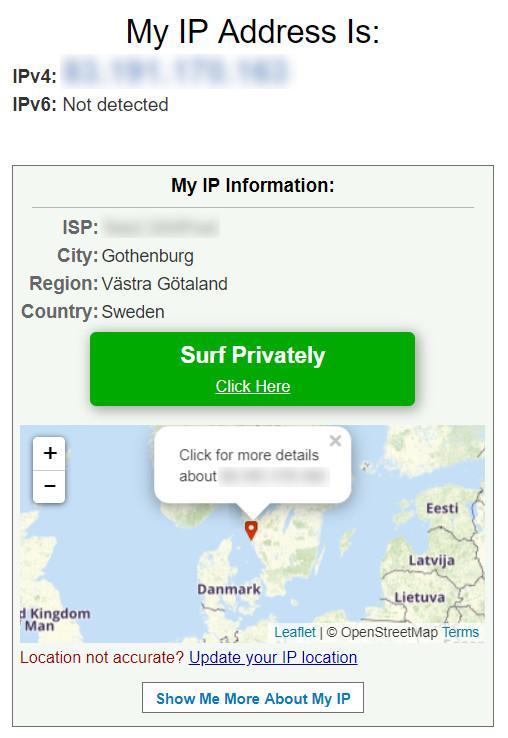
I went to a page which detects the client’s IP address and shows the geographical location. The web service thinks I’m in Ireland where the AWS data center is located.
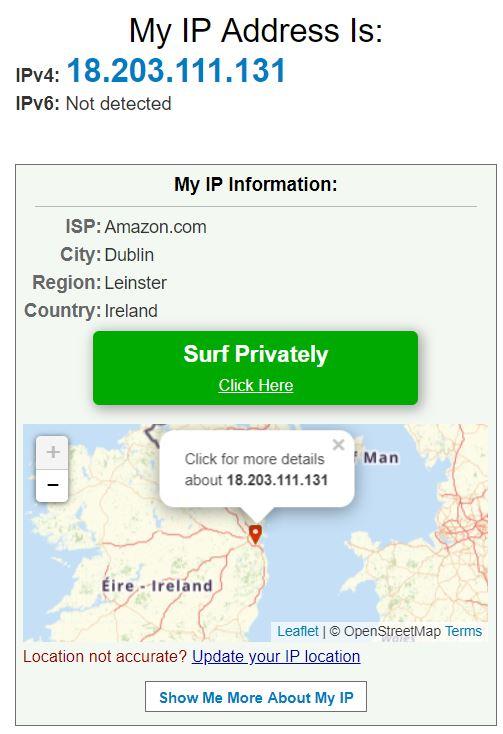
Once I switch off the browser proxy from Chrome/Windows my IP address points to my actual location. At the moment of writing I was in Gothenburg, Sweden.