

Power BI Embedded web app in Azure
Introduction
Power BI provides easy and readily available tools for report creation and distribution. However, distributing reports outside Power BI Service and to users without Power BI Pro account is limited. Say you have a Power BI report monitoring your Snowflake account usage (https://data.solita.fi/visualize-snowflake-warehouse-cost-using-power-bi/), and you’d like to share that to the development and maintenance team. You don’t want to purchase Power BI Pro licenses and you don’t want to open the report to the whole world. Instead you simply want to show your PBI report on a web page / in your intranet, where users can securely access it – and here’s where Power BI Embedded and Azure Web Apps come in handy!
In this blog post we’ll set up an environment with a Web App, and use a service principal (whose identity we’ll retrieve from Azure Key Vault) to access Power BI Service to retrieve a report for Embedding. All the work will result in a template that is easy to copy for new web applications to embed new reports. We’ll also take a look at some handy modifications to our Web App template for retrieving a desired report page and hiding navigation elements. You don’t need to be familiar with .NET, we’ll be doing only slight modifications to an existing Microsoft template!
Environment
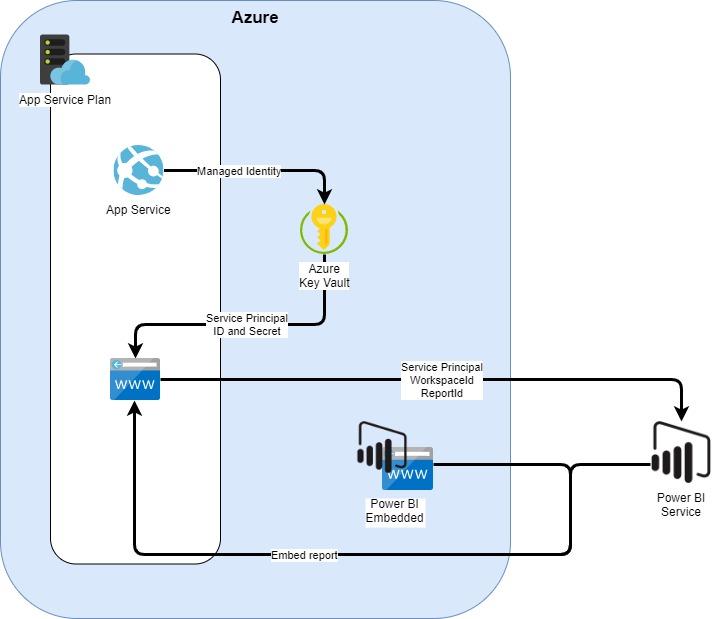
Target environment is presented in the picture below. The goal is to setup the environment in a way that it is easily reusable: for example adding a few more web applications with other reports embedded in them shouldn’t be too much of a trouble.
App Service Plan
Azure App Service Plan provides a pool of resources for App Services running inside the Plan. You can view it a bit like a server farm in old on-premises systems. The main decisions to make are your App Service Plan location (West Europe, US East, etc…) and the amount and level of resources available inside that Plan: number and size of instances, pricing tier. Start small when developing and scale up as required. As always, refer to Azure documentation for up-to-date information on different service levels: https://docs.microsoft.com/en-us/azure/app-service/overview-hosting-plans
App Service
Azure App Service provides infrastructure for a single application inside an App Service Plan. Each App Service receives a URL pointing to that particular App Service: for example https://ourprojectsnowflakemonitoring.azurewebsites.net. Our embedded report is a web application running in App Service. We’ll be using App Service managed identity to identify our application to Azure Key Vault. And lastly we can use App Service network configurations to restrict access to our application.
Web application
A web application running in Azure App Service can be written in a number of languages. We’ll be using a template provided by Microsoft from https://github.com/microsoft/PowerBI-Developer-Samples/tree/master/App%20Owns%20Data. We’ll modify the template so that we can retrieve configurations from Azure Key Vault, namely our Service Principal information. We will also use application settings so we can easily copy our web app for new embedded reports.
Azure Key Vault
Key Vault provides a secure place for accessing and storing secrets. In this example, we’ll be storing our Service Principal credentials there, and allowing access to our App Service.
Service Principal
Service Principal can be seen as a technical account in Azure AD. It offers a way to authenticate as a service, not as a user. Using Service Principals to authenticate your applications to Power BI Service is a more scalable way: say you have multiple workspaces and multiple applications using the reports: creating, managing and authorising multiple service principals is simpler than multiple “Master Users”. For much more detailed documentation, please refer to https://docs.microsoft.com/en-us/power-bi/developer/embed-service-principal.
Power BI Embedded
Power BI Embedded provides Power BI capacity outside Power BI Service. We can setup workspaces to use the Embedded capacity and provide the reports to outside users via web apps. Power BI Embedded comes in three capacities: A for capacity in Azure, EM for volume licensing, and P for Premium licence. Unless you already have volume licensing or Premium capacity, you would most probably want to use A capacity bought from Azure.
Power BI Service, Workspace and Report
The Embedded report resides as usual in Power BI Service in a Workspace that is assigned to use Embedded capacity. As we are using Service Principal, our Workspace needs to be V2, and we need to allow Service Principals to use it.
Environment setup
Terraform
I’m used to creating my environments using Terraform (https://www.terraform.io/). There’s a lot of blog posts out there discussing why you should or shouldn’t use Terraform in Azure. I personally like the easy readability and reusability of it.
Using Terraform in Azure and setting up a CI/CD pipeline from Azure DevOps is a topic for another blog post. Here, we’ll focus more on setting up our environment and the different configurations we require. So don’t worry right now about the Terraform syntax, let’s focus more on the output.
We are creating an App Service Plan sized D1 and Shared tier. This is suitable for development and testing.
resource "azurerm_app_service_plan" "service_plan" {
  name                = "blogpowerbiembedded"
  location            = "${module.defaults.resource_location}"
  resource_group_name = "${azurerm_resource_group.rg.name}"
  tags = "${module.defaults.tags}"
  sku {
    tier = "Shared"
    size = "D1"
  }
}
Then we add an App Service to previously created App Service Plan. We set the App Service to get a “System Assigned” identity. Using SystemAssigned identity, our newly created web app receives an Azure AD identity which we then authorize to access Azure Key Vault to retrieve Service Principal Secrets. This way we don’t have to authorize anything else (for example another service principal) besides the application itself to retrieve the secret.
We also set an app_settings block. These are application configurations, which will override the configurations set in code. These will become handy later on.
resource "azurerm_app_service" "snowflake_monitor" {
  name                = "example-snowflake-monitor"
  location            = "${module.defaults.resource_location}"
  resource_group_name = "${azurerm_resource_group.rg.name}"
  app_service_plan_id = "${azurerm_app_service_plan.service_plan.id}"
  https_only          = "true"

 identity {
    type = "SystemAssigned"
  }

  app_settings {
    "reportId" = "nnnnnn"
    "workspaceId" = "nnnnn"
  }
}
Creating a key vault is pretty straight forward. What is special here is that we grant “get” and “list” permissions to the system assigned identity of our App Service: the tenant_id and object_id are dynamically referencing the corresponding outputs of the system assigned identity. No need to hardcode anything.
resource "azurerm_key_vault" "keyvault" {
  name                        = "${module.defaults.name_prefix_safe}pbiemb"
  resource_group_name         = "${azurerm_resource_group.rg.name}"
  location                    = "${module.defaults.resource_location}"
  enabled_for_disk_encryption = true
  tenant_id                   = "${module.secrets.tenant_id}"
  sku_name                    = "standard"

  tags = "${module.defaults.tags}"
}

resource "azurerm_key_vault_access_policy" "snowflake_monitor" {
  key_vault_id          = "${azurerm_key_vault.keyvault.id}"
  tenant_id = "${azurerm_app_service.snowflake_monitor.identity.0.tenant_id}"
  object_id = "${azurerm_app_service.snowflake_monitor.identity.0.principal_id}"
  secret_permissions = [
    "get",
    "list"
  ]
}
Remember to restrict access to your web app if required. For example, restrict access to only your offices’ and vpn’s IPs.
Service Principal
Next, we need a service principal. Service principal is a technical account which accesses Power BI Service and REST APIs. It doesn’t require any licenses and it can’t login via app.powerbi.com. More info about Service Principal in Power BI Embedded context can be found from https://docs.microsoft.com/en-us/power-bi/developer/embed-service-principal.
Create the Service Principal any way you like: az cli, PowerShell, Azure Portal, have your Azure Admin do it. We then need to add permissions to our Service Principal to use Power BI REST APIs. This is pretty straightforward in Azure Portal: https://docs.microsoft.com/en-us/power-bi/developer/register-app#apply-permissions-to-your-application-within-azure-ad
What you require are Service Principal Client ID and Client Secret. Add them to your Key Vault:
resource "azurerm_key_vault_secret" "sp_id" {
  name      = "servicePrincipalClientId"
  value     = "${module.secrets.powerbi_embedded_sp_client_id}"
  key_vault_id  = "${azurerm_key_vault.keyvault.id}"
  tags = "${module.defaults.tags}"
}

resource "azurerm_key_vault_secret" "sp_secret" {
  name      = "servicePrincipalClientSecret"
  value     = "${module.secrets.powerbi_embedded_sp_client_secret}"
  key_vault_id  = "${azurerm_key_vault.keyvault.id}"
  tags = "${module.defaults.tags}"
}
Here the actual values are retrieved from another place. We don’t want to store sensitive information in plaintext in Terraform.
Power BI Service and Workspace
Setting up a Power BI Embedded can be a bit of a hassle and documentation is spread around. A more complete guide is a topic of it’s own blog post, so here’s a short summary of what needs to be done:
- Create Power BI Embedded capacity in Azure. That means A-tier capacity (P-tier is for Premium, and EM for volume licensing). Note that Embedded capacity should be in the same region as your Power BI Service is. Don’t forget to add capacity admin.
- Add Embedded capacity to your Power BI Service
- Assign a Workspace V2 to Embedded capacity. As we are using Service Principals, we need to use a Workspaces V2.
- Allow Service Principals in Tenant settings
- Allow service principals in the Workspace with your Reports you want to Embed.
Power BI Report for Embedding
Now that everything else is ready we still need the actual report and the web page to display and embed the report. The embedded report resides as usual in Power BI Service, published in our Workspace V2 added to Embedded capacity.
Open your report, and publish it to the correct workspace. Note that you will need a Power BI Pro license to do so.
After publishing, the parameters we require for embedding are Report and Workspace Id. These you can retrieve from your published report. Open your report and look at the url:

Here the part after “groups/” is your workspace ID. The part after “reports/” is your report ID.
You might remember we had an app settings block in our web app:
  app_settings {
    "reportId" = "nnnnnn"
    "workspaceId" = "nnnnn"
  }
Update your application settings.
  app_settings {
    "reportId" = "nnnnnnn-nnnn-nnnn-nnnn-nnnnnnnnnn"
    "workspaceId" = "nnnnnn-nnnn-nnnn-nnnn-nnnnnnnnnn"
  }
Now we have empty web app capacity which has access to Azure Key Vault to retrieve Service Principal ID and secret in order to access our Power BI. All that is left is the web application itself.
Web App
Our web app will be a simple web page which shows the report from Power BI. We’ll be using the template with no further authentication. The template is called “app owns data”. It is advisable to restrict web app access to your office IPs for example.
For Web App, we’ll use the app owns data sample provided by Microsoft: https://github.com/microsoft/PowerBI-Developer-Samples/tree/master/App%20Owns%20Data
Download a copy of the project, and open up the PowerBIEmbedded_AppOwnsData.sln in Visual Studio. The template requires some modifications:
- Reference the Key Vault for secrets
- Use the Key Vault as a source for configurations
Besides Key Vault, we’ll also use application settings (set before, report ID and workspace ID) as a source for configurations. This happens automatically, and doesn’t require any modifications.
Setup Azure Key Vault
Let’s add our Key Vault as a connected service:

Select the Key Vault we just created. Note, you might need to add access rights to yourself depending on your setup!

Use Key Vault as a source for configurations
Update and add NuGet packages:

You’ll want to update the already existing packages. We also need to add one NuGet package in order for us to use Azure Key Vault as a config source. Add NuGet package:
Microsoft.Configuration.ConfigurationBuilders.Azure
Now we want to modify our configurations. Open the web.config file. At the start of the file, add configBuilders section (modify “yourkeyvaultname” to match your keyvault). Also add configBuilders=”AzureKeyVault” to appSettings block.
<configuration>
  <configSections>
    <section name="entityFramework" type="System.Data.Entity.Internal.ConfigFile.EntityFrameworkSection, EntityFramework, Version=6.0.0.0, Culture=neutral, PublicKeyToken=b77a5c561934e089" requirePermission="false" />
    <section name="ServicePrincipal" type="System.Configuration.NameValueSectionHandler" />
    <section name="MasterUser" type="System.Configuration.NameValueSectionHandler" />
    <!-- For more information on Entity Framework configuration, visit http://go.microsoft.com/fwlink/?LinkID=237468 -->
    <section name="configBuilders" type="System.Configuration.ConfigurationBuildersSection, System.Configuration, Version=4.0.0.0, Culture=neutral, PublicKeyToken=b03f5f7f11d50a3a" restartOnExternalChanges="false" requirePermission="false" />
  </configSections>
  <configBuilders>
    <builders>
    <add name="AzureKeyVault" vaultName="yourkeyvaultname" type="Microsoft.Configuration.ConfigurationBuilders.AzureKeyVaultConfigBuilder, Microsoft.Configuration.ConfigurationBuilders.Azure, Version=1.0.0.0, Culture=neutral" vaultUri="https://yourkeyvaultname.vault.azure.net"/></builders>
  </configBuilders>
  <appSettings configBuilders="AzureKeyVault">
    <add key="webpages:Version" value="3.0.0.0" />
    <add key="webpages:Enabled" value="false" />
    <add key="ClientValidationEnabled" value="true" />
….
In the same web.config, find appSettings, and change your application to use ServicePrincipal.
<add key="AuthenticationType" value="ServicePrincipal" />
For local debugging, you can add workspaceId and reportId. However, the app_settings values we previously set for web application in Azure will override anything you set in here.
    <add key="workspaceId" value=""/>
    <add key="reportId" value=""/>
Fill your Azure AD tenant:
    <!-- Fill Tenant ID in authorityUrl-->
    <add key="authorityUrl" value="https://login.microsoftonline.com/common/f4nnnnn-nnnn-nnnn-nnnn-nnnnnnnnnnnn" />
You need to add empty key-value pairs for every Key Vault secret you want to import! Let’s say our ServicePrincipal secret is called “servicePrincipalClientSecret”. To import it, we need to add the following line in app settings:
<add key="servicePrincipalClientSecret" value="" />
We are also retrieving the Service Principal ID from Key Vault:
<add key="servicePrincipalClientSecret" value="" />
The actual values are fetched from Azure Key Vault.
Use configuration values in our application
Check what configuration values map to what values in application: Modify Services/EmbedService.cs In our example, we need to configure ApplicationSecret to point to servicePrincipalClientSecret, and ApplicationId to point to servicePrincipalClientId. This is at the very start of the file:
 public class EmbedService : IEmbedService

    {

       ...

        private static readonly string ApplicationId = ConfigurationManager.AppSettings["servicePrincipalClientId"];

        ...

        private static readonly string ApplicationSecret = ConfigurationManager.AppSettings["servicePrincipalClientSecret"];

...
Start debugging:

A web page should open. Click on Embed report, and it should open a report for you!

And that’s it! You’ve successfully set-up a Web App, which connects to a Key Vault using a managed identity, to get client secrets, and then uses those secrets to identify as a Service Principal to Embed a Power BI report to your web page! That was a mouthful; in other words, you are using application specific secrets the correct way and not some hard-coded human-impersonating Power BI account.
Publish our Web App
All that is left is to publish our web app:

Let’s use our previously created web app:


Click OK and then publish, and you are good to go! You might want restrict access to your web app only to your office and vpn IPs.
Some modifications
Disable filter and navigation panes from report
Say you are showing your report in a non-interactive way (a TV screen for example). You might want hide redundant filter and navigation panes from the view:
Modify Views/Home/EmbedReport.cshtml. Find the following:
    var config = {
        type: 'report',
        tokenType: models.TokenType.Embed,
        accessToken: accessToken,
        embedUrl: embedUrl,
        id: embedReportId,
        permissions: models.Permissions.All,
        settings: {
            filterPaneEnabled: true,
            navContentPaneEnabled: true
        }
    };
Change the settings block filterPaneEnabled and navContentPaneEnabled to “false”. You can find other interesting settings and their documentation like locale from https://github.com/Microsoft/PowerBI-JavaScript/wiki/Embed-Configuration-Details.
Go to report page based on URL parameter
You have a nice report showing on your TV with navigations and filters disabled. Nice. Now you’d like to show different pages from that report based on a URL.
Modify Controllers/HomeController.cs
Add ReportPage to EmbedReport:
public async Task<ActionResult> EmbedReport(string username, string roles, int ReportPage = 0)
The zero in ReportPage means that by default we’ll open the first page.
Modify Views/Home/EmbedReport.cshtml.
Change the end of the file from:
    // Embed the report and display it within the div container.
    var report = powerbi.embed(reportContainer, config);
To
    // Get a reference to the embedded report HTML element
    var reportContainer = $('#embedContainer')[0];

    // call load() instead of embed() to load the report while delaying the rendering process
    var report = powerbi.load(embedContainer, config);

    // when loaded event occurs, set current page then call render()
    report.on("loaded", function () {
       // console.log("loaded event executing");
        // call to get Pages collection
        report.getPages().then(
            function (pages) {
                // inspect pages in browser console
                //console.log(pages);
                // display specific page in report
                var startPage = pages[@ViewBag.ReportPage];
                config.pageName = startPage.name;
                // Call report.render() to display report
                report.render(config);
            });
    });
Now you can set the report page in the URL. Use ReportPage=<page_number_starting_from_0> as the parameter: For example “EmbedReport?ReportPage=1” would take you to the second page.
Further customization:
Embed container size and other style related: Content/style/style.css
Webpage customization: Views/Home/EmbedReport.cshtml
For much more information, check .NET MVC Framework: https://docs.microsoft.com/fi-fi/aspnet/mvc/overview/getting-started/introduction/adding-a-view
It is possible to require users to authenticate to your Azure AD: this option is called “users’ own data” and the template is found from the same GitHub repo as our app own data example.
Publishing a new report
Now that we have a working template, publishing a new web app pointing to a new report is extremely fast and easy.
- Get your new report’s report ID. Use the same workspace, or remember to add the service principal to the new Power BI workspace.
- Create a new web application in Azure. It’s just copying in your Terraform: Update the reportId and workspaceId, add key vault access policy. Here we are creating a new web app called “Solita-blog-datapipeline-monitor”.
- Copy our web application solution.
- Open the new copy, and publish it to the new web app in Azure.
resource "azurerm_app_service" "datapipeline_monitor" {
  name                = "solita-blog-datapipeline-monitor"
  location            = "${module.defaults.resource_location}"
  resource_group_name = "${azurerm_resource_group.rg.name}"
  app_service_plan_id = "${azurerm_app_service_plan.service_plan.id}"
  https_only          = "true"
  identity {
    type = "SystemAssigned"
  }

  app_settings {
    "reportId" = "Some-New-value-nnnn-xxxxxxx"
    "workspaceId" = "nnnnnn-nnnn-nnnn-nnnn-nnnnnnnnnn"
  }
}

resource "azurerm_key_vault_access_policy" "datapipeline_monitor" {
  key_vault_id          = "${azurerm_key_vault.keyvault.id}"
  tenant_id = "${azurerm_app_service.datapipeline_monitor.identity.0.tenant_id}"
  object_id = "${azurerm_app_service.datapipeline_monitor.identity.0.principal_id}"
  secret_permissions = [
    "get",
    "list"
  ]
}
Wrap up
You now know what kind of environment you need to securely use Web App, Power BI Service and Power BI Embedded in Azure. You know how to do some modifications to your web app or at least where to look for more information. And after the first application, publishing a new one is just a simple matter of creating a new copy with two new parameter values.
After working with Power BI Embedded for a while I’ve grown to appreciate it’s capabilities. This was just about embedding a complete report from Power BI Service, and I’m looking forward to do some more complex work combining web applications with Power BI Embedded!