Data classification methods for data governance

Data classification is an important process in enterprise data governance and cybersecurity risk management. Data is categorized into security and sensitivity levels to make it easier to keep the data safe, managed and accessible. The risks for poor data classification are relevant for any business. By not following the data confidentiality policies and also preferably automation, an enterprise can expose its trusted data to unwanted visitors by a simple human error or accident. Besides the governance and availability points of view, proper data classification policies provide security and coherent data life cycles. They are also a good way to prove that your organization follows compliance standards (e.g. GDPR) to promote trust and integrity.

In the process of data classification, data is initially organized into categories based on type, contents and other metadata. Afterwards, these categories are used to determine the proper level of controls for the confidentiality, integrity, and availability of data based on the risk to the organization. It also implies likely outcomes if the data is compromised, lost or misused, such as the loss of trust or reputational damage.

Though there are multiple ways and labels for classifying company data, the standard way is to use high risk, medium risk and low/no risk levels. Based on specific data governance needs and the data itself, organizations can select their own descriptive labels for these levels. For this blog, I will label the levels confidential (high risk), sensitive (medium risk) and public (low/no risk). The risk levels are always mutually exclusive.

  • Confidential (high risk) data is the most critical level of data. If not properly controlled, it can cause the most significant harm to the organization if compromised. Examples: financial records, IP, authentication data
  • Sensitive (medium risk) data is intended for internal use only. If medium risk data is breached, the results are not disastrous but not desirable either. Examples: strategy documents, anonymous employee data or financial statements
  • Public (low risk or no risk) data does not require any security or access measures. Examples: publicly available information such as contact information, job or position postings or this blog post.

High risk can be divided into confidential and restricted levels. Medium risk is sometimes split into private data and internal data. Because a three-level design may not fit every organization, it is important to remember that the main goal of data classification is to assess a fitting policy level that works with your company or your use case. For example, governments or public organizations with sensitive data may have multiple levels of data classification but for a smaller entity, two or three levels can be enough. Guidelines and recommendations for data classification can be found from standards organizations such as International Standards Organization (ISO 27001) and National Institute of Standards and Technology (NIST SP 800-53).

Besides standards and recommendations, the process of data classification itself should be tangible. AWS (Amazon Web Services) offers a five-step framework for developing company data classification policies. The steps are:

  1. Establishing a data catalog
  2. Assessing business critical functions and conduct an impact assessment
  3. Labeling information
  4. Handling of assets
  5. Continuous monitoring

These steps are based on general good practices for data classification. First, a catalog for various data types is established and the data types are grouped based on the organization’s own classification levels.

The security level of data is also determined by its criticality to the business. Each data type should be assessed by its impact. Labeling the information is recommended for quality assurance purposes.

AWS uses services like Amazon SageMaker (SageMaker provides tools for building, training and deploying machine learning models in AWS) and AWS Glue (AWS Glue is an ETL event-driven service that is used for e.g. data identification and categorization) to provide insight and support for data labels. After this step, the data sets are handled according to their security level. Specific security and access controls are provided here. After this, continuous monitoring kicks in. Automation handles monitoring, identifies external threats and maintains normal functions.

Automating the process

The data classification process is fairly complex work and takes a lot of effort. Managing it manually every single time is time-consuming and prone for errors. Automating the classification and identification of data can help control the process and reduce the risk of human error and breach of high risk data. There are plenty of tools available for automating this task. AWS uses Amazon Macie for machine learning based automation. Macie uses machine learning to discover, classify and protect confidential and sensitive data in AWS. Macie recognizes sensitive data and provides dashboards and alerts for visual presentation of how this data is being used and accessed.

Amazon Macie dashboard shows enabled S3 bucket and policy findings


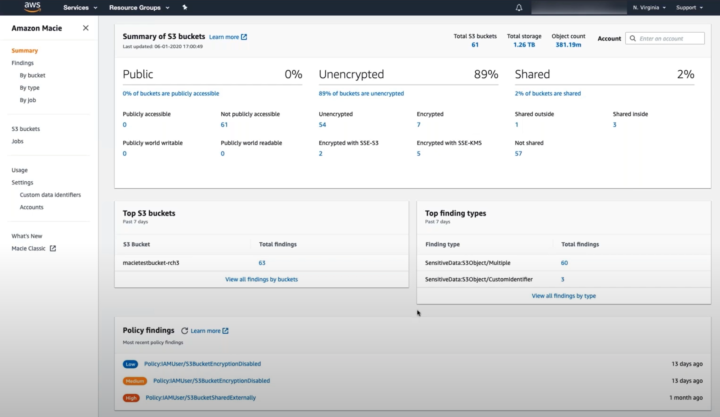
After selecting the S3 buckets the user wants to enable for Macie, different options can be enabled. In addition to the frequency of object checks and filtering objects by tags, the user can use custom data identification. Custom data identifiers are a set of criteria that is defined to detect sensitive data. The user can define regular expressions, keywords and a maximum match distance to target specific data for analysis purposes.

As a case example, Edmunds, a car shopping website, promotes Macie and data classification as an “automated magnifying glass” into critical data that would be difficult to notice otherwise. For Edmunds, the main benefits of Macie are better visibility into business-critical data, identification of shared access credentials and protection of user data.

Though Amazon Macie is useful for AWS and S3 buckets, it is not the only option for automating data classification. A simple Google search offers tens of alternative tools for both small and large scale companies. Data classification is needed almost everywhere and the business benefit is well-recognized.

For more information about this subject, please contact Solita Industrial.

Http proxy through AWS EC2 Ubuntu for fake IP address.

Creating an http proxy server to cloud – A hobby project

Introducing an approach to reroute web traffic through a virtual machine in the cloud. This was a personal competence development project for which Solita allows their employees to spend some working hours.

Why I wanted to create a proxy server to cloud?

While I was on a business trip in Sweden I had some lazy time to watch a documentary from a video streaming service. Unfortunately the web service was available only in Finland, so I had to come up with other ways to spend my evening. The obvious choice was to try whether it would be theoretically possible to hack my location to watch such programs abroad.

To stay on the brighter side of the law, I decided to only validate approach in the conceptual level. I never tried the hack in the actual service, and you should neither.

And yes, there are tons of software products to make this easier. Rather, my goal was to learn new skills and sharpen my developer competence. The focus was more in the functionality rather than in the cyber security.

Disclaimer. Use this article on for legally valid business purposes such as rerouting traffic in your own web service. Always read the rules of the web services that you are using.

Choosing the cloud provider for the proxy server

I needed a virtual server located physically in Finland. Initially I planned to use Google Cloud virtual machines as Google has a data center in Finnish soil. Microsoft Azure and Amazon Web Services do not have data centers in Finland.

Well, the first attempt failed quickly, because Google Cloud did not assign the IP address of the proxy server to Finland. So I switched the focus on creating a general purpose http proxy server on AWS to fake the location for web services.

Next comes the instructions to replicate my approach. The examples are primarily for Windows users.

Creating a virtual server to AWS for http proxy

Create an AWS account if you don’t have one. Login to AWS console from the browser.

From services select EC2. Select the preferred region from the top right corner. I usually choose Ireland because it has one of the the most comprehensive service selections in Europe. By this choice the traffic would be rerouted through Ireland.

Click Launch instance.

Select Ubuntu 18.04 LTS as the image for the EC2 instance.

Click next until you are prompted to create an SSH key. Name the key as you wish, download it and launch the instance.

Go back to EC2 instance view and note the IP address. In my case it was 18.203.111.131. It is safe to publish the info here, as the virtual machine is already destroyed.

Connect to AWS EC2 instance and create a tunnel

You need to have PuTTY Key Generator and PuTTY installed. The key file was downloaded in pem format from AWS. Convert the pem file to ppk using PuTTY Key Generator. Load the pem file and click Save private key.

Normally you would never want to show the private key to anyone. The key and the EC2 instance for this tutorial have already been destroyed.

Go to PuTTY and give the username and IP address of the remote machine for PuTTY. For AWS EC2 Ubuntu instance the default user is ubuntu.

Go to ConnectionSSH > Auth and browse the ppk file that you just saved.

Create a tunnel that will route all traffic in your local machine port 8080 to port 3128 of the remote EC2 Ubuntu instance. 3128 is the default port for the squid proxy tool in Linux that we will install soon.

Click Open from the bottom of PuTTY. The terminal window appears.

Install squid in the virtual machine to make it an http proxy server

Install squid to the remote Ubuntu machine.

sudo apt update
sudo apt install squid

Find the line from the squid configuration file where the http access has been denied by default.

grep -n 'http_access deny all' /etc/squid/squid.conf

Open the squid configuration file for editing.

sudo nano /etc/squid/squid.conf

Simultaneously press CTRL and  to enter the line number to find the correct line.

Change the value to:

http_access allow localhost

Press CTRL and x to save. Choose y to confirm. Hit Enter to overwrite.

Finally restart the squid service.

sudo service squid restart

The proxy server is now successfully configured.

Configure Google Chrome browser for http proxy

Go to Google Chrome settings in  your laptop. Find the settings having keyword proxy.

Click Open proxy settings. The browser opens Windows settings for the Internet Properties. Click LAN settings.

Route all traffic through your local machine’s (127.0.0.1) port 8080. That port again was tunneled to AWS EC2 port 3128 where the squid proxy server is running on top of the Ubuntu operating system.

Click Ok to see the magic happening.

Checking if the http proxy server works in the browser

I went to a page which detects the client’s IP address and shows the geographical location. The web service thinks I’m in Ireland where the AWS data center is located.

Once I switch off the browser proxy from Chrome/Windows my IP address points to my actual location. At the moment of writing I was in Gothenburg, Sweden.

New call-to-action