
Learning from the Master: Using ChatGPT for Reinforcement Learning – part 1
This blog will reference source code presented here: chatGPT_RL_Blog1
Grammarly and GitHub Copilot are tools that help professionals improve their writing and coding by identifying errors and suggesting corrections. Grammarly is a writing tool that checks grammar, spelling, and punctuation, while GitHub Copilot is a coding tool that suggests code completions and helps with refactoring. These tools are designed to help professionals who already know the solution to the problem but want to speed up their work by automating error checking and providing suggestions to improve their writing or coding.
ChatGPT, on the other hand, is a language model that can generate text similar to human language. It can be used to generate code based on input, but it’s not specifically designed or trained to optimize code. However, ChatGPT can understand natural language instructions and generate code that follows those instructions, which makes it even better for people who are not experts in coding to write code based on their needs and it can perform a wide range of tasks. Additionally, ChatGPT has the ability to understand natural language inputs and generate human-like responses, which is not the case for Grammarly and GitHub Copilot which are specialized for specific tasks.
I have come across several blog posts (f.ex. https://www.solita.fi/en/blogs/gpt-will-you-do-the-fandango/) discussing the use of ChatGPT for data science and have personally conducted my own testing and troubleshooting with it. As a result, I decided to utilize ChatGPT for a hobby project in data science. It revolves around optimizing the revenue of taxi drivers with reinforcement learning. The following details my process, the challenges encountered, and the outcomes achieved.
For reference, this optimization problem was presented as a part of a Reinforcement Learning course when I was studying at university. Multiple different solutions to this problem are available on GitHub and Kaggle.
Here is the link to the source material presented: chatGPT_RL_Blog1
Primer – What is reinforcement learning?
Reinforcement learning is a type of machine learning where an agent learns to make decisions by interacting with its environment. The agent receives rewards or penalties for its actions and uses this feedback to improve its decision-making over time. A common example of this is a computer program that learns to play a game by repeatedly playing it and adjusting its strategy based on its performance. The goal of the agent is to maximise its overall reward over time. Reinforcement learning has been used to train agents to play complex games like Go and chess, as well as control robots and drones.
Reader discretion is advised – Why can the outputs differ when using the same inputs in chatGPT?
“ChatGPT generates its output based on the input it receives and the patterns it has learned from the dataset it was trained on. If the input it receives is slightly different, the model will generate a different output based on the patterns it has learned. Additionally, ChatGPT is a probabilistic model, so it samples from the distribution of possibilities it has learned from the data. Therefore, even if the input is the same, ChatGPT may generate a different output each time it is run. The variation can also come from the fact that the model is not deterministic.” – chatGPT
If you want to deep dive into the subject, “why does the data make the model”, I recommend having a look at Andrew Ng’s work Data-centric AI Resource Hub (datacentricai.org)
Generating boilerplate code with chatGPT
Let’s first see how chatGPT builds the environment for the reinforcement learning problem.
The problem declaration was given as a README.md file. The environment for the cab driver is defined and constrained very clearly so that students can start working with it immediately.
Let’s see how chatGPT performs, there won’t be pictures of the complete outputs since that would make this blog way too long. The reader is encouraged to try these input prompts while you’re reading and taking a look at the boilerplate was the result of this experiment.
Input: Based on this input explain the problem and summary of a possible solution.
Output: “The problem at hand is to develop an RL-based algorithm that can assist cab drivers in maximizing their profits by helping them make better decisions on the field. The recent hikes in electricity prices have caused many drivers to complain that their profits are almost flat despite gradually increasing revenues. The algorithm’s goal is to help drivers choose the ‘right’ rides, i.e. those that are likely to maximize the total profit earned by the driver that day. The objective of the problem is to maximize the profit earned over the long-term. The decisions are made at an hourly interval, and the algorithm needs to take into consideration the current state of the driver (location, hour-of-the-day, and day-of-the-week), the ride requests received, and the rules governing the ride-allocation system. A possible solution in python would be to develop a Q-learning algorithm that takes into account the state, action, and reward, and updates the Q-values over time to converge to an optimal policy for the cab driver to follow.”
If you read the problem definition you can see that chatGPT wrote a really nice summary of the problem described.
Input: Based on the previous input generate, a environment.py file that can be used to train an RL agent to solve the problem. The reinforcement learning agent is a Tensorflow Keras API based deep Q learning model.
Output: “I’m sorry but creating an environment.py file that can be used to train an RL agent to solve the problem would require me to have access to the relevant data and the complete structure of the deep Q learning model. Additionally, it would also require a significant amount of code development and testing to make sure the environment is working correctly.
However, I can give you some guidelines on how to create such an environment.py file:
- Define the state space and the action space for the agent
- Create a class for the environment that initializes the state and implements the step function, which takes in the action chosen by the agent and returns the next state, reward, and a boolean indicating if the episode is over
- Implement a method for resetting the environment to the initial state
- Implement a method for rendering the current state of the environment
- Create a function for getting the state from the environment, which will be used by the agent to update its Q-values
- Add any additional functionality needed for the specific problem and the chosen RL algorithm
Please keep in mind that the implementation details of the environment will depend on the data and the specific problem you are trying to solve.“
Let’s try a different type of input, a summary in natural language about the code that we want ChatGPT to generate.
Input:
Output an example in python based on this definition:
The CabDriver class is used to simulate the cab-driving environment for the reinforcement learning agent.
- The __init__ function initializes the class and sets the following attributes:
- self.action_space: a list of all possible actions the agent can take, represented as a pair of integers for the pickup and drop-off locations.
- self.state_space: a list of all possible states the agent can be in, represented as a tuple of integers for the current location, hour, and day.
- self.state_init: a randomly generated initial state for the agent to start in.
- The convert_state_to_vector function takes in the current state and converts it into a vector format, which can be fed into a neural network. The vector is of size m + t + d, where m is the number of cities, t is the number of hours, and d is the number of days.
- The replay function takes in the current state and returns the number of requests the agent can receive at that location, time and day. The function uses a Poisson distribution with an average rate specified for each location. The possible actions are obtained by randomly sampling from the action space and appending a [0,0] action which means no pickup or drop-off
- The get_reward function takes in the current state, action and the time matrix and returns the reward for the given state and action. The reward is calculated as the difference between the revenue from the passenger and the cost of fuel and other expenses.
- The get_next_state function takes in the current state, action and the time matrix and returns the next state of the agent after taking the given action from the current state. The next state will be the destination location, the time of arrival and the day of the week after completing the travel time. If the action is [0,0], meaning no pickup or drop off, the next state will be the same as the current state.
- The reset() function returns the action_space, state_space and the initial state of the agent at the beginning of the episode.
Output: code output from natural language input – environment
Now the result looks promising, let’s iterate once more. Code stubs for the environment and agent were provided as a part of the assignment from the university. Let’s ask chatGPT to fill in the code stub based on the previous output.
Let’s try a third kind of input, a code skeleton.
Input: Fill in this code skeleton. Add docstrings for all functions.
Output: Boilerplate filled from the skeleton by chatGPT
The output looks like something we can start working with.
Q-learning algorithm
Let’s start working on the RL agent class.
Input: Create a DQNAgent python script that uses the CabDriver class for training
Output:
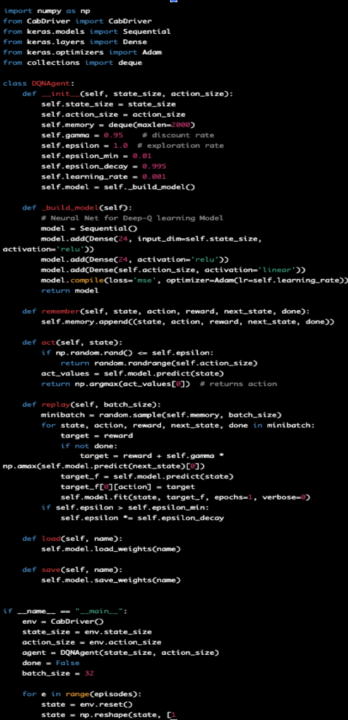
This looks really good; the function naming is now clearer than with the environment and ChatGPT has added the necessary parameters. Let’s try using the natural language input that defines the DQNAgent class.
Input: Build a python script based on this description and the previous output:
- The DQNAgent class is a class for creating a deep Q-network (DQN) agent.
- The __init__ method is used to initialize the class, and sets the size of the state and action space for the agent, as well as initializes the following hyperparameters for the DQN:
- discount_factor: the discount factor used to weigh future rewards in the Q-learning algorithm
- learning_rate: the learning rate used to update the model’s weights
- epsilon_max: the maximum value of the epsilon exploration parameter
- epsilon_decay: the rate at which epsilon decays towards epsilon_min
- epsilon_min: the minimum value of the epsilon exploration parameter
- batch_size: the number of samples used in each training update
- memory: a deque object used to store previous experiences for training
- model: the DQN model created by the build_model method
- The build_model method is used to build the neural network model for the DQN. This method creates a new Sequential model, adds layers to the model, and compiles it with the mean squared error loss function and the Adam optimizer with the learning rate specified in the class initialization.
- The get_action method is used to select the next action to take in the environment. It uses an epsilon-greedy policy, where with probability epsilon, a random action is chosen, and with probability 1-epsilon, the action with the highest predicted Q-value is chosen.
- The append_sample method is used to save a sample of the form (state, action, reward, next_state) to the replay memory. This sample can later be used for training the DQN.
- The train_model method is used to train the DQN model using samples from the replay memory. It first checks if there are enough samples in the memory, and if so, it randomly samples a batch of samples from the memory. It then creates empty arrays update_output and update_input that will be used to update the model’s weights.
- It then loops through the samples in the mini-batch and for each sample, it predicts the target Q-values using the current model, computes the target Q-values using the next state, and updates the update_output and update_input arrays with the state and target Q-values respectively.
- After updating the arrays, it then fits the model with the update_input and update_output arrays, with the batch size specified in the class initialization and for only one epoch.
- The save method is used to save the current DQN model to a file with the specified name.
Output: code output from natural language input – agent
Interestingly the output didn’t change that much, a train_model function was added, and the function naming was replaced by the inputs. And finally let’s see the input when we use a code skeleton and chatGPT fills in the blanks.
Input: Fill in this code skeleton based on the previous inputs and outputs. Add docstrings to all functions.
Output: Boilerplate Agent code filled from the skeleton by chatGPT
This will be the boilerplate that I’ll start working on in the next part of this blog. As it can be seen it is by no means a working solution.
Interestingly as I requested chatGPT to regenerate the output a few times, this started happening:

Parting words

In summary, this blog post has shown you how to use chatGPT as a starting point for your machine-learning projects. You can find all the code and examples used in this blog post from GitHub: chatGPT_RL_Blog1
In the next part of the blog, I will go through the changes I made to the boilerplate code to make it work. In the last chapter of this series, I will use chatGPT suggestions to optimize functions in the code and add some optimizations of my own to see how good of a solution we’ll end up with.
FYI: All the text in this blog has been written with the help of Grammarly and the images have been generated by: DALL·E (openai.com)