

Building machine learning models with AWS SageMaker
AWS SageMaker
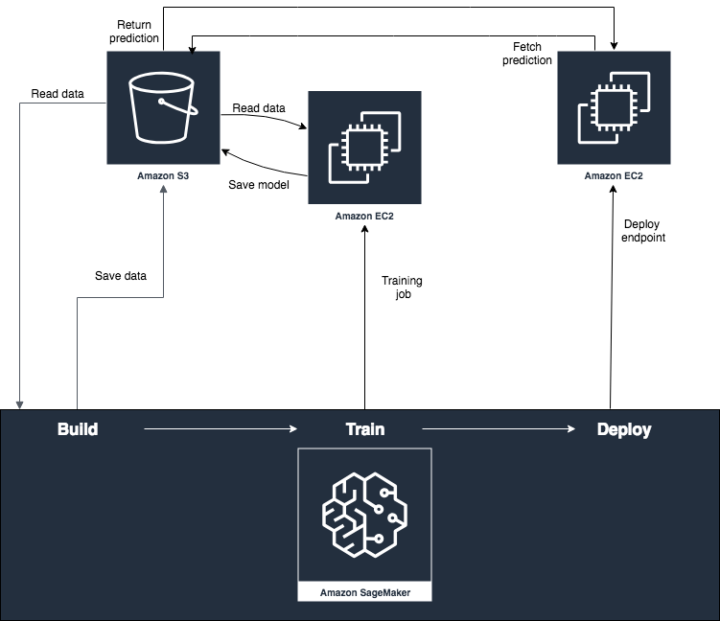
SageMaker is an Amazon service that was designed to build, train and deploy machine learning models easily. For each step there are tools and functions that make the development process faster. All the work can be done in Jupyter Notebook, which has pre-installed packages and libraries such as Tensorflow and pandas. One can easily access data in their S3 buckets from SageMaker notebooks, too. SageMaker provides multiple example notebooks so that getting started is very easy. I introduce more information about different parts of SageMaker in this blog post and the picture below summarises how they work together with different AWS services.
Dataset
In the example snippets I use the MNIST dataset which contains labeled pictures of alphabets in sign language. They are 28×28 grey-scale pictures, which means each pixel is represented as an integer value between 0-255. Training data contains 27 455 pictures and test data 7 127 pictures and they’re stored in S3.
For importing and exploring the dataset I simply use pandas libraries. Pandas is able to read data from S3 bucket:
import pandas as pd

bucket = ''
file_name = 'data-file.csv'

data_location = 's3://{}/{}'.format(bucket, file_name)

df = pd.read_csv(data_location)
From the dataset I can see that its first column is a label for picture, and the remaining 784 columns are pixels. By reshaping the first row I can get the first image:
from matplotlib import pyplot as plt
pic=df.head(1).values[0][1:].reshape((28,28))

plt.imshow(pic, cmap='gray')

plt.show()
Build
The build phase in AWS SageMaker means exploring and cleaning the data. Keeping it in csv format would require some changes to data if we’d like to use SageMaker built-in algorithms. Instead, we’ll convert the data into RecordIO protobuf format, which makes built-in algorithms more efficient and simple to train the model with. This can be done with the following code and should be done for both training and test data:
from sagemaker.amazon.common import write_numpy_to_dense_tensor
import boto3

def convert_and_upload(pixs, labels, bucket_name, data_file):
	buf = io.BytesIO()
	write_numpy_to_dense_tensor(buf, pixs, labels)
	buf.seek(0)

	boto3.resource('s3').Bucket(bucket_name).Object(data_file).upload_fileobj(buf)

pixels_train=df.drop('label', axis=1).values
labels_train=df['label'].values

convert_and_upload(pixels_train, labels_train, bucket, 'sign_mnist_train_rec')
Of course, in this case the data is very clean already and usually a lot more work is needed in order to explore and clean it properly before it can be used to train a model. Data can also be uploaded back to S3 after the cleaning phase for example if cleaning and training are kept in separate notebooks. Unfortunately, SageMaker doesn’t provide tools for exploring and cleaning data, but pandas is very useful for that.
Train
Now that the data is cleaned, we can either use SageMaker’s built-in algorithms or use our own, provided by for example sklearn. When using other than SageMaker built-in algorithms you would have to provide a Docker container for the training and validation tasks. More information about it can be found in SageMaker documentation. In this case as we want to recognise alphabets from the pictures we use k-Nearest Neighbors -algorithm which is simple and fast algorithm for classification tasks. It is one of the built-in algorithms in SageMaker, and can be used with very few lines of code:
knn=sagemaker.estimator.Estimator(get_image_uri(
	boto3.Session().region_name, "knn"),
	get_execution_role(),
	train_instance_count=1,
	train_instance_type='ml.m4.xlarge',
	output_path='s3://{}/output'.format(bucket),
	sagemaker_session=sagemaker.Session())

knn.set_hyperparameters(**{
	'k': 10,
	'predictor_type': 'classifier',
	'feature_dim': 784,
	'sample_size': 27455
})

in_config_test = sagemaker.s3_input(
	   s3_data='s3://{}/{}'.format(bucket,'sign_mnist_test_rec'))

in_config_train = sagemaker.s3_input(
	   s3_data='s3://{}/{}'.format(bucket,'sign_mnist_train_rec'))

knn.fit({'train':in_config_train, 'test': in_config_test})
So let’s get into what happens there. Estimator is an interface for creating training tasks in SageMaker. We simply tell it which algorithm we want to use, how many ML instances we want for training, which type of instances they should be and where the trained model should be stored.
Next we define hyperparameters for the algorithm, in this case k-Nearest Neighbors classifier. Instead of the classifier we could have a regressor for some other type of machine learning task. Four parameters shown in the snippet are mandatory, and the training job will fail without them. By tuning hyperparameters the accuracy of the model can be improved. SageMaker also provides automated hyperparameter tuning but we won’t be using them in this example.
Finally we need to define the path to the training data. We do it by using Channels which are just named input sources for training algorithms. In this case as our data is in S3, we use s3_input class. Only the train channel is required, but if a test channel is given, too, the training job also measures the accuracy of the resulting model. In this case I provided both.
For kNN-algorithm the only allowed datatypes are RecordIO protobuf and CSV formats. If we were to use CSV format, we would need to define it in configuration by defining the named parameter content_type and assigning ‘text/csv;label_size=0’ as value. As we use RecordIO protobuf type, only s3_data parameter is mandatory. There are also optional parameters for example for shuffling data and for defining whether the whole dataset should be replicated in every instance as a whole. When the fit-function is called, SageMaker creates a new training job and logs its the training process and duration into the notebook. Past training jobs with their details can be found by selecting ‘Training jobs’ in the SageMaker side panel. There you can find given training/test data location and find information about model accuracy and logs of the training job.
Deploy
The last step on our way to getting predictions from the trained model is to set up an endpoint for it. This means that we automatically set up an endpoint for real-time predictions and deploy trained model for it to use. This will create a new EC2 instance which will take data as an input and provide prediction as a response. The following code is all that is needed for creating an endpoint and deploying the model for it:
import time

def get_predictor(knn_estimator, estimator_name, instance_type, endpoint_name=None):
    knn_predictor = knn_estimator.deploy(initial_instance_count=1, instance_type=instance_type,
                                        endpoint_name=endpoint_name)
    knn_predictor.content_type = 'text/csv'
    return knn_predictor


instance_type = 'ml.m5.xlarge'
model_name = 'knn_%s'% instance_type
endpoint_name = 'knn-ml-%s'% (str(time.time()).replace('.','-'))
predictor = get_predictor(knn, model_name, instance_type, endpoint_name=endpoint_name)
and it can be called for example in the following way:
file = open("path_to_test_file.csv","rb")

predictor.predict(file)
which would return the following response:
b'{"predictions": [{"predicted_label": 6.0}, {"predicted_label": 3.0}, {"predicted_label": 21.0}, {"predicted_label": 0.0}, {"predicted_label": 3.0}]}'In that case we got five predictions, because the input file contains five pictures. In a real life case we could use API Gateway and Lambda functions for providing interface for real-time predictions. The Lambda function can use boto3 library to connect to the created endpoint and fetch a prediction. In the API gateway we can setup an API that calls the lambda function once it gets a POST request and returns the prediction in response.
Conclusions
AWS SageMaker is a very promising service that allows reading data, training a model and deploying the endpoint with less than a hundred lines of code. It provides many good functions for training but also allows using Docker for custom training jobs. Jupyter Notebook is familiar tool to data scientists, so it’s very nice that it is used in SageMaker. SageMaker also integrates very easily with other AWS Services and allocating resources for training and endpoints is very easy. The machine learning algorithms are optimised for AWS, so their performance is very high.
The amount of code needed for training a model is not the biggest challenge in a data scientist’s everyday job, though. There are already very good libraries for that purpose, and one of the most time consuming part is usually cleaning and altering the data so that it can be used for training. For that SageMaker doesn’t provide help.
All in all, optimised algorithms, automated hyperparameter tuning, easy integration and interaction with other AWS services saves a lot time and trouble for data scientists. Trying out SageMaker is definitely worthwhile.